|

.jpg.44da0172a400adb6811f03be15189781.jpg)
RIP-Felix
-
Posts
1540 -
Joined
-
Last visited
-
Days Won
33
Content Type
Profiles
Forums
Events
Downloads
Store
Articles
Everything posted by RIP-Felix
-
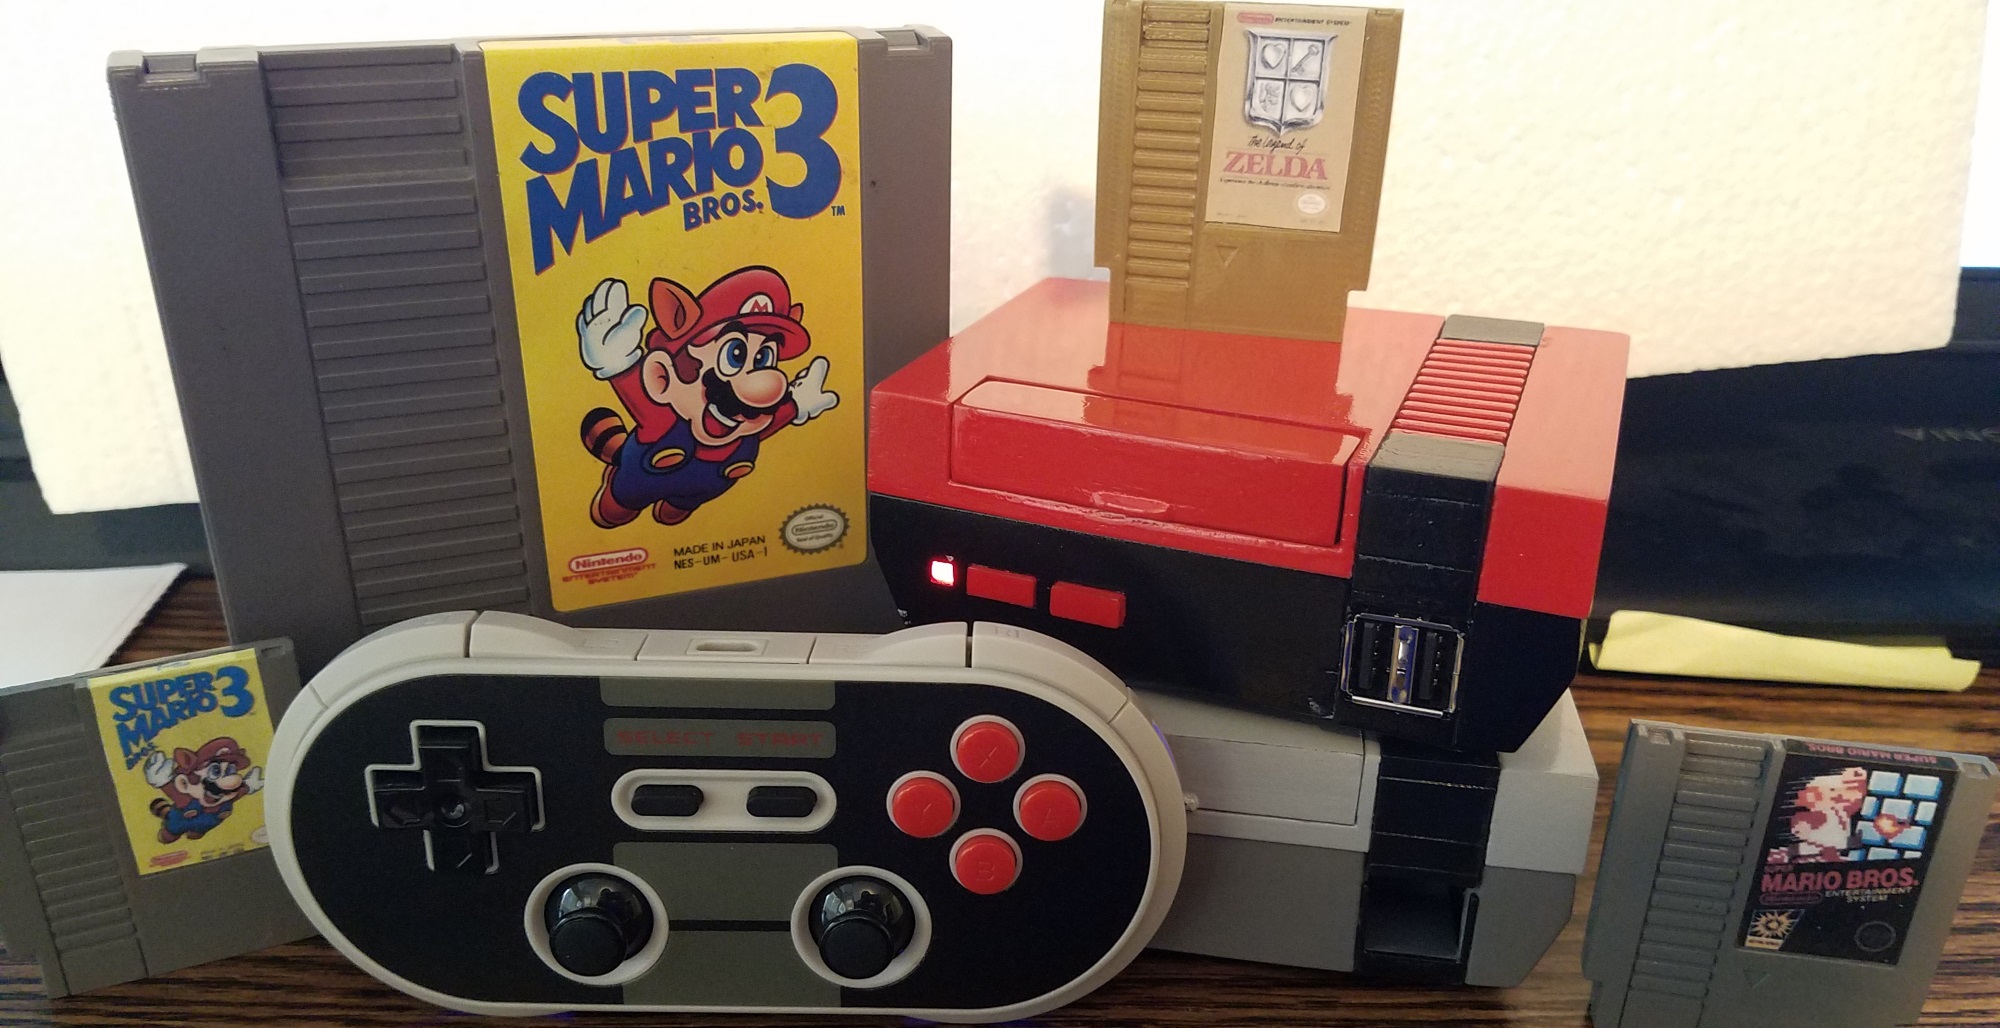
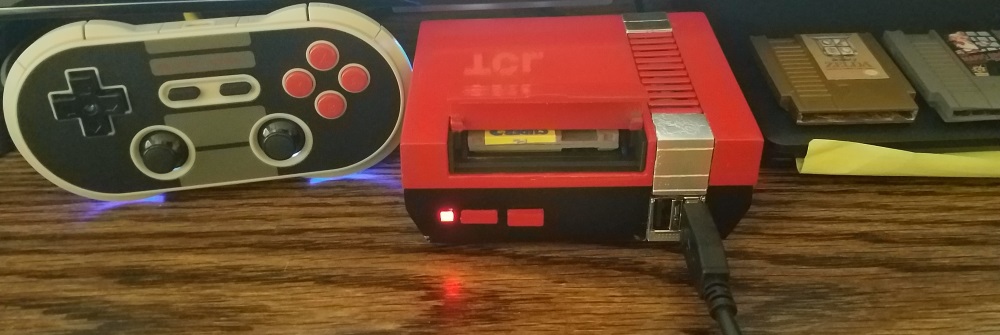
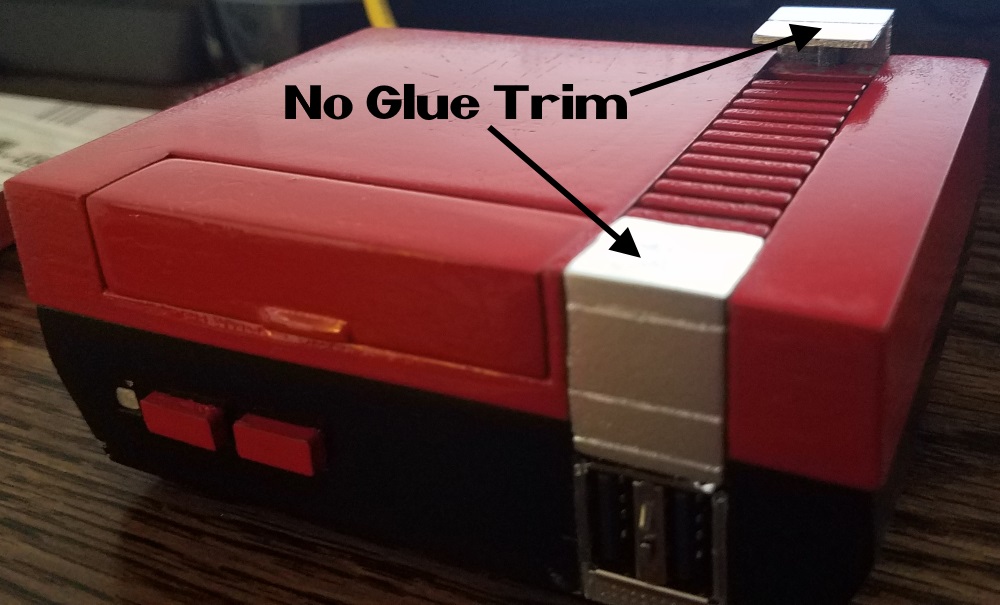
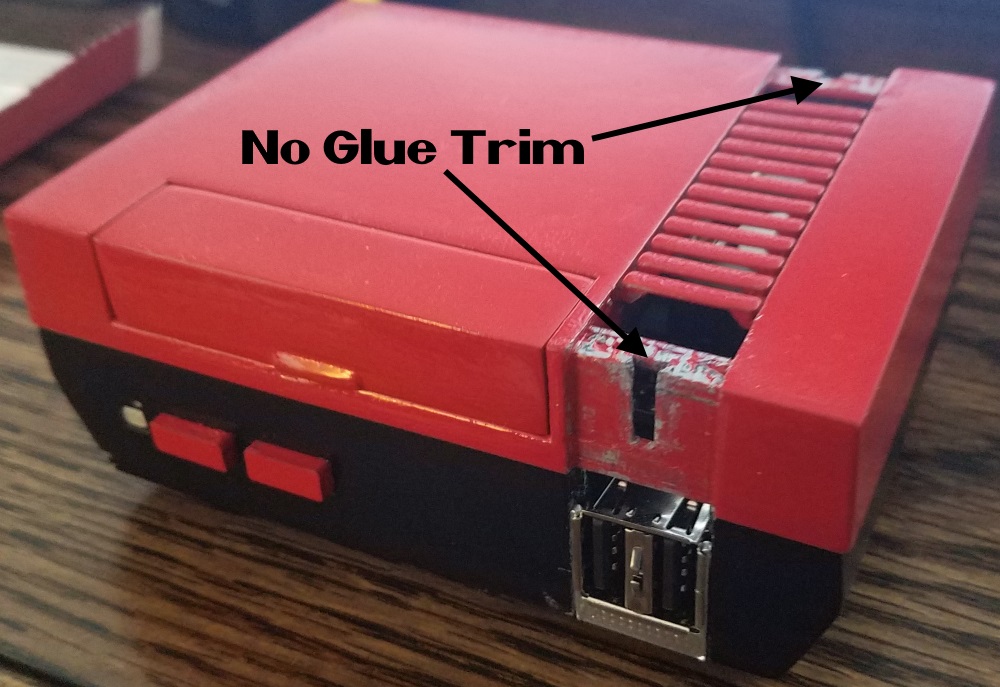
No not yet. I'm sticking with PSX using *.pbp (PSP format) images. Saved a lot of space (am getting 25-50% compression with PSX2PSP!) NDS is on the list non-essentials, but I ran out of room on my 32GB SD with PS1 images, it's my favorite system and I now prefer the Pi for emulating it (Save states, easy disc swapping, and when Retro achievements are introduced, Hello!) So just PS1, NES, SNES, Genesis, Atari 2600, GameBoy & color, and Gameboy Advance. I need to get a bigger SD, figure out how to image my card and put it on the larger one. My only gripe with Raspberry Pi 3 is the pathetic N64 emulation. That's a real bummer, it's my next favorite system after PS1. Apparently an O-droid x4 can handle it way better, but not perfectly. It can even handle some Dreamcast games acceptably, but most poorly if at all. In case anyone is wondering what Han is referring to, this is my NEStalgia Build (a Raspberry Pi powered MiniNES inspired by Daftmike's original work). [Link to build page] Yes those are cartridges and they function! The behavior of the power and reset buttons emulate the original NES by use of a custom python script running on the pi in the background. Under the cartridge slot is a NFC tag reader which reads an NFC tag inside of each cart. The name of the game is written to the NFC tag by first playing a game, which loads it's name into the last played list, then by holding the reset button for 3 seconds. The name stored into the last played list is copied to the NFC tag in the cartridge. The next time the pi is powered on with that cart inserted, the NFC reader sees it and tells emulation station to load that game instead of loading emulation station first. So it just loads the game like the Original NES would. If you press the Power button (which latches like the original), the script displays a black screen and starts a 30s timer. This gives you time to remove the previous cart and insert a new one. When you press the power button again with a new cart, it loads that game. You never even see emulation station! If you don't press the power button again withing 30s, the script sends the shutdown command to the pi and it turns off. There is no power cut off, technically the pi is in standby, but it draws a negligible amount of electricity in standby (like $1/year). If no cart is inserted when you press the power button, emulation station loads. You can of course return to emulation station at any time by pressing Start+Select. Also if you decide you want to go back to the game in the cartridge slot at any time, from any where, you can just hit the reset button and It will load the cart immediately. It's very intuitive! Actually this button emulation behavior was my idea, which is kinda cool (I'm sure someone else would have thought of it, I just requested it first). I actually contributed to this effort (even if it was a community project and a small contribution). The No Glue (interchangeable) trim is mine, however. No one else has that (Actually only 2 other people have it, they helped me test the models by printing in PETG and PLA, since I only use ABS), because I've been hoarding my redesigned 3D Case models (I'm not happy with them yet. I don't think they're ready for release). You can see them in the pics. Evan Wright (who designed the electronics) and Jared Kirchgatter (who designed the software) did the rest. There are other electronics kits available too, each for their niche audience. No nfc variants and so on. If you want to learn more, check out my build page (linked earlier) and the Mini NES and SNES Builders Facebook page. Just request an invite and you'll be let in shortly. And yes, a miniSNES is currently being developed (NFC capable).


-
I can understand where she's coming from. She had a valid point and made it. She chose to highlight this, I rationalize the characters emotions and mistakes such that it's romantic and believable, like Cline wanted. That's why it's troll bait. She wanted to write a piece that would have some bite to it, about a book that's hot right now. Granted it's a legitimate social concern, but one not intended by the author. He understandably didn't catch the possibility it could make people feel that way. You can poke holes in any author's work. I like the book. I make excuses for the book, so I can continue liking the book. I'm not a women who has gone through this, but I'm a man who has. I am clearly biased, I don't have a women's experience on the subject. I know it, but that's half the battle. Knowing I'm biased helps me to put aside my skewed paradigm and see this from another perspective. I identify with the guy because I am one, but I can sympathize with the woman because I can empathize and have been through something similar. I don't agree with the "Trophy Women" argument, but I see her point.
-
I hope your not within 10 feet of sea level. Storm surge is a b!t@h. That and tornado's. Stay safe . Oh, I saw this on the news and thought its a good trick. Freeze a cup of water (Regular size cup or coffe mug, about 2.5 - 3 inches diameter + 1 fl cup of water), put a quarter on top of the ice and put it back in your freezer. If you loose power and your fridge thaws you'll know the food's not safe to keep if the quarter is at the bottom of the cup. Good to know, could save you some money and peace of mind, fearing you eat potentially spoiled food. Dysentery is the last thing you need in a disaster. Good luck to you and yours!
-
Yeah comics are another story. Big business has really taken over and ruined the spirit. I was never really into comics, but I remember marvel trading cards in the 90 were the shiz and cool as hell. Now trading cards are a huge waste of money. Magic the gathering, basketball/baseball cards, pogs, then shamefully pokemon. I still have a box full of pokemon cards in the garage somewhere. I had some youthful fixations. I doubt any of it is worth any serious cash now. So collectable my butt. Perceived value to kids is about it.
-
Glad you like it, I loved my AMD builds. I went with an i7 this time and love it too. Intel or AMD are really great options. Just depends on your budget.
-
Dazzle!!! what up bro! I'm with you...lol! Man that video bring me back, lots of cameos too. What the hell is Elijah Wood doing there - Gangsta! After that video, there's only one way to precede it (you know what I'm talking about)
-
I'd like to see a full PS1 GameEX build that could use the disc/dvd tray. I'd love to be able to replace it with a UHD/Bluray drive and use the same tray disc tray. I doubt the feasibility though.
-
I'll take the bait. I think she made a few valid points, from a feminist perspective. However, it's important to point out that feminism has taken a fall out of the mainstream consciousness. This explains, even if it doesn't excuse, some of the male egocentrism. But what about the female egocentrism. Remember that cuts both ways. Yes I'm a guy, but please check your prejudice at the door and let me make my arguments. You might be surprised. Warning: I go deep (AKA wall of text. You have been warned)
-
Sorry I didn't post earlier, work demanded my full attention. I like the hub idea. I saw that earlier and thought it would be a perfect little GenesisPi build. As for the collectors statue, I'm not really into it. I don't really like these sort of collectables. The NES/SNES classics I do, because they're functional; they play games, not just sounds. So I'd have no qualms about ripping a genesis statue apart, if I wanted one - it's too big for me. It's just a hunk of plastic they sell for ridiculous markup to generate hysteria, which is interest in the company (AKA advertising). Basically, collectables are us paying them for advertising their company. On the plus side, it's more effective than a commercial and can produce some cool toys occasionally. What kills me about the practice is that when they hit upon a collectable, one everyone wants and would otherwise justify a full production run, they keep supply short so it stays in the realm of collectables. At that point it should graduate to a full product, but no, they want the publicity. So screw them, it's mine. I bought it. I can rip it's guts out and replace with a pi if I want to. I don't have to play to their game.
- 112 replies
-
- 1
-

-
- nes classic
- retropi
- (and 3 more)
-
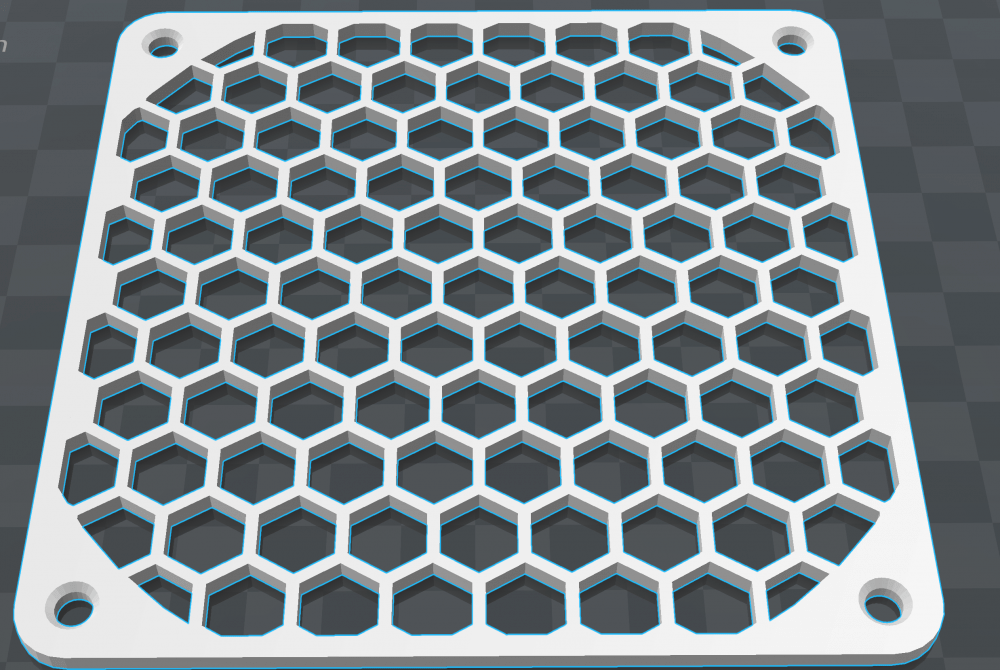
Yeah? It's good for printing these too (120mm Fan Grill). I just installed the Z endstop mod. It's just a small clip that depresses the Z endstop switch a few millimeters higher (the one that tells the printer its as far down as it can go). This gives me a little more room for the glass bed I added. I was having to twist the thumbscrews too tight and it was causing my bed to twist. I could print, but it wasn't ideal. I used a dial gauge to level the bed this time so I could get the bed level down to 0.001mm. That should help tremendously. If I were looking at buying another 3D printer, I might spring for one that has auto bed leveling and it's own enclosure, they're just less hassle. This was cheaper though. So give and take.
-
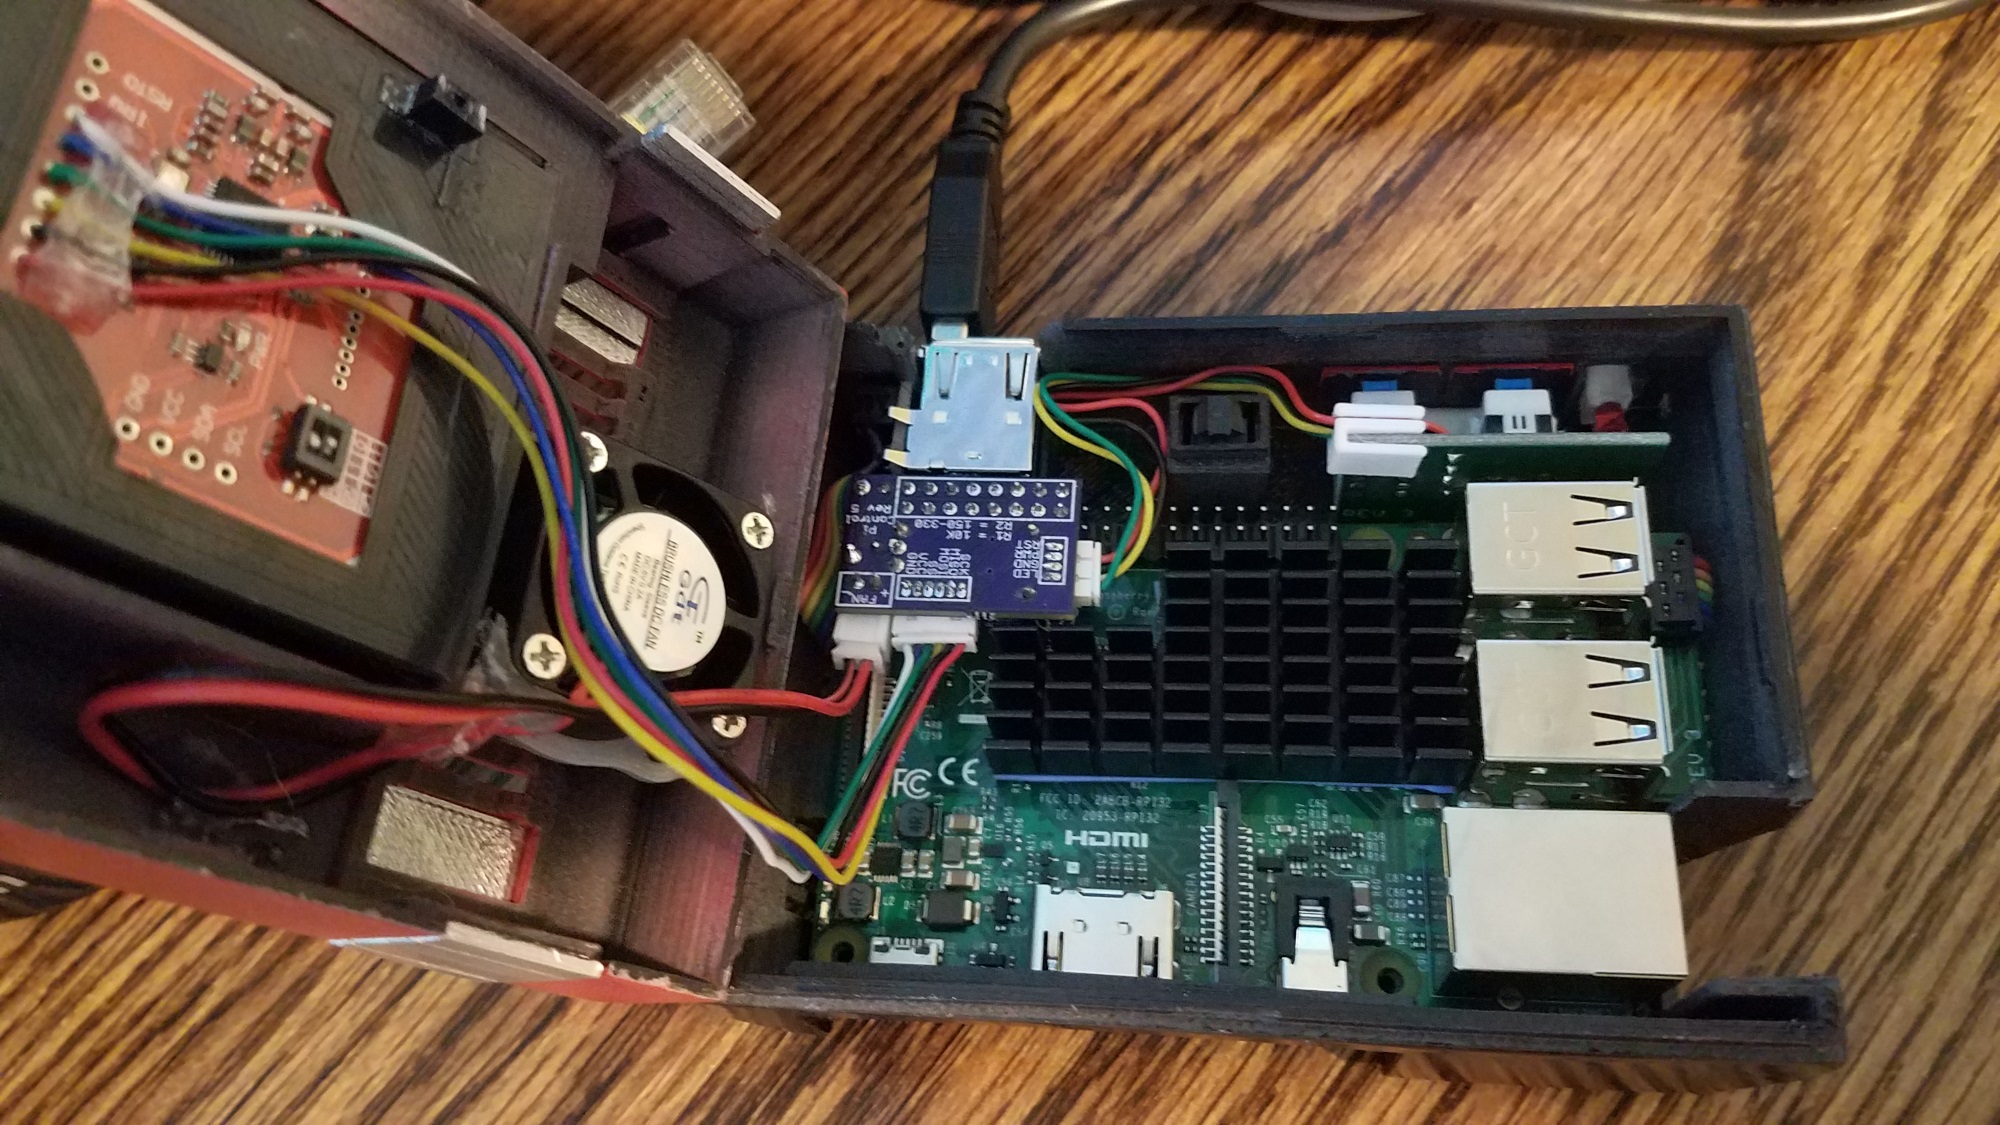
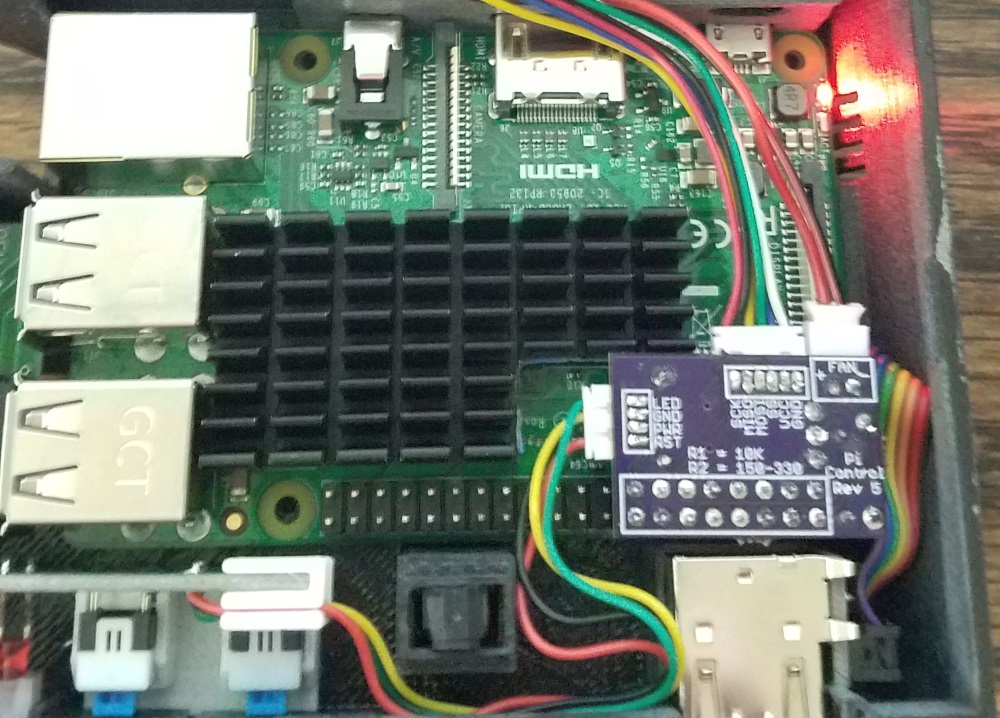
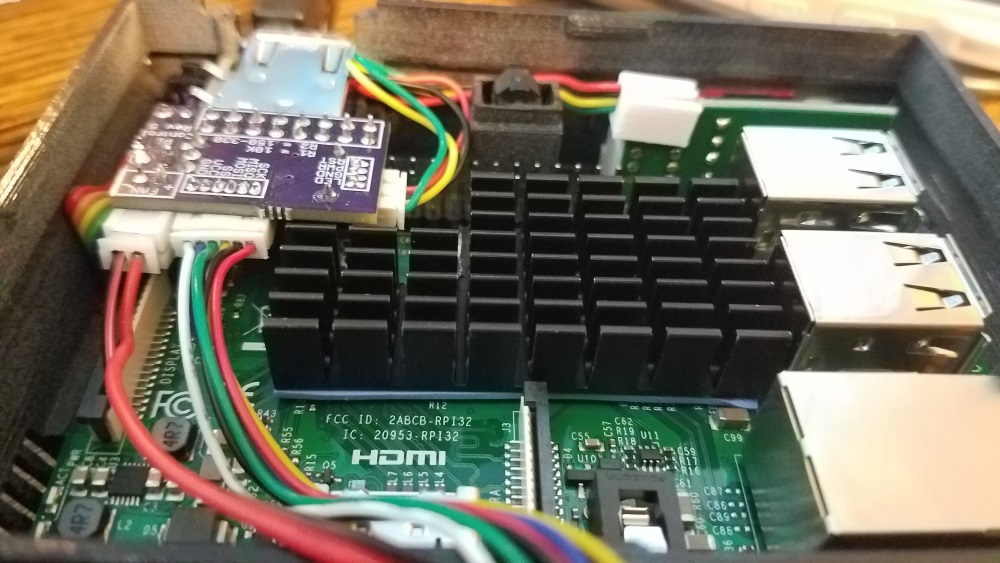
This last week I soldered up 3 electronics kits (minimum order of PCBs from OSH park). I found it easier to solder this time around, the flush cut snips help immensely. But man, those pico conn headers are small!!! The 30x30mm fans came in. One is 7mm thick and the other is 10mm. The 7mm has a larger JST connector that wont fit the one my kit uses, but the 10mm fits perfectly. I printed the fan shroud to mount it in NEStalgia and set the fan thresholds as low as I could get the temps. I decided to load up a playstation game to test and was getting a steady 47-49C with fan on full. The fan is quieter than the 25mm it replaced and It pushes a lot more air! The fan shroud encloses around the top vents and forces cool air in. I haven't tried forcing hot air out in this configuration yet because it usually doesn't perform better, but it might in this situation. Since this fan shroud really makes a good seal and the case has vents under the cpu, it might be able to force cool air up under the RPi motherboard and keep the airflow moving quick enough to expel the heat as fast as it builds. I'll try fliping the fan tomorrow and look at the temps, I still think blowing cool air directly from the top vents down on the Heatsink is the better way to go. I can feel the air squeezing out of the case seams, which suggests to me that I need to modify the bottom shell to allow for more airflow. Anecdotally, while testing I decided to try "Martian Gothic Unification" on PSX. It sucked me in. It's like Resident Evil and I never even knew it existed until reciently. Think Zombies on Mars! There is some weird psychokinesis, simureality, alien life form mystery I've yet to unravel. For a PS1 game, it's a solid story and voice-over job. You control 3 characters who are directed to work apart. "Stay alone, stay alive" or something like that. They entered the base from separate airlocks, as directed, and are thus physically separated from one another by sealed security doors. You pass needed items over a system of Vacuum tubes around the base and can switch between the characters at will by pressing select (not a linear system at all). You have to think about the safety of your character when you switch to another because they can be attacked and killed while you're controlling someone else. It's an intriguing game mechanic that works well with this theme. It's got that base exploration, puzzle, and syfi Gothic horror hook to it. I can't believe this one slipped by me for so long! I'm glad I found it now, because all the timelines are near concurrent (takes place in 2017). It's kinda like watching back to the future in 2015 to see what all they got right. ...Back on topic. I'm probably going to build 1 more NEStalgia (2 total). I may give one to my cousin. The other 2 electronics kits are for different projects. One is earmarked for SNEStalgia. The last one I haven't decided for sure yet, but I'm leaning toward a MiniGenesis. I'm currently working on getting my 3D printer back up. I've been procrastinating. I need to perform some mods that make bed leveling easier and more precise. I also moved it to the garage, because I'm back to printing in ABS. The fumes are toxic and I'm not keen on keeping the printer in my room anymore. That also means I need to make an enclosure for it that's more permanent than the Cardboard box I'm now using. I'm still waiting on the final MiniSNES (NFC cartridge version) to be released by one of the Mini NES ans SNES builders members. I have some changes to my NEStalgia case to make too (More vents on bottom shell, better Lid design, other minor tweaks). So, I have some printing to do. Then sanding, priming, and painting again (I hate that process). So that's where I'm at.

- 112 replies
-
- 1
-
-
- nes classic
- retropi
- (and 3 more)
-
Thanks everyone, she's looking into those options.
-
Tutorial Website! Dustin Westaby in the Mini NES and SNES Builders facebook group created this fine tutorial to make one for yourself. It's quite good. I wish I had it when I started on mine. There are parts list, materials (printed, tools, accessories), assembly and soldering tutorial videos and scematics, everything you need to know laid out in logical order with links to everything. Very cool!
-
Hey, I know some of you are web developers/IT pros. My sister is planning to start her own bookkeeping business and wants to build a website, but she has NO experience with web development. I know there are some companies that have website builders with templates you can choose from and personalize. I thought I'd ask you guys for some suggestions where she should check out. She was looking at taking classes from the local community college before I told her she didn't have to be a web developer to create a website, although she could hire one. IDK, maybe that's worth it?
-
I did a comparison test with the heatsink on/off running a PSX game. The heatsink keeps the CPU ~8C cooler with active cooling in my tiny case. I routinely run from 43 to 55 C in this tiny case depending on where I set the fan thresholds. With the fan at full I can keep it at 42-43C with this heatsink. Without it, temps hover around 50C. I think I can improve this with a redesign of the Bottom shell to improve airflow and a fan shroud for the top shell. I have a 30mm fan on the way also.
- 112 replies
-
- 1
-
-
- nes classic
- retropi
- (and 3 more)
-
Here is the kit I got. I had to modify it to make it work with the pi control board, but it fits nicely without modification otherwise.
-
Indeed it is. The only thing that concerns me about it is, because there are taller SMD components on the motherboard between the CPU and LAN chip, that I have to use a 0.5mm thermal pad. It's thick enough to envelop the taller components and sit on the chips. I still need to find an way to clip it down, it's just adhering on it own ATM.
-
I think I found my answer about the lack of a Reset Pulse on the A2600 Revision 16 "Vader" four switcher. I stumbled across this excellent site which has everything the would be Atari 2600 repairman could need to know about the system. I had a quick read through the service manual and found that the 4 model revisions of Atari 2600 have some important functional differences. My woody four switcher, besides the single motherboard form factor, added some pull up resistors and diodes to the Television Interface Adapter lines (LM1 and Sync). These prevent feedback and ensure +5v on the signal. This change is also present on revision 16 "Vader" motherboards, except they add a Timing Chip (A205) into the Reset Circuit that eliminate problems the reset pulse was necessary for (I assume this is why I don't get the same curve). It's not the result of a faulty reset pulse circuit, but rather a design change that removes this problem entirely. So the lack of a reset pulse I noted earlier on the Vader is a non-issue. It would be a problem on the 2600 and pre-revision 16 2600A motherboards, but they checked out. That solves it then. I now have 3 functional Atari 2600s. One "Heavy Sixer" (2600) in pristine condition, one rev. 14 "woody four switcher" (2600A) with a broken Player 1 difficulty slider, and one rev. 16 "Darth Vader" (2600A). They all play games without major issues! If one ever breaks down, now I know how to troubleshoot and fix them (I'll use that service guide's flowchart to diagnose and fix the problem). Actually, from that guide, I now know that the best one of the three to use for daily play is the Vader. It has the best circuit protection and won't have issues with the reset timing. The 2600 should be tucked away for preservation or placed on display, but not used while an alternative exists (Vader/Woody/Emulation).
-
.jpg.44da0172a400adb6811f03be15189781.thumb.jpg.4316d89cc7dd35bcdf11c619d81a9d25.jpg)
PinKadia! The Ultimate virtual Pinball / Arcade / PC combo cabinet!
RIP-Felix replied to TerryRed's topic in Gamer Rigs
That simpit is delicious! Man, that's what I envision when I think of playing Elite Dangerous or GT! The only thing it's missing is this: -
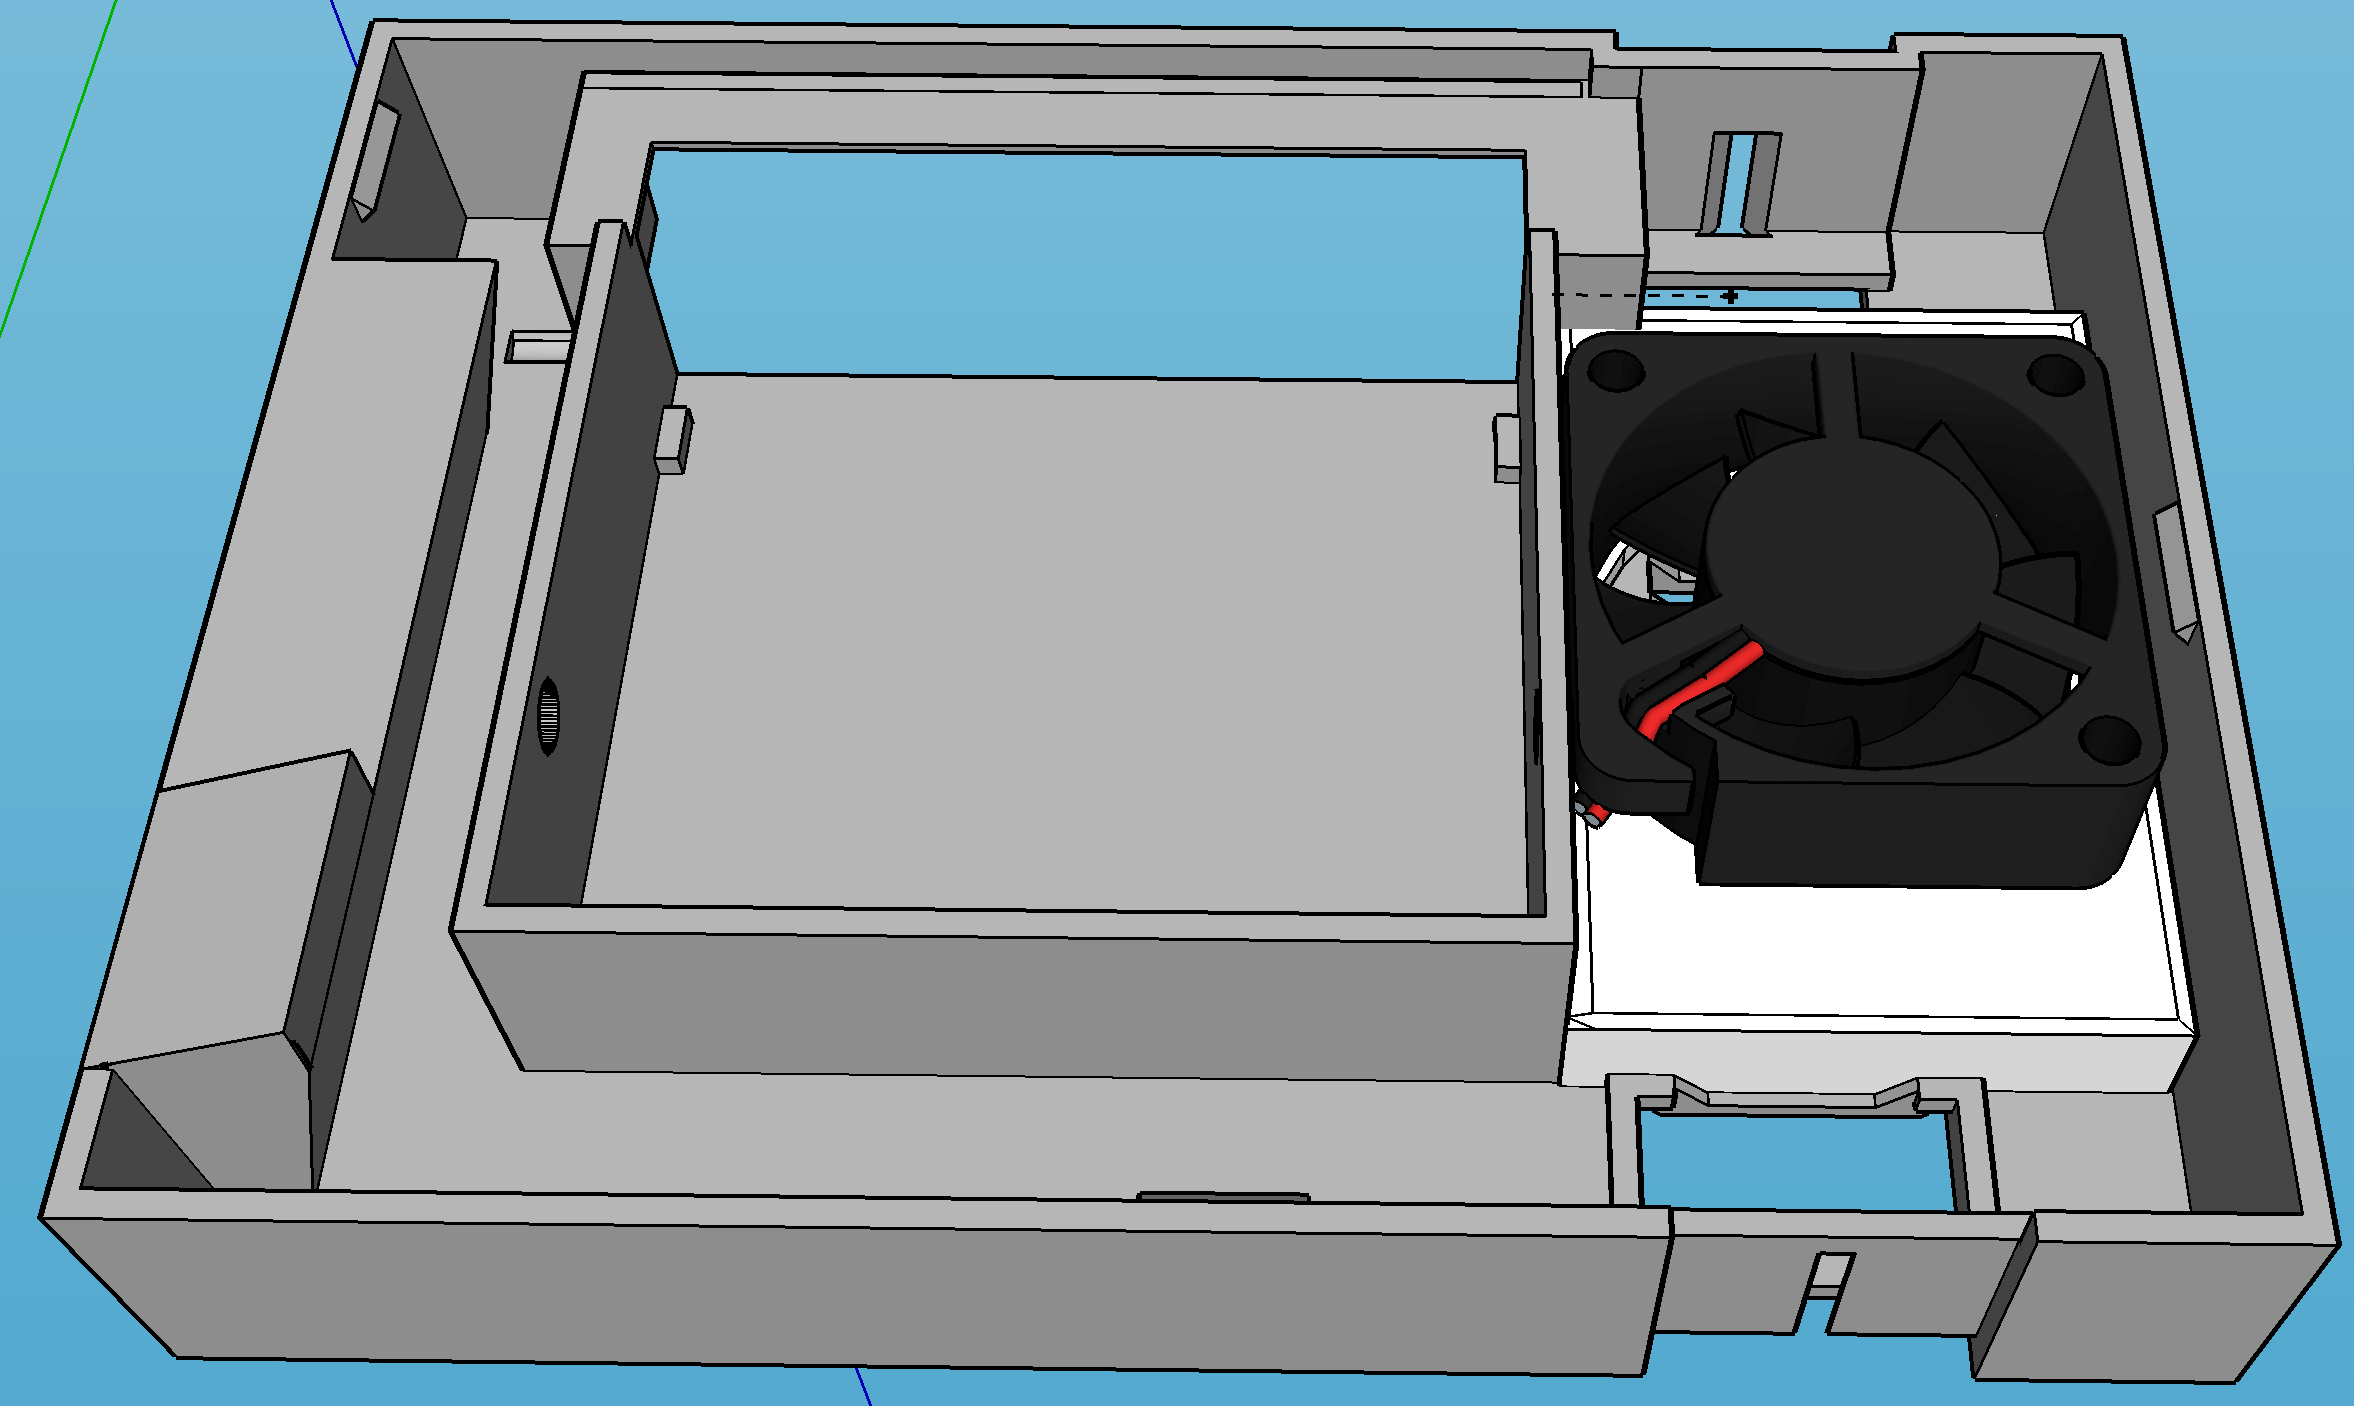
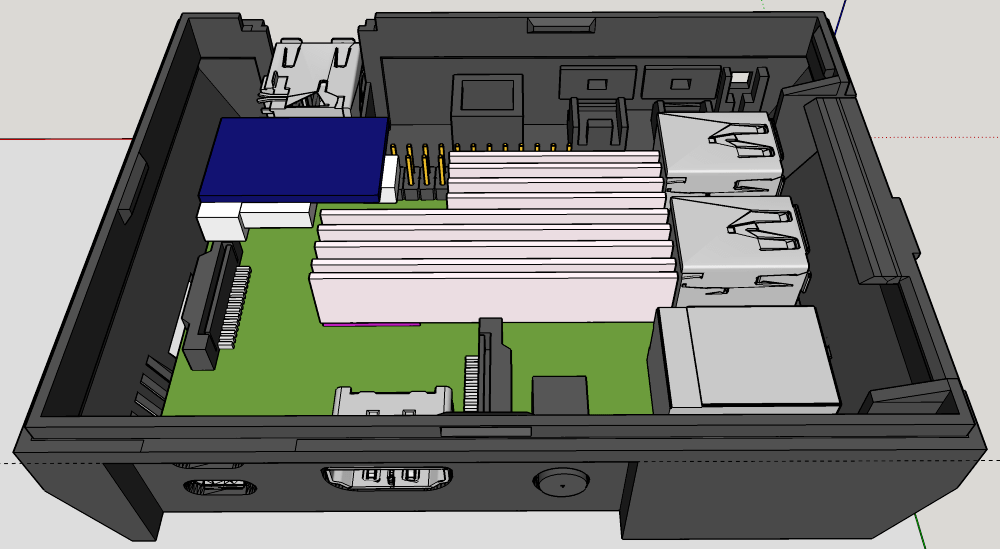
Universal XML Scraper: A better solution to scraping artwork Thanks for pointing me to this tool. It's exactly what I wanted. I really like the wizard, it runs you through the setup with just pictures of how you want to set it up. That's a great idea! I left the paths vanilla and ran a couple of systems to test. N64 went perfectly! I only have 3 games to test with, since N64 emulation on pi3 is pathetic (Any help there would be appreciated, if it's possible to play them smoothly. I haven't overclocked yet, but just installed a custom heatsink that's 25x50x10mm so that shouldn't be a problem now). Here's a mockup I made in Sketchup to help me check clearances, so everything will fit nicely without interference. BTW, my Sketchup file has every 3D printable part needed to make one of these. All I have to do is export the layer the 3D model is on to COLLADA (*.dae), then I can open it in another program and export to STL, finally I can import that into my slicer for printing. A little roundabout, but very cool! When the test scrape on N64 went well, I scraped Atari 2600, for which I have 33 games. They went well too. So now I'm scraping the rest. I really like how it shows the primary artwork first while your video loads, then the video plays. And with sound It really improves the atmosphere. It brings the frontend alive. Next up? Overclocking and attempting to get N64 emulation working...
-
Oh...I totally forgot about "Wild 9"
-
You do your thing bro, I was just floating an idea. If someone wants to bite I'm your first customer!
-
It'd be cool tho. I wonder if you can make a simple form/link/whatever where we can type our RA Username, then it adds ours + our friends to the list that gets scraped from RA data, that way only those we want to show appear on the scroller. I'd love to add that kind of RSS to my systems scroller. On GE home it could display overall RA score, in Gameboy color it could show friends last played on that system and score, and etc. I still need to add RA emus to my HTPC and Cabnet to take advantage of RA, but in Retropi It's pretty awesome. And If this type of RSS automatically updated with achievements/score, that's a pretty enticing project don't you think? I have no Idea how much work I'm talking about however, so call me crazy if it shoe fits...lol.
-
I was thinking more of integrating it into the scroller for each system that supports RetroAchievements (Kinda like krackerman did for MAME highscores in his GameRoomEX). IDK if theres a way to filter the complete retroarch user list to display just GE member scores and export to XML for the scroller to display. Or even if you can filter by system. But that's kinda what I was envisioning. Do you think the API could be used to gather that Data and export to a usable format that the scroller can display?
-
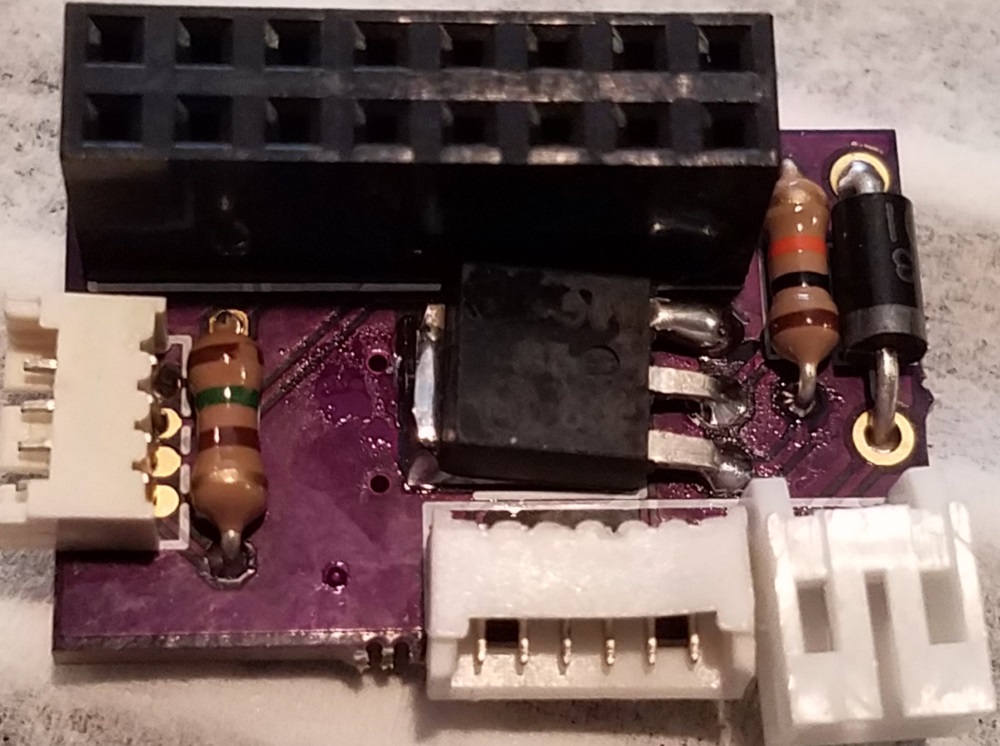
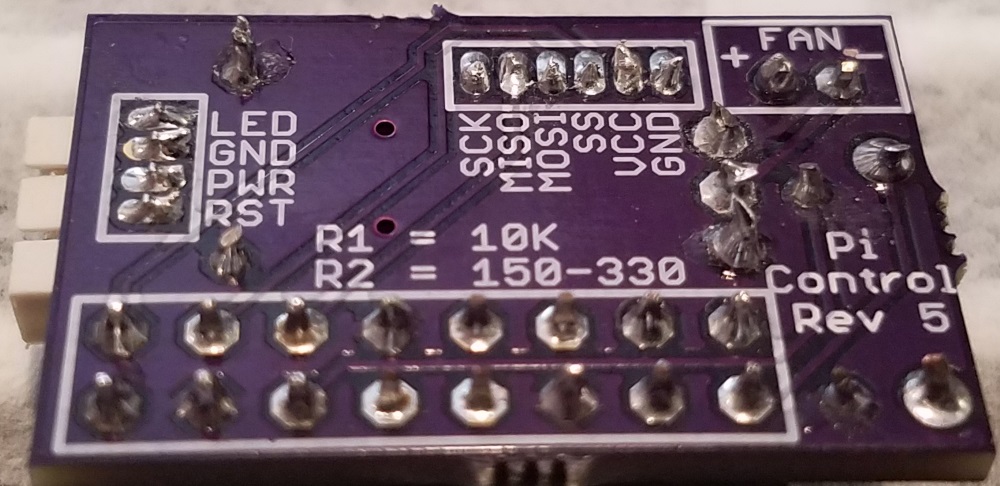
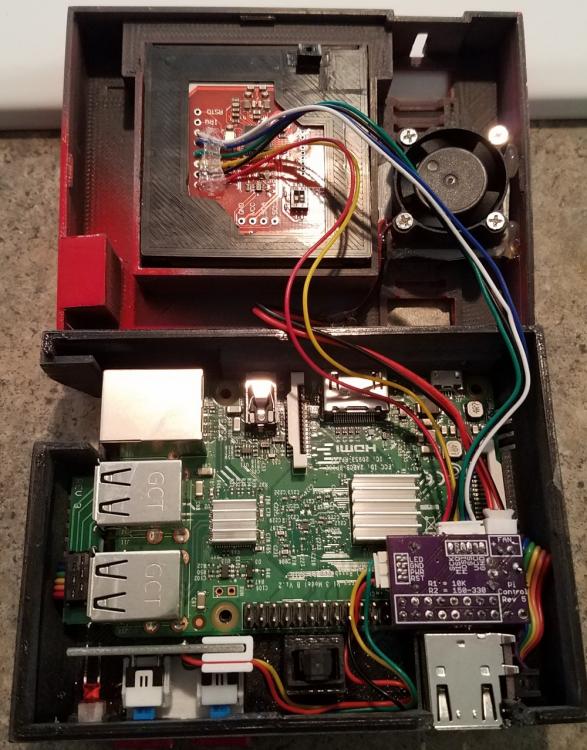
Could you point me to a post so I can do the same on my cabinet and HTPC GameEX builds? Electronics Revision I eventually wanted to make more of these. My cousin would probably find this a fun gift! I wanted one or two more Pi Control boards for future projects. They add safe shutdown pwr/reset buttons, NFC, and fan control. So they will come in handy for future SNEStalgia and MiniGenesis projects...Hint...Hint. So I went ahead and ordered the electronics: OSH Park: Great Board House (Minimum order of 3 each) Pi Control Rev 5 Pi Control control board Rev 4 Pi Control USB extender Rev 4 Digikey: Great Electronics Supplier Custom Cart (Has most of what you need. Style A USB port is optional, but my Case is designed to use these ones. Quantities are for 1 but you need to multiply them by 3, since you have to get a minimum of 3 PCBs from OSH park) Also needed are 4 pin and 6 pin conn. headers Amazon: NFC reader Power Button Reset Button Ribbon Cable for USB Extender (Optional) USB port: This is style B, may look better but requires a modification to the case for them to fit. NFC Tags e-bay: JST Connectors (4 pin and 6 pin) Assembly videos: Finished Product:
- 112 replies
-
- 1
-
-
- nes classic
- retropi
- (and 3 more)