|

.jpg.44da0172a400adb6811f03be15189781.jpg)
RIP-Felix
-
Posts
1540 -
Joined
-
Last visited
-
Days Won
33
Content Type
Profiles
Forums
Events
Downloads
Store
Articles
Everything posted by RIP-Felix
-
I agree it's more plausible, but is it the future you'd rather live in? Assume that the advanced haptic rigs and immersion "chambers" could convince all your senses that the Virtual is real. Would the fact it's a fantasy detract from the experience? Or would you enjoy the safety and versatility of fantasy over the consequences of reality? On the flip side, would you enjoy meeting alien cultures and exploring the real universe without the fantasy?
-
A word of warning. There is a hardware flaw that prevents powering from a standard USB charger/port. You have to use the official Pi4 adapter. They will be releasing a hardware revision to address this, but the initial units will be affected. So I wouldn't buy one for a while, to be sure that you don't get one of theses initial run boards.
-
Which would you rather have? A future like Star Trek, with space travel and alien cultures, but no holo deck. Or a fully immersive VR Fantasy world, like Ready Player One. Which do you think is more likely to be possible?
-
.jpg.44da0172a400adb6811f03be15189781.thumb.jpg.4316d89cc7dd35bcdf11c619d81a9d25.jpg)
RetroArch will be Steam’s biggest emulation launch yet, coming July 30
RIP-Felix replied to tthurman's topic in Social Club
If emulation starts gaining traction on major 1st party platforms and allows you to play a Switch game on PS4, then you better believe Nintendo is going to try and bury the attempt in legal fees, just like SONY did with Bleemcast. Even though Bleemcast won, they couldn't continue to conduct business because of the legal fees. It was awesome to Play Metal Gear Solid with upgraded graphics on the Dreamcast, but SONY didn't think so. Mainly because backwards compatibility with the PS2 was a major selling point and it didn't improve graphics. Bleamcast was superior, but didn't sell PS2's, it sold Dreamcast's instead. Right now 1st parties are not going after fans, they're going after egregious infringers. So don't go selling hacked SNES classics with 1000's of games on e-bay. That's the kind of thing for profit companies tend to dislike. I just want to keep playing my old games in new and exciting ways (filters, shaders, pretty fronts ends, run ahead latency reduction, save states, rewind/FF, rom hacks, netplay, Retro Achievments and etc). Whether that comes free from the enthusiast emulation scene or sold by 1st parties, I think there's room for both to exist. As long as enthusiast emulation stays in the background creating, and doesn't threaten to undercut profits, like SONY vs Bleemcast, then there's no incentive for 1st parties to get involved. -
(Expired) Playstation Classic - $19.99 (Prime Day deal)
RIP-Felix replied to tthurman's topic in Social Club
He destroys more powerful hardware to install a parasite Pi? Just hack it! WAY LESS WORK, no modding crime! I died inside watching that horror film. -
Roku Ultimate + Hulu w/ Live TV and no ads + Netflix suits my needs. However, it's getting expensive on it's own right. Include internet access and it's creeping up on basic cable rates. Leave it to capitalism to ruin the fun just when it was getting good. This is the one good thing about monopoly, it's a one stop shop for everything. It's just that they can then start hiking the price having captured the market. Competition might be annoying, but it should keep prices competitive. And if they have that one show you just have to subscribe to see, you can grab a month and cancel after the binge. I did that with HBO for Game of Thrones and John Oliver.
-
PART 3: GOING HI-DEF (Dreamcast HDMI) The problem I was having with Dreamcast on my setup before the DCHDMI was that I could only get VGA to pass-through the OSSC to my TV at 480p DTV. The Dreamcast has a 480p DTV video signal, which is misinterpreted by my TV. This is a complicated issue, but to put it simply, the screen will look narrower than it should. The OSSC has a DTV option that fixes this. Line doubling 480p --> 960p would work, but my TV won't accept that resolution. I really wish I had gone with an LG OLED at this point instead of this evil VIZIO! So 480p DTV was the best I could do! The mCable was able to take that 480p and upscale to 1080p with anti aliasing, but it stretches to 16:9 and my VIZIO refuses to let me change the aspect back to 4:3 (LG and TCL do) . Even If it did, that wouldn't be the correct aspect ratio for DC. It would be close enough to not bother me though. If I had another TV, one that was more forgiving of input resolutions and Aspect ratio changes, the OSSC might be all I Need. But I don't, and it's still a compromise. Besides, I'm trying to make the Ultimate Dreamcast here, which mean no comprimizes! Moreover, there was some interference I couldn't clean up with the Low pass filter on the OSSC. A rolling bar of static plagued me. From a distance, it mostly disappeared, but If I looked for it on dark screens I could spot it. I want more than 480p DTV through the OSSC! And this project demands it! Enter the DCHDMI: After 2 months of waiting I received my DCHDMI yesterday! The install went well, though I had some trouble with the tiny resistors on the motherboard. There are some very small resistors you have to solder to for the controller to access the OSD, but the moment my iron touched them they desoldered. I was just trying to attach a wire to one end, but the whole resistor moved! So I had to reposition it with some fine forceps and solder it back into place, which is difficult see, non-the-less solder back into place (they are that minuscule). This is certainly not an install for beginners! You NEED a temperature controlled solder station, flux, and confidence going in. Otherwise this install could go south pretty quick. The flex cable install went smooth. It's quite a bit more complicate than the UltraHDMI flex install for the N64, but not so much so that I wasn't prepared. Here's the install video I followed: The actual flex cable I received from a Round 6 kit was different from the one in the video. It doesn't have the jumper to bridge. He must have removed it. Cool, less work for me! My first impression after turning it on was, "Um...where's the picture?" I had a bunch of trouble getting it to output to my TV. I thought it might be my TV, so I tried it on another TV, but it had the same issue. I thought I might have installed it incorrectly, but I finally was able to get it to display by pressing the button combo for resetting back to VGA mode "L+R+Y+B+START". Then I had issues getting it to stay on after reset. I eventually worked out that I needed to "Force VGA". And in order for that to work I needed to have a VGA cable plugged into the Dreamcast as well as the HDMI cable. In "Cable Detect" mode it's supposed to choose the correct output based on the mode the Dreamcast is in, which is affected by which cable is plugged into the video out port. Sometimes I could get it to display, get into the OSD and change settings, and other times I couldn't - which required me to reset back to VGA mode to get the screen back. I kinda wish it would just work, like the UltraHDMI for the N64 does. However, I guess the DC having various display modes makes that not as easy. I still haven't figured out all the quarks yet, but I'm happy with the "force VGA" method. I did find the mCable was able to accept more resolutions and upscale them to 1080p, which actually made things a bit easier to deal with while finding the best resolution to output. The real reason the DCHDMI is king is it's 1080p output option. It places 960p image inside a black 1080p border, which it outputs to the TV. This is a perfect integer scaled, DTV aspect correct, upscaled 1080p signal any TV will accept. I did have to manually set the output color space to Full range, to match my TV setting, but then it was perfect. AND I MEAN PERFECT. This is a really good looking pure picture. There is Zero lag, zero interference, and the upscaled picture is very crisp! It looks like an emulator, but it's not. This is a Digital image coming strait from the digital source on the motherboard. No analog conversion process for information to get lost in. Because the aspect is correct and resolution so close to 4K, the picture is as clear as possible. Smoothing is only applied by the TV's upconvert from 1080p to native 4K, but if I had a 1080p screen there would be none. If I had a capture card, I'd take some screenshots to show you the difference this makes vs the OSSC. But it's a serious upgrade. This is a good review that shows similar results to what I'm seeing: EDIT: Because I installed my GDEMU before the DCHDMI I didn't initially update the firmware. The reason is that the GDEMU is unshielded and can interfere with the wireless module on the DCHDMI during the firmware download, potentially corrupting the firmware flash. I was afraid of bricking, so heeded the warning. I soldered the 12v rail's voltage regulator back in and replaced the GDROM, then downloaded the firmware update. I then desoldered the regulator and replaced the GDEMU, but now with the latest firmware. I'll have to do this each time there is a significant firmware update, but it's not that difficult (if you have the right tools). I might be able to shield the GDEMU, but I'll have to think about that. Firmware updates have added HQ2X filtering to the video output. This was mentioned in the video above and it's a nice improvement. While it does soften the edge slightly, it's more about guessing geometry and inserting pixel data that's not there. So at times it gives an antialiasing like effect, but mostly it fills the corner of jaggy's with a triangle of the same color. This goes a long way to reducing sawtooth edges. It doesn't look to my eye to soften the entire image like AA usually does. Just the edge between high contrast colors seem to be the most affected (in a positive way). Anyway, the result looks from a normal viewing distance to be coming from a PS3, not a Dreamcast! It's kinda mind blowing that the DC can look this good without emulation. And because it's original hardware, I don't have to worry about the accuracy of emulation, which is something that plagues the DC. There is supposed to be Antialiasing coming in a future Firmware release, so that may be an interesting feature to try out. HQ2X is very impressive as it is.
-
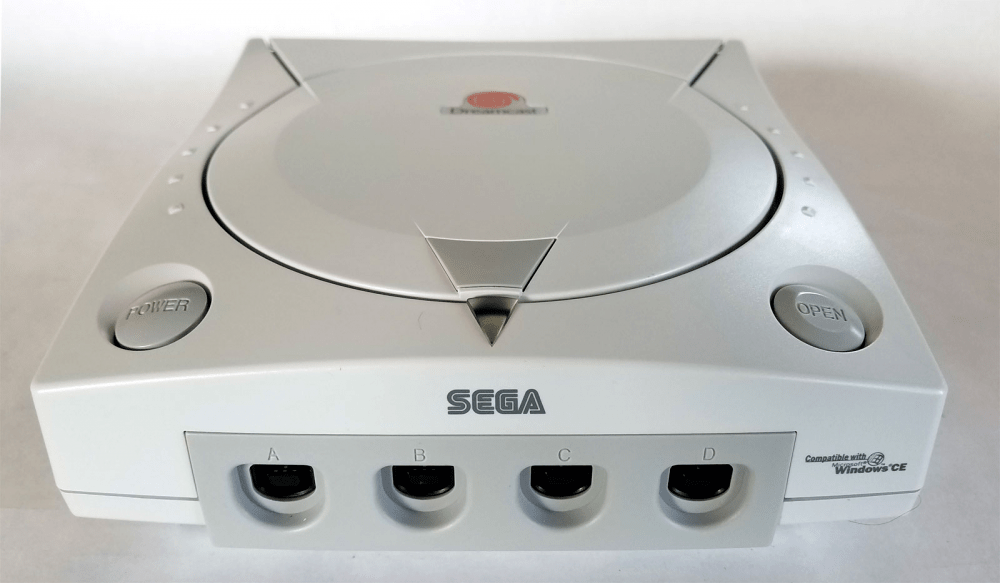
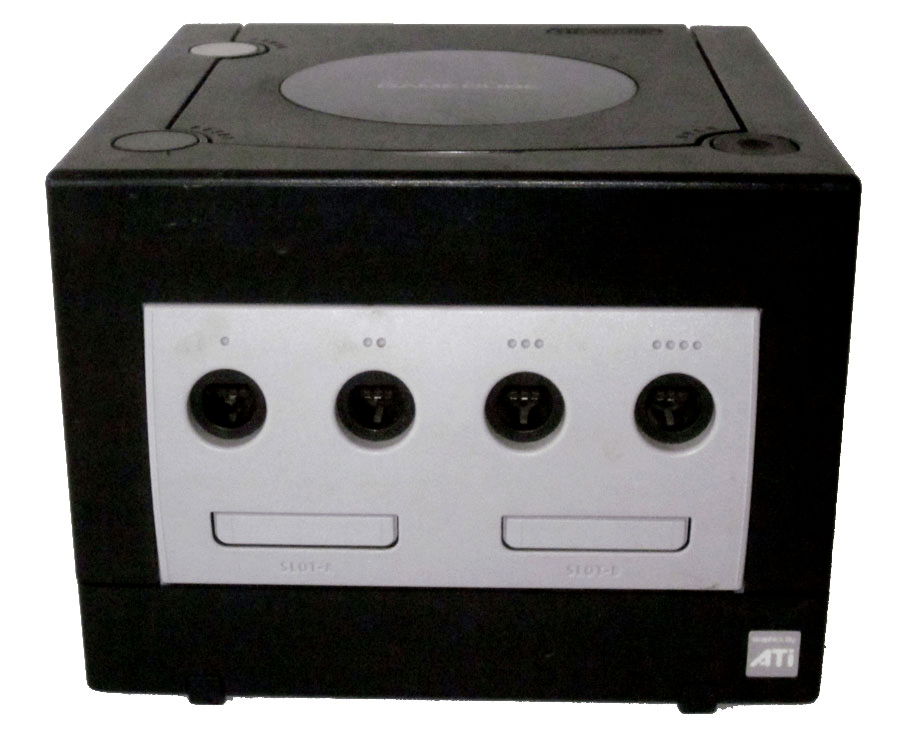
Anyone besides me feel like Nintendo ripped off the the Dreamcast's design? I've never read anywhere that the designs were derivative, but just looking at them side-by-side makes me wonder. That controller port rectangle is very suspicious to me. I can't help but feel there's a story there.
-
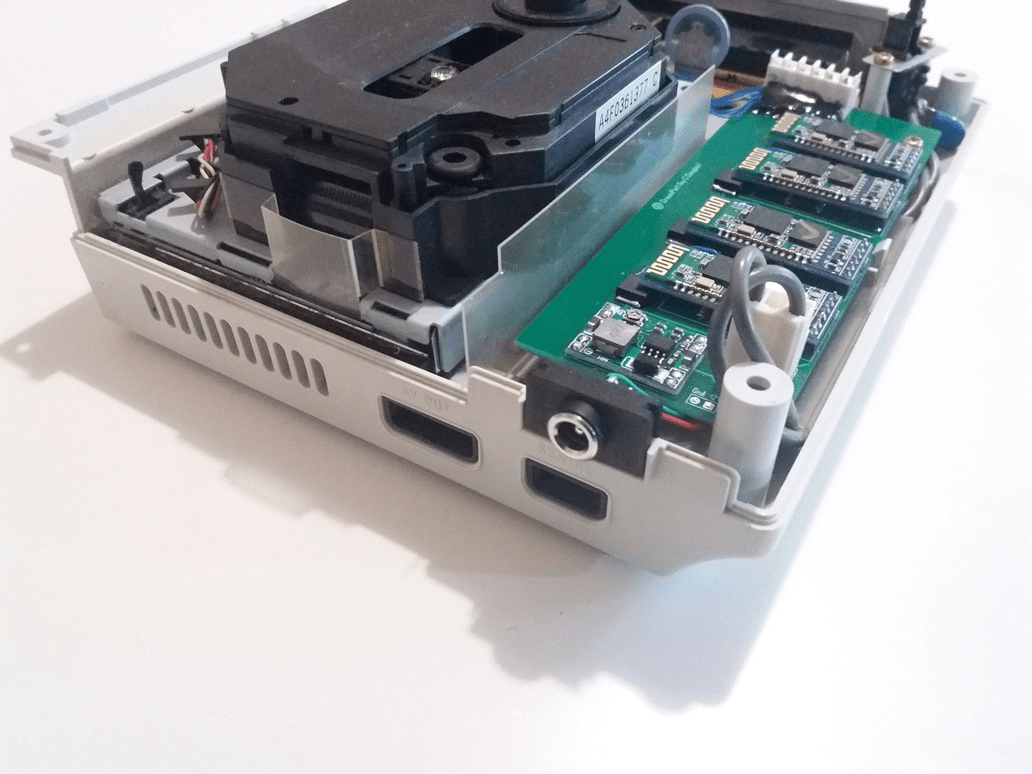
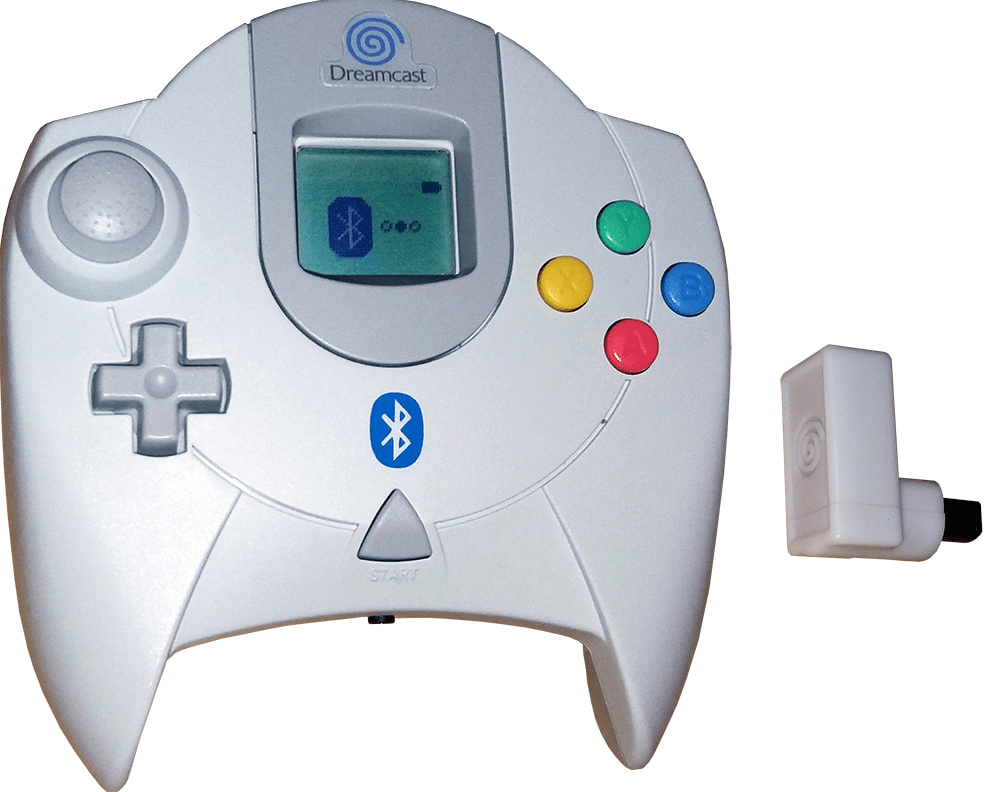
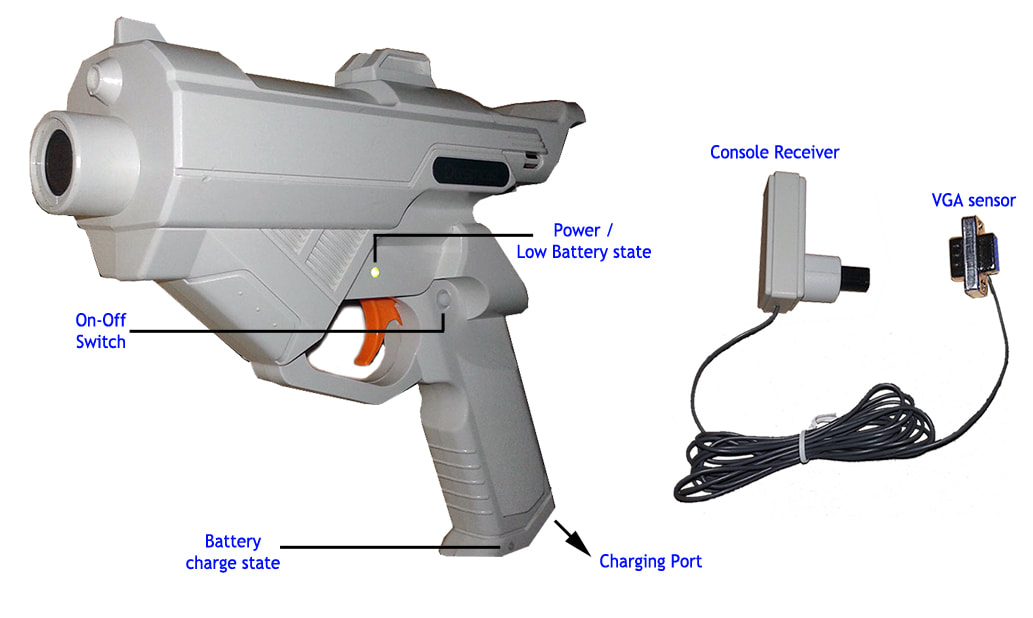
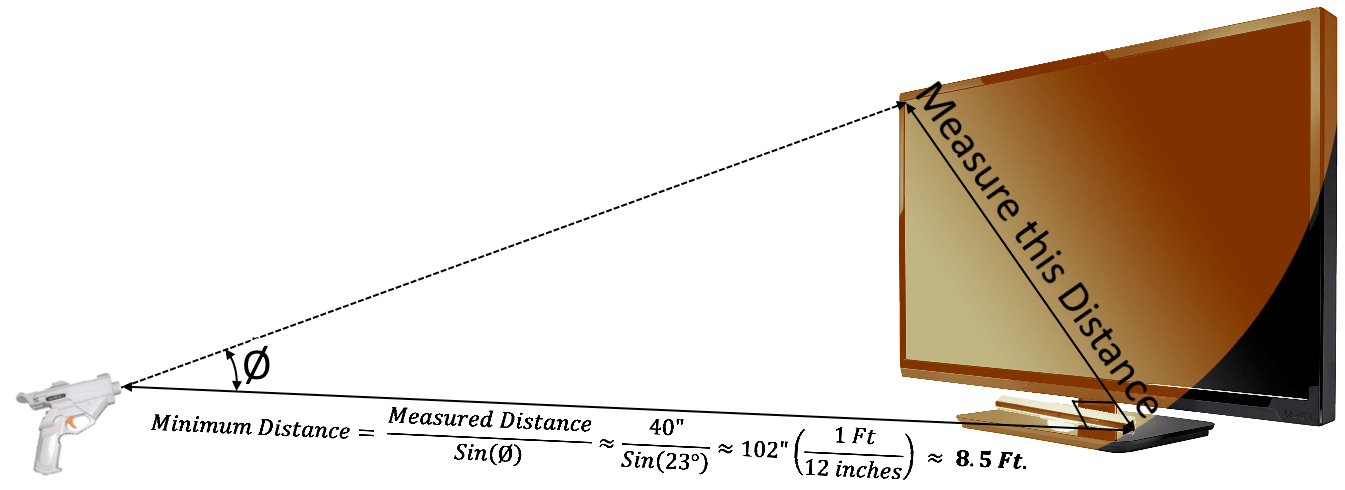
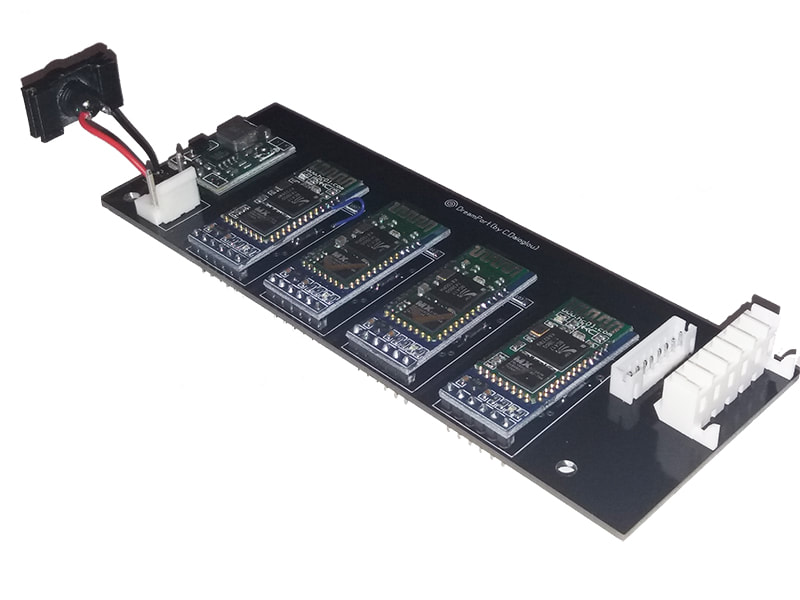
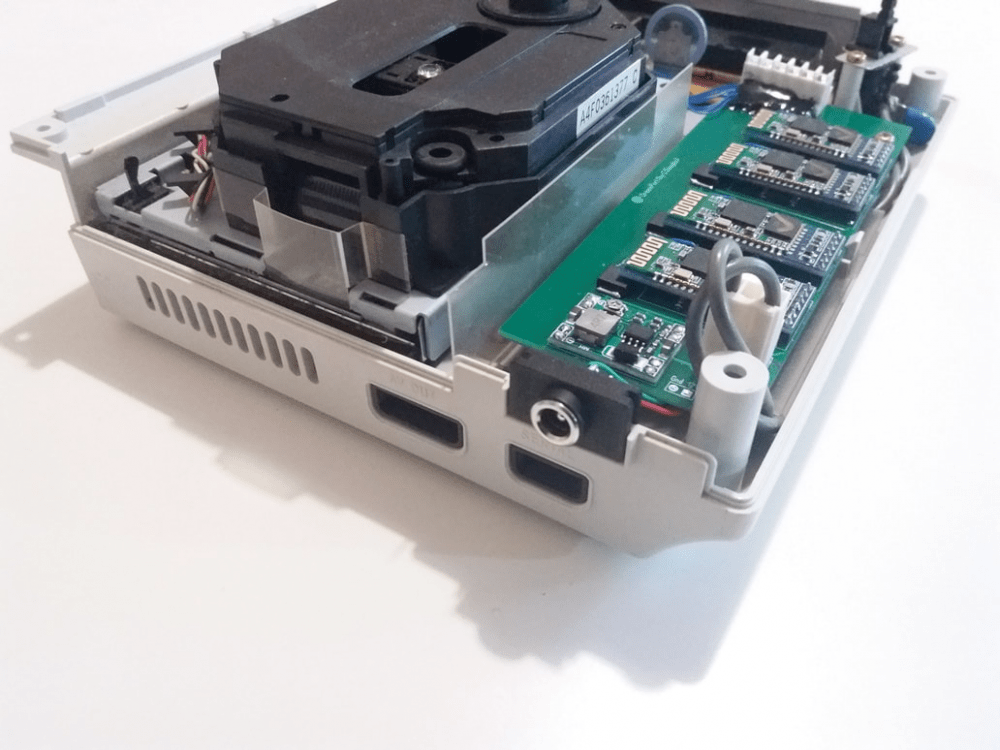
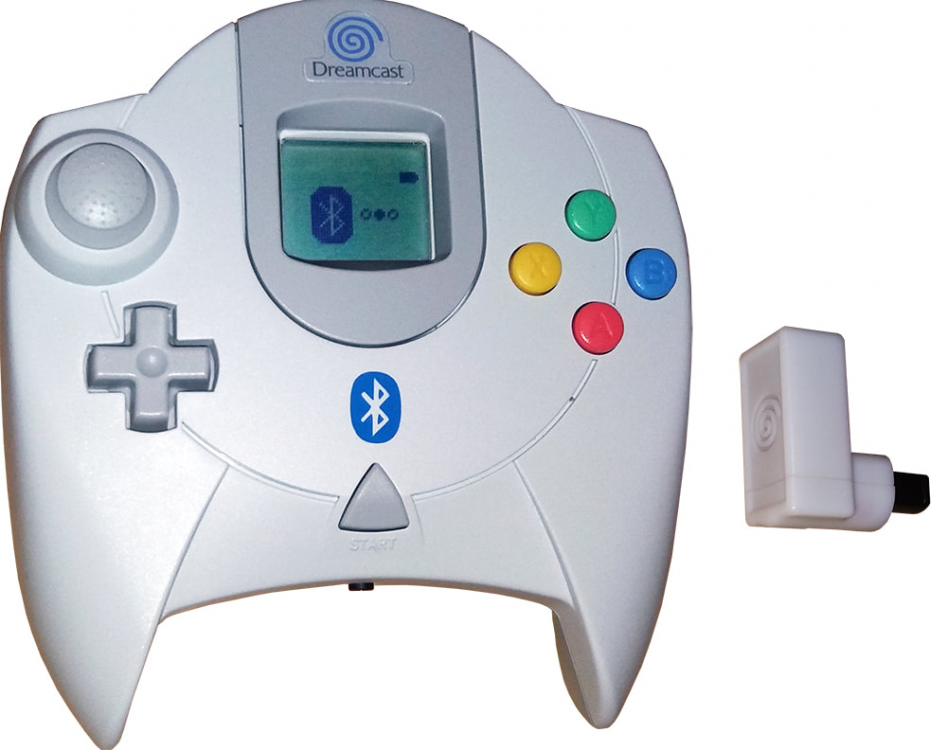
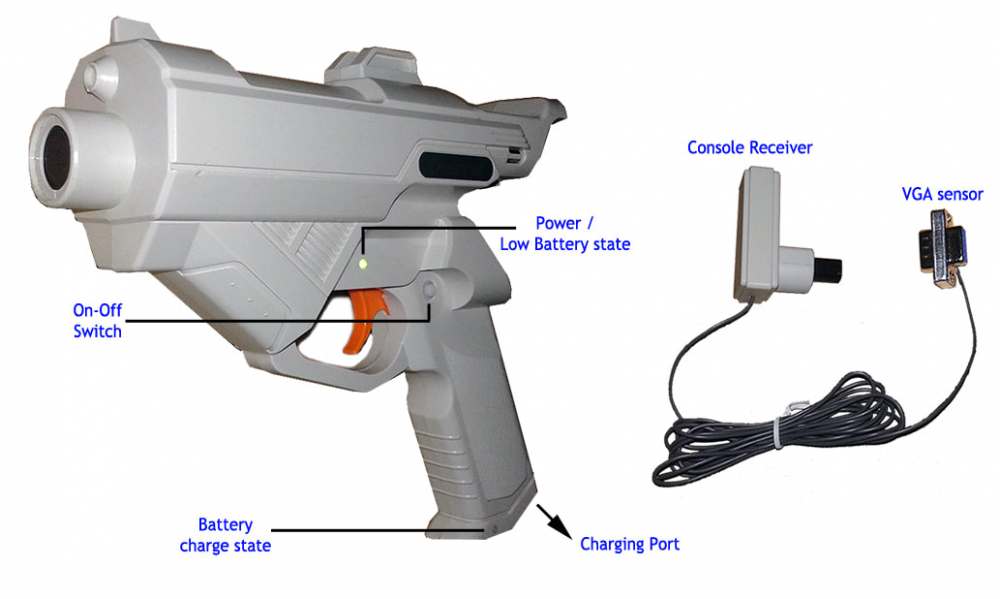
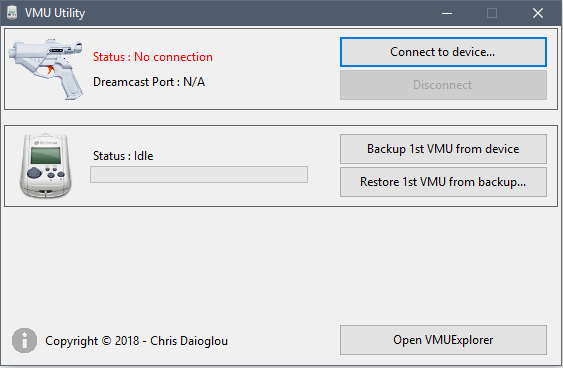
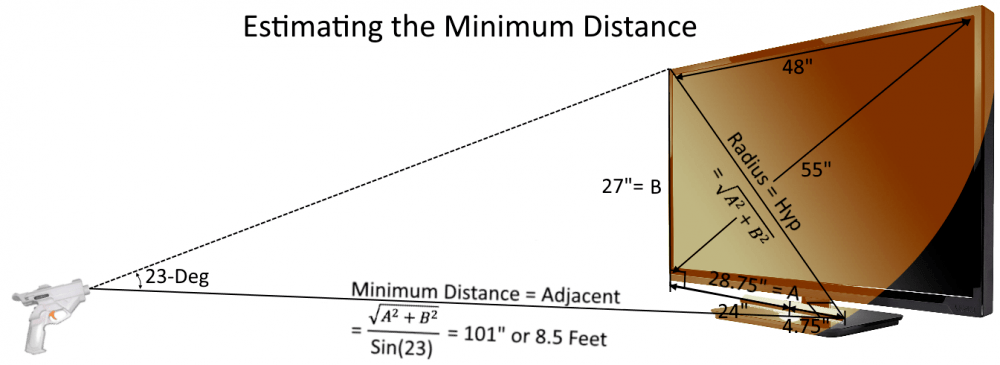
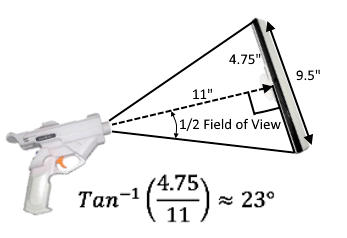
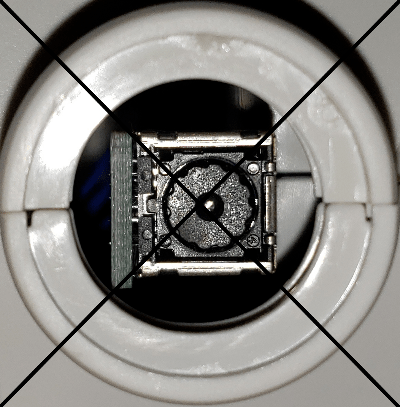
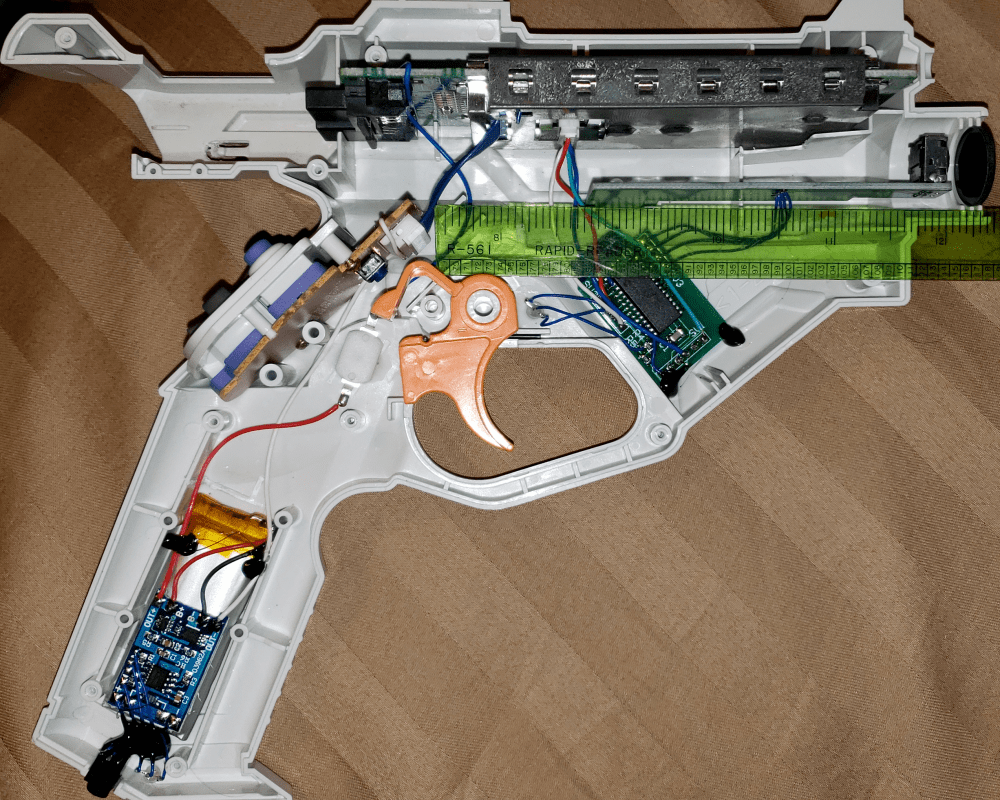
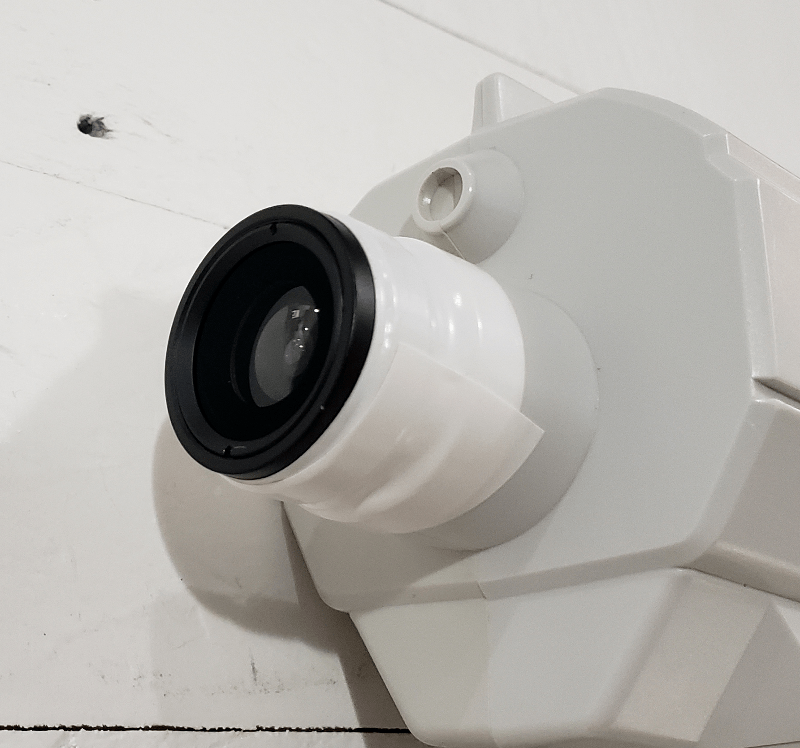
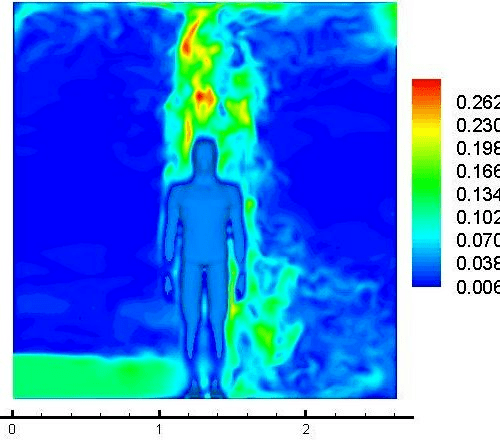
PART 2: GOING WIRELESS (ONLY THE BEST FOR MY DREAMCAST) Thanks to Chris Daioglou there exists a way to bring the Dreamcast into the wireless Bluetooth era. It is not a cheap endeavor I have embarked on, but I don't care at this point. I want only the best for my Dreamcast. Enter the DreamConn+ and LigntConn Controllers: These controllers are brand new in box PAL controllers that Chris bought up in bulk and modifies to be wireless with his Bluetooth mod boards. He does the install and ships the units out worldwide. It is quite expensive, but that's his prerogative. They are completely wireless and functional replacements for the original wired controllers. This means they interface with the VMU and peripheral devices exactly as you would expect. Unlike the original controller however, the DreamConn+ controller also has 2 full VMU's worth of memory onboard, without a VMU inserted. So you don't need one to save games. Moreover, both come with a 9 hour battery life with USB charging and a custom overlay that displays the battery level on the VMU! In game reset is selectiable using the VMU menu as well. There is software you can install on your computer to manage the VMU memory and dump/manage saves. This is a useful feature for emulators. I don't think it can yet be used as a Bluetooth PC controller. It would be awesome if they are all you need for both the OG Dreamcast or PC emulation, complete with VMU saves. However, I'm not sure how/if emulators support saving, loading, and displaying VMU information on it. Imagine if that worked though, holy hell would that be awesome. As for the lightgun, it connects to the VGA out to get the sync signal. This will still work if using the DCHDMI mod to display video and that doesn't affect the original output of the console. It comes with a Wii style IR LED bar that the Light Conn uses for reference on the screen. This way it can be used on a modern TV. You just need to calibrate the sensor and it will be good to go. It also has been modded to allow auto reload, so you don't have to point off screen to do it. I'm not sure if that was a workaround or something I can turn off in settings. I kinda feel like it's cheating, but if it's needed to get it to work then I guess I can live with it. What about the Power supply? The OG power supply was great because it allowed you to use a common non-proprietary cord to plug the Dreamcast in. However, that puts all the heat producing electronics inside the console. One of the issues of the GDEMU mod I performed is that the power supply might get hotter and make the system more prone to overheating, reducing the power supply's lifespan. I removed the 12v rail voltage regulator to solve that problem, but there is another solution - Replace it entirely. Enter the DreamPort: The DreamPort is a drop in replacement for the power supply. It will allow the system to be powered by a 12v laptop charger instead. That offloads the heat producing electronics to the power brick on the charger outside the console, so the console itself will run much cooler. That should extend the life of the console! That's not all, it also has 4 Bluetooth DreamConn+ dongle boards built in. This mean you don't need to plugin the controller port dongles into the front of the DC in order to pair 4 Bluetooth controllers. This frees the other ports for peripherals, like extra controllers, light guns, and the keyboard. The original ports will continue to function as normal. The best feature IMO is that you can power the console on/off with your wireless controller, just like a modern console! Chris also makes a wireless keyboard for the few games that use it, KeyConn controller, but I'm fine plugging in a PS2 keyboard into this adapter and using an extension cord to reach my seat. He also sells Backlit VMU's, which are kinda cool, but a luxury I don't need. I purchased these a month ago and they just shipped. I will edit back when I have a chance to fully test them... *** EDIT: Okay I received an exotic looking package from Greece the other day, complete with a bunch of interesting looking stamps. Even the USPS delivery guy who made me sign for it was admiring the stamps. It looks like it took a trip across Europe! Anyway, inside were the Lightconn light gun and DreamConn controller. The Dreamport power supply will be in another package and hasn't shipped yet (I bought it after these shipped). After testing them a for a day I have some initial impressions. LightConn light gun controller: I was initially disappointed! The issue is that I can't get far enough back to calibrate the gun in my gameroom. I made the picture below to illustrate what I'm talking about. Think of the lightgun's sensor as a flashlight. If you point at a corner of the screen, the sensor needs to still be able to see both the the LEDs on the sensor bar. If you're too close then the cone of sight is too narrow. Step back a few feet and then it'll work. It's probably partly my fault for not realizing the limitations of a wii style IR sensor bar setup in my gameroom. The minimum distance I calculated I could be from my 55" TV is 8.5 feet, and I'm just a bit closer. There's no room to move back, so it just won't work for me unless I can increase the field of view of the sensor in the gun. EDIT: This works well if you are in a large enough room for your TV. Because the Sensor has limited field of view you need to be far enough away from the TV for it to work. The example calculation below is based on my 55" TV, but you will need to plug in a different measurement for your TV size. This is how you can calculate the minimum distance you need to be from the screen for your TV. I measured Ø at about 23 degrees. For a more detailed explanation, read the following in the geekiest voice you can imagine (I hear Bentley from Sly Cooper in my mind): The calibration "procedure" itself is easy. Pressing Start+B on the light gun brings up a calibration menu on the VMU. There are 2 options. Test calibration allows you to shoot around at your TV and see if the Light gun sensor can pick up the IR sensor bar. One beep means it picked it up, 2 means it didn't. This allows you to figure out how far back you need to be from the TV. The second option is the calibration. You just point at the upper left corner of the screen and fire. Then the lower right. Calibration is easy, if you are far enough away from the TV. Then you just need to calibrate again inside the game as you normally would. I've only had it a day, so we'll see if it's worth the expense (which is hard to justify in the best case scenario). Right now I'm feeling like the Lightconn IR tech is so fiddly that there is no way to justify the $205 premium unless it can measure up to the light gun experience on a CRT. Even then, it's a luxury price! I'm blushing for having spent that much for this. I need to play with it in a best case scenario to test accuracy, lag, and etc. So I'll move over to a larger room and smaller TV. I'm holding out hope it'll be what I expected after I accept the minimum distance issue. Right now I'm having buyers remorse. I can't recommend it at this moment, but maybe I can after I get a chance to get over the disappointment of this limitation and test it in it's element. EDIT: Chris confirmed the sensors are harvested from Nintendo wiimotes. He suggested using a wide angle lens like those used for cell phones. I picked up a 270-Degree fisheye lens and 0.65x wide angle to test out. The picture to the right shows how I attached the fisheye lens to the barrel with some white electrical tape. I have tested this out a bit and can confirm that it does indeed work. It greatly increases the field of view, although I haven't calculated by how much. I was able to calibrate the mod, which is easy. Then again as normally done in game. The result is as you would expect from a Wii style light gun game. The only difference is that you can't see the reticle moving on screen. You have to point and shoot to find out where the bullet hits. The lag is about the same as the wii, which I never really cared for. CRT based lightguns have no lag and offer a WAY better lightgun experience by comparison. But that's not the point of this. This is to allow you to use your Big screen HDTV, and it does that using modern lightgun technology. The fact that it doesn't hold a candle to the old lightgun technology is not something I can bit@h about. That's beyond Chris' control and it would be unreasonable to compare this to the experience on a CRT. I can say that the fish eye lens is very sensitive to the angle you are sitting at. You can't move very much from the spot in which you calibrate it. If you move more than a foot or so, the accuracy suffers or tracking is lost. The wide angle lens is better, but yields a smaller improvement to the field of view. Accuracy doesn't seem to be bad though. I was worried that the lens' would distort the tracking calculation, and it may, but it doesn't see to ruin the accuracy. The bullet lands pretty close to where I'm pointing, no matter where on screen I point. However, because of the lag and larger inaccuracy compared to CRT technology, it's really hard to hit small targets or those far away. I tested The House of the Dead 2 and had trouble tracking/hitting fast moving enemy's, small enemy's like owls/fish/slugs, and enemy's in the background you can snipe before they get a chance to attack you. If they are right in front of you, no problem. If they are attacking a civilian and you need to protect them, harder, but reasonable. That first boss (judgement) has a weak-point, the fast moving bat character flying around. That little jerk is pretty hard to hit with this mod, considerably more so than SEGA intended. I had the Difficulty on very easy and had to use multiple continues. EDIT: So after having this for awhile and experiencing its limitations I can say that it does what it's supposed to do. No, it can't equal the experience on a CRT. Yes, it's hard to justify at such a high price point. Considering there is no other lightgun for the Dreamcast that can work on an HDTV, I can say that it might be worth it to you. IF there is a lighgun game you just have to play again, manage your expectations. The Lightbar based triangulation method is laggy. There's no getting around it. CRT lightguns are superior and these games were programmed with them in mind. Their difficulty was balanced with them in mind. Your memory of the game was literally formed with them in mind. You're experience of the game using this lightgun will be worse and that's just a given. Having said that, the games are still fun and playable at easy difficulty. Your enjoyment of them with this will be highly subjective. I kinda like having the ability to play these games on my HDTV. However, I'm looking forward to HD-Retrovision's Dreamcast Cables to use with my CRT. Then I'll get a stock lightgun and play these games the right way. I don't see this as a replacement for the CRT in my setup, just as a way to play on my HDTV. More of a novelty than a serious controller for total domination. I have nothing against Chris. This is a technically impressive mod, it just costs more money for him to produce and sell for profit than it delivers in performance and value to the end user. In my case it's not worth it, but to someone with money to burn and no room for a bulky CRT it might be. Your Milage May Vary is what I'm saying. The bottom line is this, I'd buy again for $60, but not for $205. Will I be asking for a refund? No. Part of the reason I bought this was to write it up in this thread and provide my unbiased opinion. The main reason is that I was going all John Hammond on this build, "sparing no expense". DreamConn Bluetooth controller: Awesome! It's really cool how he was able to seamlessly integrate the VMU interface wireless. It works as expected, with its animations, but has a battery indicator added in the corner. Everything works as expected. The X+Y+B+A+Start button combo still works to reset the game to the start screen, then to the GDEMU if pressed on the start screen. The only difference I can tell from a wired controller, besides the battery indicator on the VMU, lack of a cord, and the blue PAL logo, is that there's some lag... I noticed it's more difficult to pull off moves in Soulcalibur than a wired controller. I have been playing a lot of Soulcalibur in testing DC mods over the last few weeks and getting used to Cervantes' special attacks again (He's my go to). The lag is not egregious or anything. It's just noticeable when you're used to the feel of a wired controller. This is a real con, I don't mean to downplay this. I HATE lag! One of my main goals with this project was to reduce it as much as possible. However, you don't lose the ability to plug a corded controller in and lag is a given for wireless controllers. From what I've read about how demanding the timing for the Maple Buss is, I doubt this can be improved at all. In other words, this may be the best we can hope for. So how much lag is there? It adds 53-55ms, just over 3 frames. I shot 240FPS footage of sonic jumping after a button press and averaged 10 jumps. I compared the wired time (122+/-13ms) to the Dreamconn+ time (176+/-12ms). The +/- is one standard deviation. The fact it is basically the same tells me that my methodology was consistent (about the same amount of imprecision between measurements). Note, these times are for my VIZIO P55-F1 TV over HDMI input 5 (low latency port, which adds 15.3ms for 1080p60 content) via the DCHDMI mod. The Dreamconn is expensive, but exactly what I expected when I paid the premium for it. It's not like I've really put it through the grind yet though. EDIT: I have had enough time to get over the new car love affair, and have a pretty good idea of the limitations of the controller now. My opinion has soured a bit. I wouldn't use it for fighting games because of lag. It's fine otherwise. However, I tried to play through Blue Stinger, an action title that doesn't require super tight controls, but every so often it would drop connection for 2-3 seconds. When that happens the character just stops, or keeps running in one direction, then you get control back 2-3 seconds later. Now that's unacceptable lag, no matter what you're playing. In fifteen minutes of gameplay it maybe happened twice. I'm not sure what causes this, but I'm only 6 or 7 feet from the console, so I don't think signal strength was an issue (perhapse interfereance?). Once it happened while I was fighting and caused me to take damage! That's when I decided it wasn't worth it and switched to the wired controller. I removed the VMU and transferred it to the wired controller. Then I plugged in the wired controller. This was while the game was still running. The controller was super buggy! Controls were messed up and the VMU wouldn't display the animation. Maybe I wasn't supposed to remove a VMU which was paired through the Bluetooth controller. I ended up having to restart the console with the wired controller plugged in to get it to work properly. My guess is that you are only allowed to have 1 controller in a port at a time. So if you have a wired controller in the P1 port and try to pair the Bluetooth controller, it will be assigned P2. This isn't a problem unless you have the DreamPort installed (See Part 4). The Bluetooth dongle would normally block a controller from being inserted in the P1 port, but the Dreamport has the dongle board mounted to the power supply internally in the console, which leaves the controller ports free. So now it's possible that 2 controllers are trying to communicate over the maple buss at the same time, which doesn't work. I found that out the hard way, losing some progress in the game. EDIT: So the infrequent drop-outs in the Bluetooth connection are my only real complaint about the DreamConn+. Not being able to trust it won't happen at a critical point, causing frustration, was enough to make me switch back to using a corded controller with an extension cord. I played through the rest of Blue Stinger with the corded controller and never missed a beat. I'm disappointed to have to mention this, as the controller mod is almost perfect otherwise. However, it was annoying enough that I had to stop using it in order to fully enjoy my game. So I have to mention it here if I'm being unbiased. I don't know if this is just my controller or a known issue. Given this limitation I have a hard time feeling 100% confident in the purchase. When it was just the 55ms of lag, I was happy. But periodic 2-3 second drop-outs is almost a deal breaker. Now, I should mention that at CES 2018 Retro-Bit teased wireless Dreamcast and Saturn controllers. Assuming it's in the $60 range, it might make for an affordable alternative. However, they said that they were targeting late 2018 for release, and that never materialized. The Saturn controllers are now slated to be released late this year, which is a pretty firm promise. They actually have a Saturn product. I would recommended you wait to see what Retrobit brings to the table. If you buy a Dreamconn+, then retrobit releases a half-way decent product, you will have wasted $100. However, after a full year they still don't have a wireless DC controller. According to Retro-Bit they are aggressively targeting late this year (For the Saturn Controller), but want to have a product 'they and SEGA will be proud of'. The dremcast controller was only mentioned in passing, and may be refferring to the corded USB controller for PC they also promised at CES. So although the Dreamconn+ is likely the only option currently, you should be aware there is a remote possibility an alternative could be on the horizon.


- 86 replies
-
- 1
-

-
- gdemu
- dreamcast mods
- (and 5 more)
-
Want to feel old? Sega has been out of the console business for longer than it was in it. SG-1000 to Dreamcast was 18 years. It's been over 18 since since they bowed out.
-
Yes, that is true. However, I'm not limiting the list to DC exclusives. For me that's besides the point. Playstation has triangular polygons and Saturn used rectangular, it's fun to compare the different versions of the games. Interestingly, because the DC launched during the 5th generation of consoles it got many of them upgraded to the 6th. The honerable mentions above were all released on PS1, except Star wars E1 racer which was on N64. RE2 got an N64 release, but you had to have the expansion pak. That game had a 32-bit, 64-bit, and 128 bit releases! The DC had a bunch of titles from the 5th generation. I have a GC, PS2, and X-Box as well. It's fun to see how the games changed between releases. Some have exclusive content, upgraded graphics, subtle changes, bugs and workarounds. It's fun finding which console the definitive version of the game was on. You're noticing a critical business decision SEGA had to make during the Sixth generation console wars. I'll use Shenmue 2 as an example. It was developed by SEGA AM2, but in 2002 Microsoft secured exclusivity in NA, so it was on the X-Box only. Japan and Europe got the DC release. It was a Dreamcast title that MS pilfered from SEGA after it was clear they weren't going to survive the console wars. Otherwise, SEGA AM2 would have released it exclusively on the DC worldwide. SEGA was smart, once they realized they weren't going to survive the hardware battle they doubled efforts to license software content to Sony, Nintendo, and Microsoft. They made a good business decision and bowed out amicably. They continued to power out quality SEGA games, and still do. This is why they survived as a company and we saw so many games released cross platform. But make no mistake, the Dreamcast was the console they would have been meant for had the Dreamcast slayed. A fringe benefit is that there are a nauseating amount of ports available on PC and modern consoles, so there are many more ways to play. I'm a DC purist! Dreamcast is the beating heart of SEGA's sixth generation games, and that's the console I think they should be played on. I'm clearly biased though! SEGA was my first. Must Play Games that were exclusive to the Dreamcast and have no port (My top Five in orange).
-
Thank you I may need it! Actually the DCHDMI install is the most technical soldering I've faced yet. So all the practice I got on the UltraHDMI mod for N64 and the SNES repair have turned out to be very good confidence builders. I'm sure I can do it myself. I have Ecco the dolphin too, a childhood favorite of mine on the Genesis led me to get it for Dreamcast. I never got that far and I haven't returned to it, maybe I should now! Actually this is always a fun topic. What Are your Must Play Dreamcast Games? Every one of the following are must play: Honorable mentions as the definitive version of the game: Holy crap the DC has a great library when you really look at it. Did I forget any of your favorites? Feel free to call me out, I'd love to find a hidden gem.
-
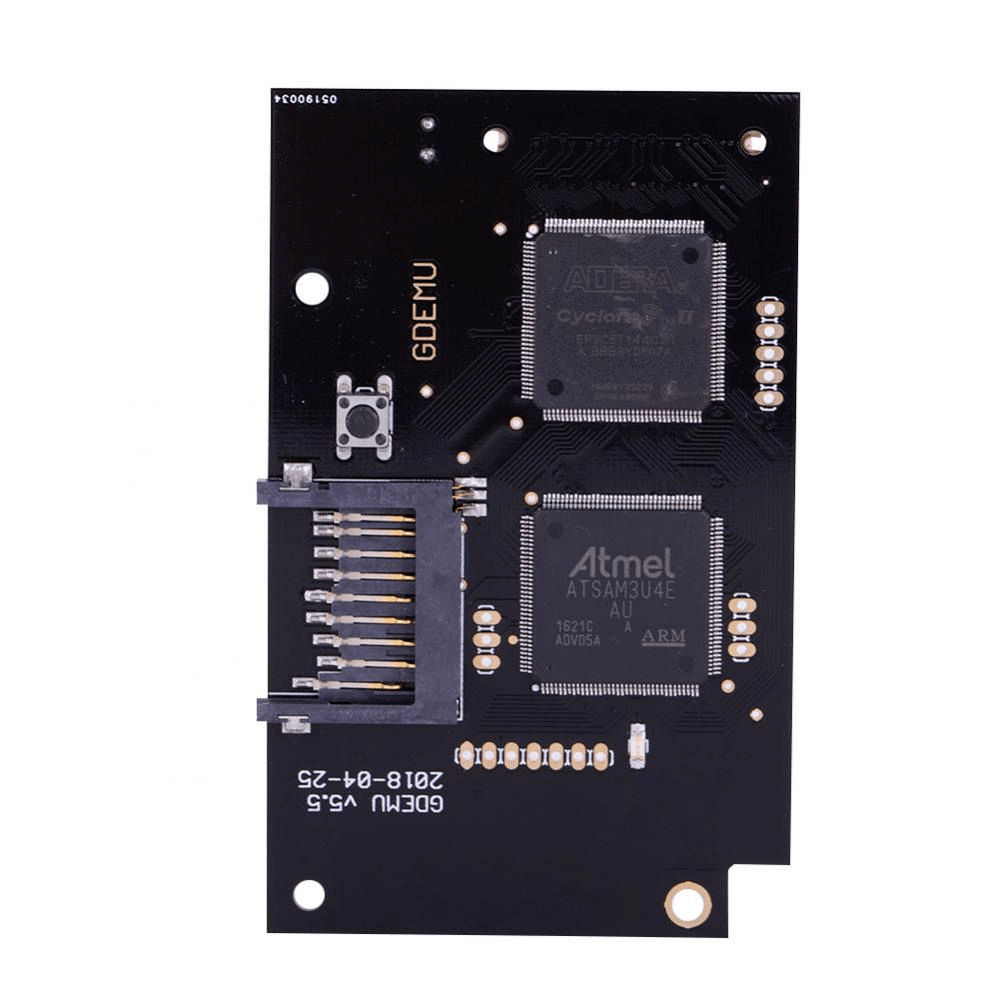
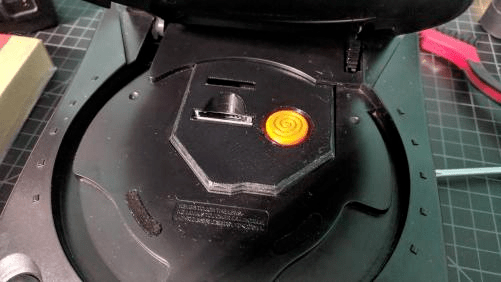
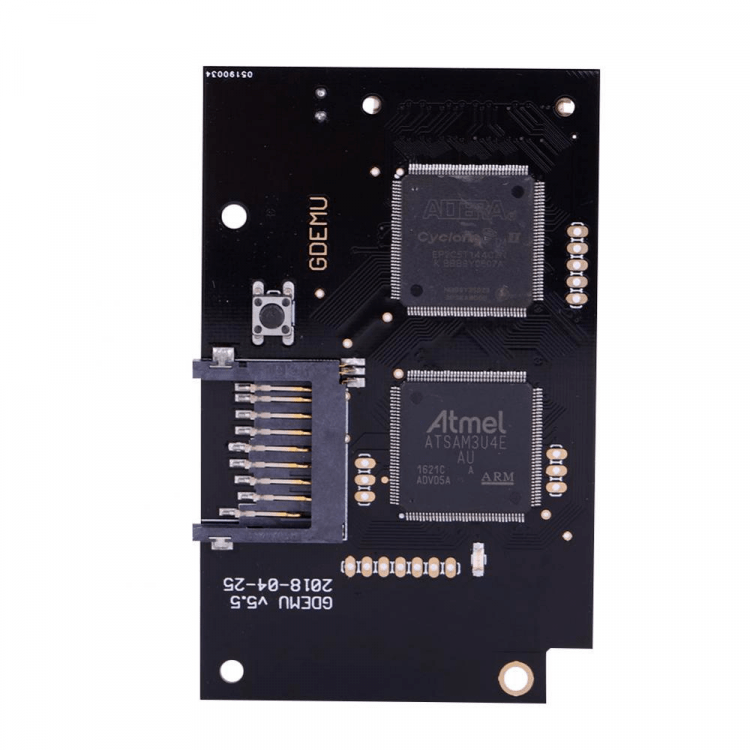
PART 1: Optical Drive Emulator - The GDEMU Hardware: Buy a GDEMU. Clones are cheaper, but they are knock offs that undercut the original designer and his incentive to continue improving the product. If you would like to take advantage of his firmware updates, you will need his board. DO NOT UPDATE THE FIRMWARE ON A CLONE. The clones use different chips that require a slight change in the firmware for them to work, which means if you try to update the firmware, IT WILL BRICK! Otherwise, clones work the same and I will not disparage anyone who chooses the more convenient option. They are much cheaper and available to purchase immediately, instead of pre-orders and waiting for your batch to ship, which takes months. EDIT: Clone GDemu's are slightly different from the official. If you plan to buy a DreamPort power supply from Chris Daioglou you may need perform a simple mod to fix an issue with the powering a clone GDemu. See Part 4 (below) for details. The official GDemu doesn't require you to mod the DreamPort, it work's properly out of the box. Installing the GDEMU is relatively simple. Open your Dreamcast, unscrew the GDROM drive and install the GDEMU in it’s place. A 3D printable mount and SD card extender (15mm is perfect) mod makes this look like it was built for the Dreamcast. One important thing to mention is that the GDROM draws power from the 12v rail on the power supply. In NTSC units this is the only device that does. So when you remove it, the 12v rail is left floating. This causes the voltage regulator to get hotter than it would under load, making your Dreamcast more vulnerable to overheat. The easiest solution is to add a 300Ohm 1W resistor across 12v and Gnd. You can just jam the legs into the connector. This simulates a GDROM drive and returns the load to normal. However, the safest and most efficient solution is to desolder the voltage regulator. It’s not needed (except on PAL units), unless you ever intend to replace the GDROM drive. If you might decide to go back to stock, you would just need to solder it back into place. So use some electrical or Kapton tape to keep the regulator in an out of the way place inside to console. This way you won’t lose it. Obtain an SD card large enough to hold all the games you want to put on. A full GDI set will require a 400GB card. You can’t use windows to format a card above 32GB to FAT32, but HP USB Format Tool will. I would provide a link, but don't like softpedia or cnet, as I've gotten malware from them before. I did download from it from cnet and it seemed fine, no funny business occurred. Just be careful to read each step in the installer instead of blindly clicking next, they may try to trick you into installing other stuff this way. Download it and format your SD card to FAT32. Usually a quick format will suffice. It may give you a “this media is write protected” warning and exit. Just try again and it will usually continue with the format. If not, double check that the Lock switch on the SD card is not engaged. Move it to the unlocked position if it is. If that still doesn’t work, try it on another computer or try another tool, there are many free ones available online. Software: You will need games of the correct type. Original Dreamcast games are not Compact Discs, but rather Gigabyte Discs (GDI), which are be about 1.2GB in size. That won’t fit on a CD. Many of the game available on the internet, after dumping directly from the Dreamcast (because they can’t be read by a normal computer’s CDROM drive), were compressed to reduce the size of Video and audio files. This allowed them to be burned onto a CD, which the VA0 and VA1 models of Dreamcast can play (VA2 can’t). I couldn’t get them to work on my VA1, besides it’s compressed anyway and that’s not original. Also, I’ve read it adds strain to the GDROM and hastens the death of the laser. I don’t know if that’s true or just a rumor, but if you plan to lessen the wear on your Dreamcast games by playing backups then the GDEMU is a non-destructive way that also allows you to play uncompressed GDI files. Win win! The most common format online are CDI (Compact Disc Images). These work well with emulators and are the easiest to get SD Card maker to recognize. However, because they are compressed you will not get the best audio/video experience possible. There is no way to restore the uncompressed GDI from a compressed CDI. It will not be the way the designers of the game intended for them to be seen. For Dreamcast purists, like me, CDI is unacceptable if you are planning to replace the GDROM (meaning you can’t play your original disc anymore). I don’t want a loss in video/audio quality that will undue all the work I put into upscaling. Do the console justice and get GDI’s. They’re a lot more work, as I detail below, but the Dreamcast is worth it! And once it’s done, you won’t need to do it again unless your SD card fails. So keep a backup. If you plan to have more than one game on the SD card you need GDmenu, but want SD Card Maker for GDEMU v1.10 by Madsheep. Making the SD Card Manually: GDmenu must be in a folder called 01 on the root directory of your SD card. Rename GDmenu.cdi to “disc.cdi”. Each disc of your games must be nested into folders named 02, 03, 04, 05…50…101..and so on. This makes it difficult to know which game is in which folder. Let’s take folder “02” for example. It must contain one disc… If you use CDI format, the CDI file must be Named “disc”. Every folder would contain 1 file called “disc.cdi”, so this makes it impossible for you to know which game it is. You can create a text file with the name of the game inside the folder to help you however, as GDEMU will ignore it. If you use GDI format, the GDI must be named “disc”. The BIN and/or RAW tracks must be named “track01”, “track02”…and so on. Keep the same file extension as the file originally had (“track02.bin” or “track02.raw” for example). The GDI file itself is like, but not the same as, a CUE sheet, if you’re familiar with them. It’s just a text file that tells the game which frame each track is found on. You can open the GDI file with notepad, but Notepad++ is much better. You will see each track of the game listed, probably with the original title of the game. You need to make it match the new name of the tracks, “track01.bin” instead of “Shenmue Disc 1 (Track 01).bin”. Once that is done, GDEMU will properly be able to read the GDI and load the game. If you have more than a few games to add, doing this manually is not practical. Using SD Card Maker for GDEMU v1.10: This is the only program I’ve found that automates the process of making/sorting the GDmenu, but it has some very annoying quarks. You must work around them or do it manually. That is a real pain if you have more than a few games, so this is just going to have to be annoying. It will be easier and way less time consuming than doing it manually though. Download SD Card Maker for GDEMU v1.10. Note, because there are relatively few people that visit the site or use this program your antivirus protection may try to prevent you from downloading the file, citing a “bad.reputation” or “trojan virus” warning or even block the link I provided, saying dangerous website blocked. This is a false positive so ignore it and download the program. The antivirus may remove important components of the program and otherwise try to scare you away from using it. This too is a false positive. Just ignore the warnings and make an exception to exclude it from future searches. Be sure to restore any removed components from quarantine. I wish madsheep made a better effort to prevent this and errors in the program, but it's just going to have to be this way. I had issues with SD Card Maker not recognizing the SD card. SD card maker flatly refuses to see it on my main computer and won’t let me do anything until it recognizes an SD card. I had to use a different computer to get it to work. I never found out why this is, but it’s just something you may encounter. CDI images are the easiest to use, as it can recognize and add them without much fuss. It may not correctly get the name of the game, especially for hacks. But you can customize the names for your GDmenu before building the SD card. So if you have the game file next to the menu edit window, you can scroll through your games to check which one it was, when it blanks or incorrectly labels a game. You may experience a long loading time before the GDmenu appears. This is because GDmenu is reading the disc images one by one to build the gamelist. The more games, the longer the loading time. SD card menu has a hack to allow instant loading! Check the box in the lower right hand corner of the program window called “menu hack”. However, it doesn’t work for games SD card maker doesn’t recognize after importing. I had only one in my set, NEO XYX.CDI. This one file caused the GDmenu loading screen to appear for over a minute. Then the GDmenu would appear without the custom names I had setup in SD Card Maker before building the image. However, GDI images can be much more frustrating to get into SD Card Maker, then again to get it to build the image (error messages galore). When I went to add the game, it would throw an “unhandled exception” and refuse to. I eventually found the cause of that issue and got them in. But after hours of building my image, it again threw an error and didn’t build my GDI file structure correctly. The issue was SD Card maker can’t handle a space appearing at the beginning of a line, or more than one space appearing anywhere else inside the GDI file, or special characters. I don’t know for sure, but it may not like excessively long names before track01, for example. I just went with the manual GDmenu format (track01), so if I had to circumvent SD Card Maker, I could. Once all those are removed, however, it worked well. Editing GDIs to work with SD Card Maker: 1. Download Notepadd++. and Open a GDI file in Notepad++. Many GDI roms available have spaces at the beginning of the first 9 tracks. Those have to go. Also, there may be more than one space for the first few tracks so the text lines up with the next line of text. SD card maker doesn’t like extra spaces! Moreover, it hates special characters and a space at the beginning of a new line. So we’re going to have to edit them to remove these obstacles from SD card makers very picky path. For example: A GDI like this… 21 1 0 4 2352 "Reel Fishing + Wild (USA) (Track 01).bin" 0 2 5375 0 2352 "Reel Fishing + Wild (USA) (Track 02).bin" 0 3 45000 4 2352 "Reel Fishing + Wild (USA) (Track 03).bin" 0 4 266479 0 2352 "Reel Fishing + Wild (USA) (Track 04).bin" 0 … and so on for additional tracks …has to change to this… 21 1 0 4 2352 track 01.bin 0 2 5375 0 2352 track 02.bin 0 3 45000 4 2352 track 03.bin 0 4 266479 0 2352 track 04.bin 0 …and so on for additional tracks …otherwise SD Card Maker won’t add the file to the list. 2. Using Regular Expressions to edit these files is not the most user friendly thing, but I’ve tried to make it as painless as possible. Maybe Madsheep will make an update to his program that eliminates this in the future, but for now we’re stuck with the nitty gritty. It involves editing all your GDI files at once, so it would be a good idea to backup your files to another folder in case something goes wrong. Do that now, and don’t touch those during this process. They are your fail safe. 3. Open Notepadd++ and go to File --> Close All. When you open Notepadd++ it keeps previously opened tabs in memory. Close them all now and keep Notepad++ open. We’re going to drag all of our GDI files in at once. 4. Navigate to you newly copied folder which contains all your game subfolders, inside each of which the tracks and GDI files are. In windows explorer, there is a search bar in the upper right of the window. Type *.gdi. This will show all the GDI files within all the subfolders. Highlight all of them (CTRL + A) and drag them into Notepad++. This opens all of them in tabs along the top of the program window. We’re going to edit all of them at once. 5. My GDI files followed the NoIntro naming convention. 12 8 4 4 2352 "Game - Name (Europe) (En,Fr,De,Es) (Track08).bin" 0 9 450 0 2352 "Game - Name (Europe) (En,Fr,De,Es) (Track 9).raw" 0 10 45000 4 2352 "Game - Name (Europe) (En,Fr,De,Es) (Track 10).bin" 0 .This will not work, because SD Card Maker doesn’t like special characters and potentially long names. In any case, to build a card manually these need to change to track##. So that’s what I’m going with. 6. Go to “Search” --> “Replace”. In the lower left corner of the replace tab there is a box called “Search Terms”. Select the option called “Regular Expressions” and uncheck the box next to it called “. matches newline”. The idea here is to use Regular expressions to match a pattern in the text and replace with something we want. However, we need to do this in steps and in the right order. Step 1: Find What = ".*track\s+(?=\d{2}\))|".*track(?=\d{2}\)) Replace With = track Explanation = matches quotes (“) followed by any number of characters (.*) until it finds the word track followed by any number of whitespace characters (\s+), but only if followed by 2 digits) (?=\d{2}\)). The next part signifies an OR (|). The OR is same thing but for a situation where there are no whitespace characters between track and the 2 digits. Putting track in the replace box and pressing “replace all” replaces "anythingTrack_ (the underscore is a space), and “anythingTrack with just track. This simplifies our job immensely. Example, watch how it changes: 12 8 4 4 2352 "Game - Name (Europe) (En,Fr,De,Es) (Track08).bin" 0 9 450 0 2352 "Game - Name (Europe) (En,Fr,De,Es) (Track 9).raw" 0 10 45000 4 2352 "Game - Name (Europe) (En,Fr,De,Es) (Track 10).bin" 0 Becomes 12 8 4 4 2352 track08).bin" 0 9 450 0 2352 "Game - Name (Europe) (En,Fr,De,Es) (Track 9).raw" 0 10 45000 4 2352 track10).bin" 0 Press the Replace All button and verify the above worked as expected. If not press the Back button in the toolbar (or edit --> undo) and figure out why. You can undo mistakes as long as you don’t save and close the file. This is why you made a backup copy of everything. Replace all just replaces all the matches in the currently selected tab. “Replace all in all opened documents”, however, replaces everything. Do that only when you’re sure this 5 step process works for your set. Step 2: Find What = ".*\(track\s+(?=\d{1}\)) Replace With = track0 Explanation = matches quotes (“) followed by any number of characters (.*) until it finds the word track followed by any number of whitespace characters (\s+), but only if followed by 1 digit) (?=\d{1}\)). This is for a situation where the format is "anythingTrack 1) instead of "anythingTrack 01). Example from step 1 Becomes… 12 8 4 4 2352 track08).bin" 0 9 450 0 2352 track09).raw" 0 10 45000 4 2352 track10).bin" 0 Press the Replace All button and verify the above worked as expected. Step 3: Find What = [^a-zA-Z0-9 .\n] Replace With = empty, we just want them to be deleted. So nothing is in the replace box. Explanation = This will match any special character except the ones after ^. Example from step 2 Becomes… 12 8 4 4 2352 track08.bin 0 9 450 0 2352 track09.raw 0 10 45000 4 2352 track10.bin 0 Press the Replace All button and verify the above worked as expected. Step 4: Find What = [ ]{2,} Replace With = space. Explanation = If there are 2 or more spaces in a line we replace with just one. Example from step 3 Becomes… 12 8 4 4 2352 track08.bin 0 9 450 0 2352 track09.raw 0 10 45000 4 2352 track10.bin 0 Press the Replace All button and verify the above worked as expected. Step 5: Find What = ^\s+ Replace With = leave empty, we want to delete the space at the begining of a new line. Explanation = This will match one or more whitespaces at the beginning of a new line and delete it. We can’t have a space there or SD Card Maker will error. Example from step 4 Becomes… 12 8 4 4 2352 track08.bin 0 9 450 0 2352 track09.raw 0 10 45000 4 2352 track10.bin 0 Press the Replace All button and verify the above worked as expected. 7. If everything proceeded correctly on this tab, repeat the same five steps, but press the button called Replace All in All Opened Documents after each step. This will do the same thing, but for every GDI all at once. This is the magic of REGEX! 8. You can now save all open tabs at once. Be sure they are ok first. Inspect many tabs first, to be sure they all are in the same format. Once you save there’s no going back! 9. My GDIs were formatted with the NoIntro naming convention. Someone better at REGEX than me may want to chime in with a more efficient method, but this worked for my GDIs. Other naming conventions may not work with the same steps. So, your mileage may vary. You may be able to modify the steps to work for you just by tweaking the expressions. As you get familiar with what they do you will eventually figure it out. It took me a week to get the above working, but I’m not a coder. So if I can do it, you can do it. 10. That just leave the tracks themselves. Download Regex Renamer. The previous steps involved more steps than this next part will, so it’s not more difficult in that regard. In fact this will be a breeze. It’s just repetitive. The reason it’s harder is because we have to apply changes one folder at time, for a few hundred folders. Moreover, Regex Renamer clears the Match field after each replacement. You just have to select it in the dropdown, however. It goes like this. Replace, select the next game folder, select the match function in the dropdown, replace, and repeat a few hundred times. This will take 10-20 minutes and aggravate your carpal tunnel syndrome, but once it’s done you won’t need to do it again. So lets just get it done. Open Regex Renamer and navigate to the your GDI folder, the one you have been modifying, not your backup. Select the first game folder in your list. This should still have the game name and we won’t change that. The tracks inside will be changed, but the folder name and GDI name don't need to be, if just inporting into SD Card Maker. You would only need to change the gdi to "disk.gdi" and the folder to something like "01", if you were building the SD card manually. Since we're using SD Card Maker to do that, we don't need to change them. Good thing too, otherwise it would be hard to know what game it is. Next locate the dropdown called “Numbering” at the top of the program window. In the dropdown change “pad” from 000 to 00. This makes it so our numbering replacement increment in two digits (track01, track02…and so on) instead of 3 (like, track001 which wouldn’t match what we did in the GDI). Match = .*(?=.bin|.raw) , this matches anything followed by .bin or .raw. Replace = track$# , this automatically replaces with Track and a 2 digit number that counts up from 01-99. Note the preview window on the right. It will show you what was matched and how it will be changed before you press Rename in the lower right hand corner. Be sure it’s correct before pressing rename. There’s no undo button and the changes are immediate. If you screw up you have to rename the files manually or restore from a backup. This is another reason I had you make a backup copy. The procedure is this. Press Rename, select the next game folder, select .+(.bin)/track$#.bin/ in the match dropdown (should be the first one down), check the GDI is not selected in the preview window, press Replace, then repeat for the remaining game folders. This goes pretty fast. It took me 10-20 minutes. My had cramped up, but it’s just repetitive clicking. Now your done. Whew! The GDI file itself doesn’t have to be named disc.gdi unless you want to manually create the GDmenu filesystem. SD card maker will import them correctly now. 11. Open SD Card Maker and press the plus button. Navigate to the GDI games folder containing all your game subfolders. In the upper right search box put in *.gdi and search. It will find all the GDIs. Select all your GDI files and press open to import them in. There should be no errors importing or when building the SD card now that we’ve curated them specifically for this software. A bonus of GDI vs CDI files is that they import faster. 12. If you want to add some CDI images, go ahead and import them now. 13. Press the “name” row in the window to sort the gamelist by name. If any are out of order, you can select it and press the arrow buttons on the right hand side of the program window to move them up or down. 14. When done, press save. You will have the option to customize the menu and rename items in the list. When done it will begin building the SD card for you. The first time, it has to copy over all the files. This can take a very long time for a full set - many hours. Once this is done you are ready to enjoy your GDemu. 15. Pat yourself on the back for a job well done and go play some Seaman! Conclusion and additional Thoughts: I wish that someone had done a writeup like I just did. It was very time consuming to complie the above tutorial. The biggest issue I had was whiping all my GDIs into shape so that SD card Maker would import and install the games on the SD card correctly. I struggled with Regular Expressions for week before I found the 5 step process above. Then another day for RegEX Renamer to get the BIN/RAW filenames right. If the SD Card Maker software were more forgiving this wouldn't be necessary. So...yeah it's a PITA. Now that it's done, however, I'm really enjoying it! The 3D printed part looks like it was meant to be there. GDI images look just as good as the GDROM games, but load a bit faster off the SD card, a nice upgrade! When I need to change discs, I can just get up and open it like normal. However, since there are no physical discs, I just press the button and the GDEMU will advance to the next disc automatically. This is a slick as it gets! Moreover, the Start + ABXY reset button combination will return me to the main menu where all my games are, without the need to get up and turn the console off/on. The original OSD menu is still easily accessable by exiting the GDmenu, so changing the clock and managing VMU memory is easily accessable. Overall, this is probably the best "Everdrive like" solution for Dreamcast. The menu is simple and clean. It looks better than the everdrive menu's I've seen. I just wish that you can press right and left to page up/down through the gamelist, like the everdrive. There is a open source project to build a new GDmenu, so maybe this will come in a future update. However, I don't know if mad sheep is ever planning to return to SD Card Maker with an update, so that may be a mute point. I'm happy with it as is! ...But I'm not done there! Next up? The DCHDMI Mod...which should be arriving soon!
-
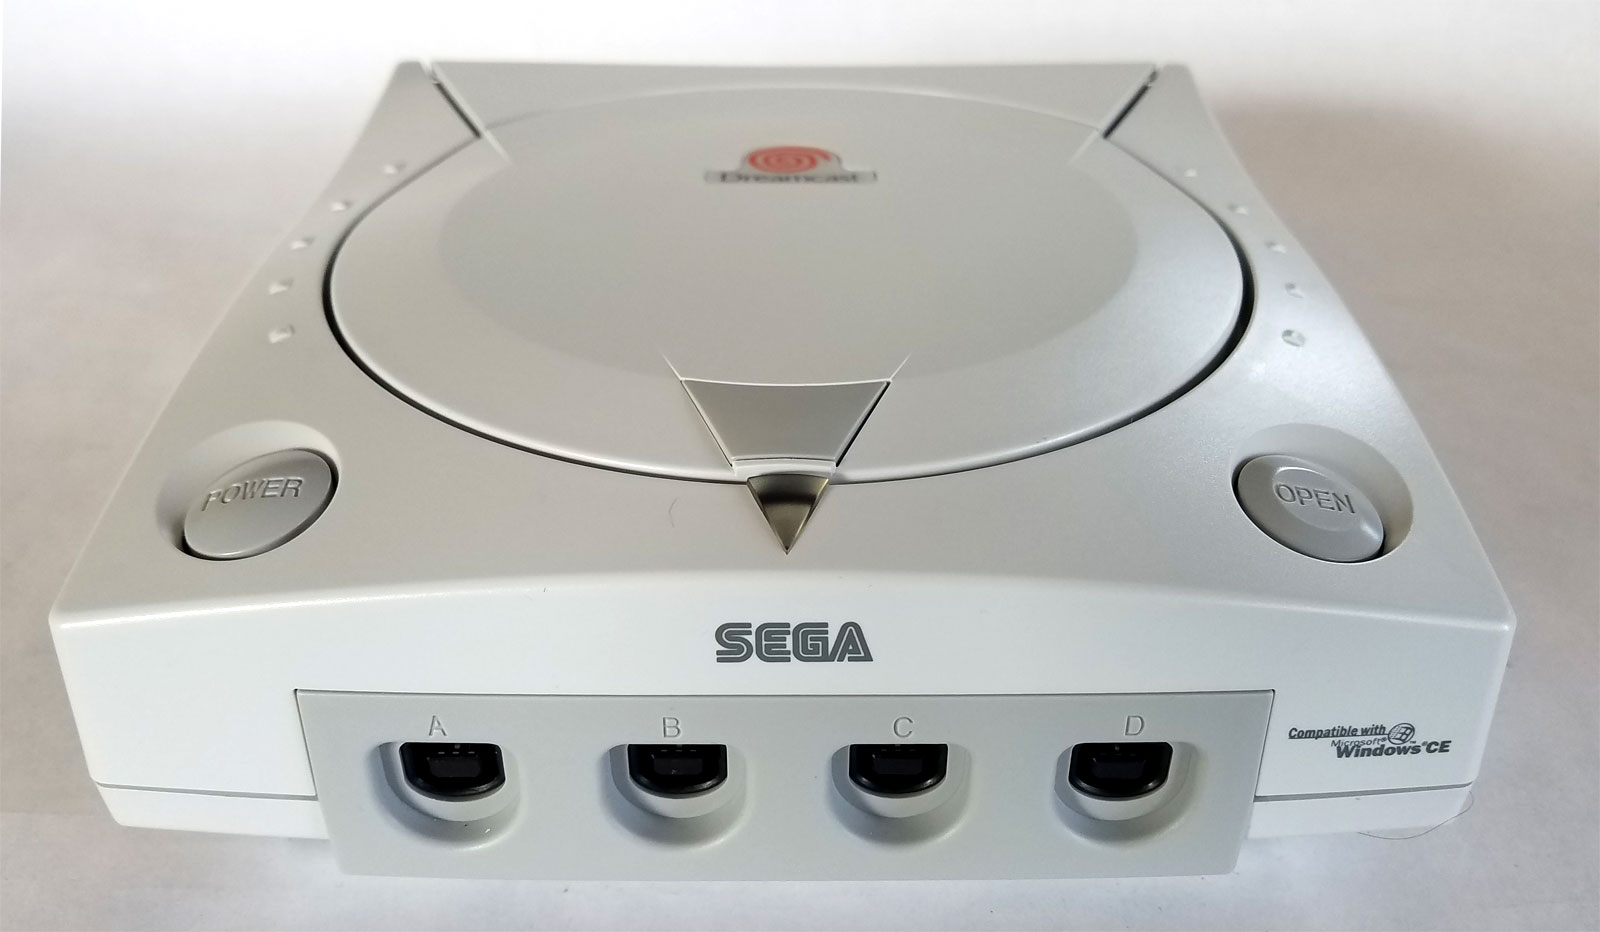
THE ULTIMATE SEGA DREAMCAST (ONLY THE BEST FOR SEGA'S BEST) Picture this. It's midnight on a Thursday and you are standing in line at the mall waiting for EB Games to open. Summer is almost over and fall is coming in the wind. Bill Clinton is still President, the economy is awesome, the Twin Towers are still defining the NEW York skyline, but the most exciting part of it all is that the doors just opened and the line has started moving. What is so important that it has you waiting in line at midnight? It's release day for the most advanced home video game console on earth! As it turned out it also became SEGA's swansong, but no one knows that yet. The SEGA DREAMCAST has everyone excited about the possibilities a 128-Bit console affords. SONY wouldn't release the Plastation 2 for over a year, Nintendo wouldn't release a successor to the N64 for more than 2 years, and there are rumblings that Microsoft would enter the game in just over a year too. SEGA was poised to own the space for a whole year. If you were excited about the next generation of consoles, SEGA was offering instant gratification. They dreamed big and went for it. I went with them. My dad and I got our Dreamcast on 9/9/99, release day. We got a copy of Sonic Adventure, Soulcaliber, and Blue Stinger. All of which are favorites of mine to this day. In fact I'm looking at them on my game shelf as I type this. My family was struggling during the 16-bit era. My Friend had the NES, cousin's cousin had the SNES, and my mom got us a SEGA Genesis. The SNES was something I only saw rarly, at get togethers or daycare. The Genesis was mine! Like many others, the Genesis was my defining console. Sonic was our jam! SEGA separated themselves as a clear and present danger for Nintendo's dominance of the Video game market after Atari crashed it. The Video Game wars were raging and I was living it up. The competition between Nintendo and SEGA had produced some of the finest games you'll likly ever see. The jump from 8-bit to 16-bit was amazing. I had seen the SEGA CD and 32x in the Toys R US, but couldn't get them. We only had enough money to live on and mom was the penny pincher. But Dad was the spender! He got the SONY PlayStation and we made the jump to 32-bit. That was a ride and a half and made me completely forget about SEGA. I just this year added the SEGA Saturn to my collection and have been enjoying a handful of games, it really was ahead of it's time. However, that was a bad thing back then because the game developers weren't given enough time to take advantage of the hardware and develop amazing 3D adventures until SONY had arrived on the scene with console sellers, like Crash Bandicoot. EDIT: As I look into this more, it's clear to me that SEGA ham strung them selves by not being as approachable to 3rd party developers as SONY was. Like Nintendo they structured deals with 3rd parties such that it limited potental profits had they developed for the Saturn or N64. This drove them to Develop instead for PlayStation. Whereas Nintendo had the capital and market share to withstand the loss of 3rd party development, SEGA did not. SEGA, like Nintendo always had great 1st party development, but was hemorrhaging money selling consoles at a loss with the idea that they would make the money back in software sales. Had they been friendlier to 3rd party developers and waited to released with a Sonic Adventure game bundled with the Saturn, I wonder how SEGA might have changed the video game landscape of today. But they didn't, the Saturn flopped, and they were loosing money for each Saturn they sold. This caused them to produce fewer consoles to limit the bleeding. The Saturn failed big in North America, due to lack of 3rd party support. Turns out, my dad made the right choice and I was lost in the world SONY created, just like so many other kids my age. Fast forward past the Nintendo's 64-Bit console craze and we arrive at SEGA's last chance to redeem themselves as a contender in the home console market. They went big this time, being the first to 128-bit graphics. Every doubling of Bits back then equaled exponential enjoyment of, and awe at, the video games made. Combine that anticipation with the prospect of a 1-2 year drought before the Gamecube, X-box, and Playstation 2, and everyone expecting SEGA's response to be HUGE!. This is why there was so much buzz around the launch of the SEGA DREAMCAST. SEGA's swansong console has solidified SEGA in my mind as a visionary in the video game industry. It had a modem, making it the first internet capable console. This was a hugely under appreciated facet to SEGA's forward thinking design, and had the developers and customers not been weary of the console after being burned by the Saturn, more AAA games and online multiplayer might have saved SEGA. Unfortunately the pioneers usually brunt the axe, Phantasy Star online was a showcase of the idea, but overall online multiplayer failed to gain traction because people were saving up for the PS2, X-Box, and Gamecube. SEGA's games didn't take full advantage, because they were still developing the tech. I wish online multiplayer in 1999 had matured to the point it had by 2002, but it didn't and the Dreamcast was overshadowed a year later by the launch of the PlayStation 2, then the X-Box, and finally the Gamecube. Microsoft's X-Box survived by benefiting from X-Box live, doing what I wish SEGA had been able to. SEGA gambled with being first, believing that forward thinking design, pioneering technology, and awesome 1st party games would carry their brand. History should credit them their due, but unfortunately they bared the burden of being in first place. Like so many others, they discovered that's not the best strategy for a race. Being first, having the best tech, taking risks, and being confident in yourself may be the American mantra of success, but it rarely equates to longevity. The industry and public needs to be with you. They tried to force the future before the future was ready. Nintendo, Sony, and Microsoft followed in SEGA's draft, waiting for the opportunity to take advantage. By then the industry and public were primed for the next generation console, but SEGA was spent. LAck of 3rd party support, loss of consumer confidence, and internal pressure had caught up to SEGA. They burned bright and fast. And like a supernova, they went out with a bang. They went big, taking on the machines that are NINTENDO and SONY, screaming in their face... ...I can't help but look back and feel a tragic miscarriage of timing and over-confidence conspired to bring down one of the greatest pioneers in the home console industry. Both the Saturn and the Dreamcast were top notch consoles that never reached their full potential. They failed for being released too soon, they were ahead of their time. SEGA should have learned from Atari's mistakes and embraced 3rd party development. That means a competitive licensing arrangement and enough lead time to allow for development and distribution. That was their recipe for success with the Genesis, and Nintendon'ts resistance cost them. That's not to say Saturn and Dreamcast didn't have great games, they did. Just not as many as SONY got. If there are any consoles more worthy of a AAA game developers attention for new games intended for release on a retro consoles, these would be my first choice. You could throw the Atari Jaguar in that discussion too, but that's another story. In preparation for the SEGA Dreamcast's 20 year anniversary I have been working on this project. For the past few months I have been on a hell of a ride. I would liked to have documented my steps along the way, but this project has been running simultaneously with my SNES repair thread and I wanted that one to be it's own show. Besides, it was a bit too early. Now I'm ready to start this new thread journaling my Dreamcast Modding Adventure... PART ZERO: IMPROVING PERFECTION So, how do you improve upon a perfect design? Well, you can't! I'm just going to fix some issues that arise after 20 years of use: Replace the aging Optical Drive which is prone to dying. Solid state lasers are dropping like flies after 20-25 years. The SEGA Saturn is experiencing this issue and so are Dreamcast's. You can replace the Giga Byte Rom drive (GDROM) with another, but run the risk of it doing the same thing. The better solution is an update to the modern era - returning to cartridge based media! In this case ,an SD Card by means of an Optical Drive Emulator, the GEDMU. Moreover, I want it to look like it was meant to be there, not a just big hole! Replace the Case Fan with a larger, quieter fan. As these age they get very noisy. Another thing to point out is that SEGA's OEM fan has a pull up resistor across the +5v (red) and TACH (yellow) line built into their fan. New PC fans don't. This causes an issue when you try to replace the fan. The Dreamcast will shut off during boot because it can't read the TACH signal coming from the fan. It thinks the fan has failed and shuts off power to prevent overheating. This will need a simple mod to fix. Wireless controller technology at the time the Dreamcast was released was crap, but not anymore. I will update the console to a modern bluetooth design. Wireless controller, wireless power on/off, while still retaining all the VMU and accessory support (tremor pack, memory cards, microphone, and etc). Even a wireless Gun Conn controller that will work with my modern Big Screen TV. Lastly, I will bring the Dreamcast into the modern era with a Fully digital to digital 1080p HDMI output via the DCHDMI mod. This will ensure that my Dreamcast is ready to power my gaming dreams into the future. And do so with all the features I'd expect from a modern Retro console today.
-
PART 9: Never give up, never surrender...It's VE Day B!t@hes! I am happy to report victory has been achieved! Thanks to a post on the SHMUPS forum I swapped the SuperCICs from my broken 1-chip and a working SNS-CPU-RGB-02. I mentioned that one of my goals was to use hot air to work off a chip with many fine pitch pins. This was my first try and it went well, thanks to a proper rework station, good flux, and solid pair of course. Well, the result was a proper boot up! No reset button needed. the game started up first try! To confirm the CIC was bad, I then tried the donor board. Weird thing was it too booted up fine. So the only explanation is a cold solder joint. I thought I reflowed all the chips on the board, but I must have missed that one. The CIC was fine. So that concludes it. I learned a lot about the SNES and had a bunch of fun trying to figure this one out. Ultimately it proved beyond me and I had to consult those with more experience than me. They came through and I'm the better for it. I pushed my soldering and reworking ability. It was close, but I'm glad I didn't give up. I feel nice bit of pride for seeing this one to the end. Moreover, the world has one fewer 1-chip SNES's going to the landfill. Actually, I bought 2 broken SNES's and both work now. That's awesome to me. That an otherwise novice can resurrect a busted console and keep it going on into the future. Yes! To put it simply...
- 24 replies
-
- 2
-
-
- snes black screen
- snes repair
- (and 1 more)
-
Lol...Fat chance! No no, I'm just a novice playing around at this stuff for fun. I do have mad respect for electrical engineers now, however. Especially reverse engineers! Holy $h!z it's much harder when you don't have schematics and service manuals to go off of. Nintendont vs Atari? Hands down the Atari 2600 is easier to troubleshoot thanks to service manuals and available schematics. The SNES? Nothing! If you had an issue they had you call a number and they did everything in house. Then they must have killed all the workers, because no one ever talked! Seriously, all the schematics on this I've found were done by enthusiasts. Nintendo keeps their secrets secret. The closest thing I've found is a Burn in Test Cart rom. Useful sure, but not a servicing flowchart complete with test diagnostics and helpful insights.
-
Yeah, maybe what I read was talking about emulating consoles, where multi threading isn't really as useful as clock speed...IDK. In any case, If the program wasn't designed from the beginning to take advantage of multiple cores, then it won't see any performance increase. Is it easy to future proof an app, where it can take advantage of as many cores as any future processor may have? Or would there likely be a limit, like a max of 8 or 16 or whatever? If so, then there won't be any universal benefit to legacy applications like clock speed was. Interesting video on the future of Intel and AMD vs ARM:
-
PART 8: Digging in...stubbornly I just got a new rework station with an iron, hot air, and a DC power supply. I went ahead and swapped U11 (a 3-prong SMD IC rama suggested to me on SHMUPS) with one from a working SNS-CPU-RGB-02. Went smooth as butter with hot air, way easier than I thought. SMD doesn't scare me anymore! Anyway, the same behavior was persistent on the 1-chip. Black screen on power up, reset button causes the game to start as normal. Also, the donor board still works fine. So U11 definitely wasn't defective...dang it! A word of caution though. If your working on a SNES always keep at least 1 screw in the power switch, to keep it secure. Or use some electrical tape on the bottom side to cover the pins. Like an idiot, I let it dangle and then I knocked it off the standoffs while testing. It must have shorted on the RF shielding. When I went to turn it on...nothing (no PWR LED). After a bit of self pity (I took a break), I confirmed I'd blown the pico fuse then replaced it. Easy fix, but it gets the mind racing. "Will I have to Recap again? Did I just send 12V strait to my CPU and blow it up? Did I just F#$K up my 1-chip." It's best to take a break and come back with a multimeter after the panic subsides and reason returns. If nothing else, it get the heart pumping! From the available schematics, datasheets, and from Fullsnes documentation I've pieced together the following: Note: I'm using "x" to indicate components I've already ruled out by either replacing with working units or I have confirmed operation with a multimeter, reflowing, swaping out, and etc. "-" means I don't know or haven't ruled out yet. Also, I'm not listing every capacitor or resistor. Just the major components. I did perform a recap, so that's already ruled out. Everything in the Power Circuit: x 10V AC/DC Adapter (Center pin -) x Barrel Jack Conn x 1.5A Pico Fuse x PWR Switch x 7805 Voltage Regulator Everything in the Reset Circuit: x Reset Switch - S-APU ("combines S-SMP, S-DSP, 64Kx8 Sound RAM, and possibly the NEC UPD6376 D/A Converter") x X2 (24.576MHz ceramic resonator that feeds into the S-APU. I replaced with one from a working donor board.) - S-CPUN A (combines CPU, PPU1, PPU2, S-CLK) - S-WRAM B x T529D (U11), "for resetting the system after detecting the voltage at the time of powering on". x Cartridge Slot pin 26 -Expansion Slot pin 19 - EDIT: I forgot about the SuperCIC chip (F411B). This is Nintendo's security chip that checks for another CIC in the cartridge to see if they match. If not it refuses to boot. This ultimately ended up being the issue (See part 9 below). I had "assumed" that if it were bad, it would refuse to allow the game to start regardless of the reset button being pressed. So I prematurely ruled it out. Turns out that a cold solder joint can cause this behavior. I must have missed that when I reflowed the chips on the board. Too bad, it really threw me for a loop. I may be missing stuff, but that's what I was able to piece together. I've been wondering about the initial PWR cycle. What I'd like to know is how it works, but there is little to no information out there. Just from observation, when you start any SNES you'll notice a flicker (I assume it's the Reset pulse), followed by a short pause before the game starts up. Mine doesn't flicker at all when I turn on the power switch. Just still black, no sync on my OSSC is displayed. The Sync doesn't happen at all until I manually press reset. Then it flickers and the game comes up like normal. So it's like there's no reset pulse on power on. So rama's suggestion on the SHMUPS forum sounded dead on point. That T529D (U11) is very suspect. Like rama said, it's job is to generate the reset signal after it "detects" power on (4.2v). It's DataSheet says that it's used as a "measure against erroneous issues at power on/off". I mean, bingo! That sounds like the right thing to check, but I've already confirmed replacing it doesn't fix the issue. So that suggests the CPU isn't ready to receive the reset pulse. In this thread rama points out that there is another reset signal generated by the S-APU that the CPU is "waiting for". I've read a bad APU can cause the system to hang (black screen), but I've not heard of the reset button fixing it. I did swap X2, 24.576MHz ceramic resonator that feeds into the S-APU, to rule it out. I also ran the Burn in Test Cartridge and it passed on everything, even though it sent my OSSC for a ride (kept dropping sync). Perhaps my APU is going bad, but it's not dead yet? But then, why would the test cart give it a pass? Same if the CPU or S-WRAM had issues? If my only way forward would be to try swapping the APU, then the SWRAM, and finally the CPU, perhaps it would be better to keep this board as a donor for when my working 1-chip goes bad. If I were to buy yet another for parts board off e-bay, it'll probably be an easier fix than this one. I would like to try my hand at replacing SM IC's, for the practice (that was the point of this purchase), but it's actually easier to get working a 1-chip off e-bay than it is to find donor boards (let alone specific chips). Go figure... I'm still not ready to surrender, but I may not have a choice. I'm willing to use hot air to remove the S-APU, S-WRAM, and CPU if I have to, but not if it means I have to destroy and easier to fix board in the process. I'm all for being persistant, but destroying a better unit is...wrong.
-
How many applications are even taking full advantage of 4 cores, let alone 16! From what I've read it's a PITA for devs to code multi threaded applications. We've already hit a thermal wall with frequency increases generating too much heat. Miniaturization is nearing it's limit too. So in the future, it's ARM and Multi threading that offer increases in performance. That must keep software developers up at night!
-
Good point! Solder fumes are toxic, and should not be breathed in. Problem is, unless you like to solder in 100 degree F heat, solder fumes will be drawn to your face by convection. It's caused by your body heat warming the air in contact with your skin, which rises just like heat from a fire. We're walking thermals. That's why on a still night the smoke from a campfire seems to follow you - because it is. Especially on cold nights. Yeah, all that's what I'm talking about. I too was using one of those for the longest time. However, when I was preparing to install the UltraHDMI mod in my N64, I decided to get a proper station. It was only a $50 Chinese cheapo, not a name brand. But it's really made all the difference. The one I just bought was $75 and has hot air, and a DC power supply as well. So that's got me covered for the modwork I've gotten into. Flux improves attraction and cohesion of the solder to the copper trace. You can reheat cold solder joints with fresh flux to renew them. That's what I did to my SNES. It saves me the trouble of removing the old solder with a wick and replacing with fresh solder. It makes it much easier to get the solder to stick and creates a stronger bond.

-
The secret is FLUX and a temperature controlled soldering station, not those 15-30W irons you get $10. They get too hot and damage things. Without flux your solder oxidizes into a brittle mass that wont melt. 340-Degrees C, a good tip and some flux is what you need to get off on the right foot. From there it's all technique. That's what YouTube is for, among other things. As a quick aside, I've seen many traces on my boards that were damaged by people using those cheap soldering irons. The copper amalgamates with the solder if you go much above 350C. Or they scrub with soldering braid too hot, which wipes/scratchs the trace off. Once it's dammaged, it's hard to get a good connection. The heat can melt the solder resist that keeps the solder on the trace, not on the ground plane around the trace. Once it's gone, It's easy to make a short. Overall, a $100 investment will get you a very decent (if cheap) rework station with a temperature selectable ceramic tip soldering iron, hot air gun, and even a DC power supply. This would make soldering MUCH easier. This is a must have if you're going to attempt to install a Dreamcast DCHDMI or N64 UltraHDMI mod. Anything more complicated than simply joining 2 wires will greatly benefit.
- 24 replies
-
- 1
-
-
- snes black screen
- snes repair
- (and 1 more)
-
Here's your positivity. I'm willing to forgive them for breaking my trust when they have earned it back. But they have to earn it. So let's just wait and see what happens. So far, what I've seen is pretty shady. Maybe they are holding it back to get it right. If that's the case, I get it. But if it flops, isn't supported for the long haul, and can't generate game development then I will not be surprised in the least. ..Oh yeah, I was trying to be positive...UM...ok! The controller does look cool!
-
Yes, I think that's a real possibility. DAMAGE CONTROL! Appease the backers and GET THE HELL OUT OF DODGE! ...with all the money... Hopefully the settlement SONY has to pay for removing OtherOS from the PS3 will deter ATARI from doing the same thing. Regardless, we should be weary of promises made by pathological lairs. ATARI can't be trusted.
-
Ideally, I feel that supporting these projects signals public interest for retro games. It may help renew the gaming industry's interest in preserving video game history, a role the emulation scene has traditionally filled. I can't see them ever doing so with the same attention to detail, but it would signal a good shift in thinking. One toward preservation, rather than neglect. Having said that, I have enough of these mini consoles already. Also, I don't think the industry cares about old games or feels loyalty to their aging demographic of nostalgic would be coustomers. This is a cash grab on the coat tails of Nintendo's sucess with the NESC and SNESC. That all.
-
Yeah, I thought that too at first. I went over the entire board thoroughly. I reflowed the 62-pin cart connector, all the fine pitch chips, and the clock crystals. I haven't tried reflowing or replacing the bazillion tiny SMD resistors/capacitors/diodes and etc on the bottom side of the board. That's a bit much! However, I did replace the electrolytic capacitors as well as the voltage regulator on the topside. At this point I'm confident the issue is a fault on one of the chips, rather than a bad connection. There's a 3 leg device with designation U11 involved in the reset/power circuit that I'm going to swap out. I have a few other working boards with that part. They are non 1-chip boards, so sacrificing one of them to restore a 1-chip makes sense. It's just I've been waiting on a hot air rework station to arrive that will allow me to lift chips without damage. It arrived today, so maybe this weekend I'll give it a try. I think I'll try it out on an old PC motherboard first, just for practice before the real thing. If nothing else this project has greatly improved my soldering skill. I feel comfortable taking on projects that I used to call it quits on. Those fine pitch legs on a CPU don't scare me anymore!