|
If neither of those of work for you, you can donate any amount by clicking here. |


shbon
-
Posts
132 -
Joined
-
Last visited
Everything posted by shbon
-
My config is the same apart from the line: AlsoLaunch=C:\Program Files\Visual Pinball\vpa1[1].1\VPA.exe Mine's AlsoLaunch=D:\Program Files\GameEx\vpauto.exe Maybe the same program, but try it? Do VP tables that don't use VPInMAME (i.e. old tables) close OK? Shaun
-
Yes, you can do that. (I was trying not to complicate the post any further!). By bending it round or creating a loop, you're just bulking up the wire a bit (effectively double thickness) which should have less chance of working loose. You can also do it at the IPAC end aswell. Alternatively, use slightly thicker wire... Shaun
-
Sort of why I stopped at a P4 2.8GHz. It's cheap second-hand, fast enough for GameEx niceities (and of course easily capable of running all the old-skool games and consoles I'm interested in with a lot to spare) but the CPUs not stressed at all and doesn't need heaps of cooling...a simple quiet CPU Fan upgrade. Also chose a nVidia 6200 GPU. Not very powerful, but it's got 256mb RAM, DX9 support and doesn't even need a fan! Choose carefully for your cabinet project... Shaun
-
I just earned 26GBP reading a few forum posts!!!!
-
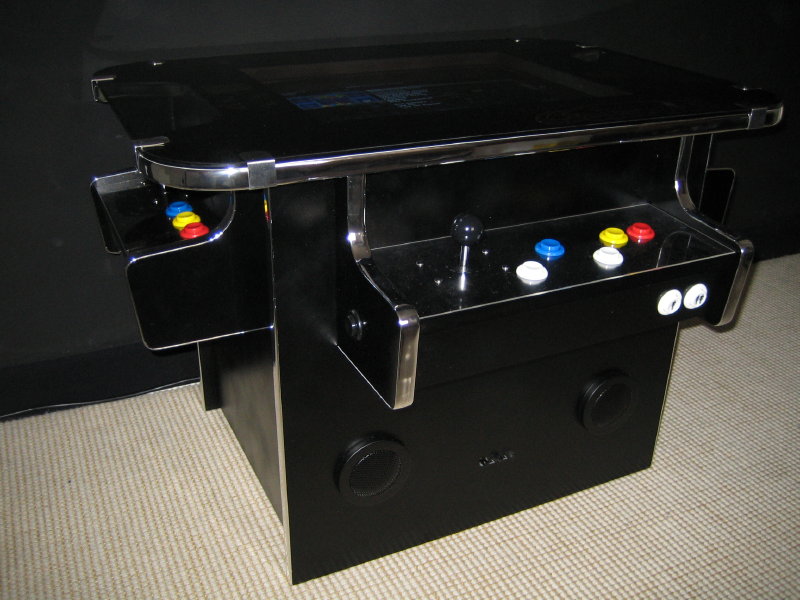
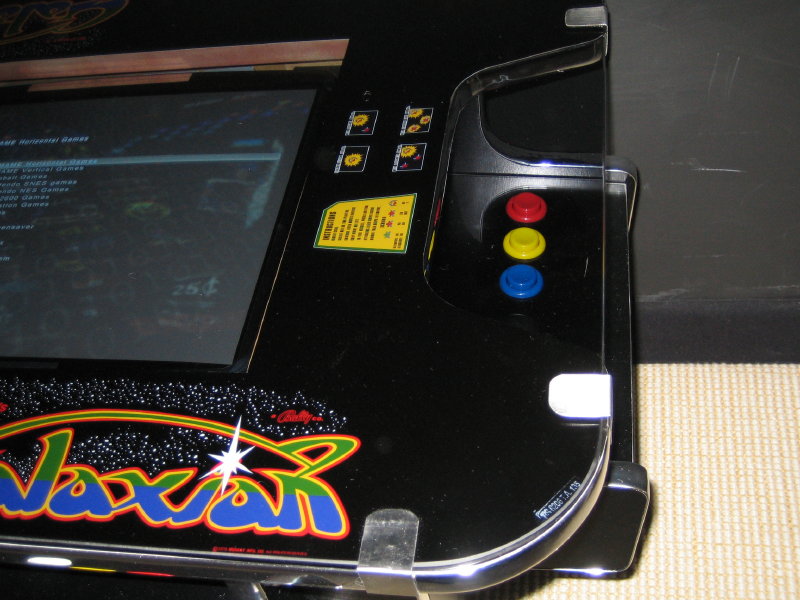
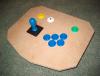
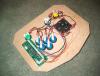
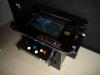
Hi katuuuz Hope this is pitched at the right level for you...CP Wiring 101! I went looking for some pictures! Refering to the first two pictures below, you'll see a prototype for a simple CP and its underside, showing the wiring to an IPAC (old style, but essentially the same as your one). Referring to the wiring picture: 1. Notice the BLACK wiring. It's connected to the GND terminal on EACH microswitch. Starting from the GREEN button notice how the black wiring goes in and then out of the nearest BLUE button, then in and out of the second blue button, third blue button etc...It then goes to the other buttons and then around the joystick microswitches. There's then a single black wire going to the IPAC. This is one example of a GROUND DAISY CHAIN. Connect this to the terminal GND on the IPAC by trapping the wire with the screw. Effectively all the GNDs are CONNECTED TOGETHER. 2. Notice the YELLOW wire at the WHITE Player1 button. It runs from the NO (normally open) terminal on the microswitch to the START1 terminal on the IPAC. Similarly, the yellow button's NO terminal is connected via an ORANGE wire to the COIN1 terminal on the IPAC. Infact, each button (switch) is connected from the NO terminal on the microswitch, via a single colored wired to the relevant terminal on the IPAC. Note: the NC (normally closed) terminal on the microswitches are never used. 3. The Joystick is done exactly the same way. It's four switches wired to 1RGHT,1LEFT,1UP,1DOWN (the PINK wiring) 4. I think you're going to use quick disconnect connectors (Red Lucar style in the UK) to connect the wires to the microswitches. To do this effectively, you'll need a wire stripper tool and a CRIMPER tool (picture 3 left hand tool) which are easily available from a DIY shop. To fix the wires into the connectors: After you've stripped about 1/4 inch of the plastic from the wire's end, you need to put the wire into the round end of the connector (from the back). Now notice the red dot at the top of the crimper tool. Put the connector between the jaws of the crimper tool and crush it (thus trapping the wire) using the grooves at the red dot. (You can see the crush mark on the red plastic area of each connector in picture 2). Practice it a few times... 5. For the ground daisy chain, at say the FIRST BLUE button, there are TWO wires, one COMING FROM the GREEN button and one GOING TO the second blue button. After stripping the wires, wind them both together and crush them in a connector with the crimper tool as you did before. 6. The wiring colors have no particular significance. It's often helpful to color-code wiring for ease of tracing. Black is generally used for ground contacts. Any old wire will do but if you're buying it, .22 gauge is about right. That's how you wire an IPAC! You then connect the IPAC to the PC via the cable that came with it (either a USB or PS/2 cable)! For the trackball, the buttons are wired the same way as above. You should download the Opti-PAC install documents from Ultimarc website to connect the trackball. It mentions a Happ trackball. Link the Opti-PAC to the PC using the supplied cable (USB or serial). Hope that helps and sorry if it's too basic for you. Shaun My CP picture source is here.

-
A big bunch of .ini files was added by Adultery not long ago, see the end of the User Submitted Configs thread... Shaun
-
What's an IPC file? I play my playstation games by converting them to ISOs (using CDRWIN) and using the command line given earlier. I don't need any before and afters using this method... Shaun
-
Should be OK just to let GameEx do it. I updated from 6.53 on my cab recently, no problems. I always take a copy of the stable GameEx BEFORE I do an update so that I can reverse the operation. Just copy the whole directory somewhere else. If it goes horribly wrong, delete and copy it all back! GameEx doesn't use the registry so this should work fine. I tend to do the same with MAME aswell. Don't want the cab out of action because you find a new bug nobody's reported yet... Shaun
-
Hi There Your command line for launching needs to include -nogui, for example: ePSXe.exe -nogui -loadbin "[ROMPath]\[RomFile]" Have a look in the docs\epsxe_en.txt for more information on configuring this emu. ePSXe is recognised as the best, also look at pSX which has very easy setup and no plug-ins to worry about... This site: http://www.emulator-zone.com/doc.php/psx/ rounds everything up for you. Shaun
-
Kyle Lindstrom's plans are very well documented and include CAD plans. They can be found here or on BYOAC... I used them as a starting point for my cocktail cab, also 90-something % done. We seem to have similar tastes aswell!! Nice upright cab BTW... Shaun


-
Thanks Headkaze. I hadn't seen this thread! It would have saved me some time tracing through the MAME code to find what I needed to change! No bad thing finding out what the code does through... Shaun That was my main point in mentioning this technique...it cures that symptom.
-
I know we probably don't read that many books between us (!), but I'd thought I'd tell you about a cracking book I've just finished reading about our beloved pastime... Despite its crass title - the Ultimate History of Video Games by Steven L. Kent © 2001 - is a very full account of the video games industry; from the earliest days of Higinbotham's interactive tennis game (1958) and Steve Russell's Spacewar at MIT (1961), through the first arcade video machine (Computer Space, 1971) and home console (Ralph Baer's Magnavox Oddysey, 1972) to the heydays of Pong, Space Invaders and Atari VCS (2600) and onwards through the rise and fall of the amusement arcade 'Golden Age' and the continued growth of Home Consoles. It's particularly strong at profiling the major players (Baer, Bushnell, Kassar, Arakawa etc.) and companies (Atari, Namco, Nintendo, Sega, Coleco etc.), from the various eras and is full of quotes and amusing anecdotes. Check it out if you're interested in this history and haven't read it already! Shaun
-
Pointed granted night!, but I've never seen the need to follow every 'u' build. I still use .106 and don't really have any reason to upgrade any time soon, especially using MAME in a dedicated cabinet. You are right that GameEx's "Bypass Disclaimer/Warnings" is easier to implement and does work adequately. I was just adding value to katuuuz's initial request. The added value was that you won't see the messages flash up. Also if you play something like Galaga regularly, you won't see the 'emulation not 100%' message EVERYTIME you play the game. I believe katuuuz is planning to use a cab at some stage, so I was just making him aware of the options! Shaun
-
If you want a more elegant solution and know C++ and don't mind doing the work, (and a know you don't mind doing the work!), you could compile your own version of MAME from the source. I editted the source and got rid of the disclaimer message, the not 100% emulated message ... infact all possible messages from EVER SHOWING and recompiled. It's only one line of code. Helps with the 'real cab' illusion. At the same time I did a P4 optimized compile for a couple of extra FPS on 'tough' games. If you want to get 'close to the edge' (again), try Mr Do!'s Compiling MAME help sheet. Regards Shaun
-
Welcome The text docs are portions of the GameEx\CONFIG\GameEx.ini file. I think most people edit the GameEx.ini directly although you can import configurations into the GameEx config app. Emulators section via Import Emulator. It's looking for one of those text files. To edit the INI directly: Open up that file in notepad or something and search for "[Emulator_1]" The lines between [Emulator_1] and [Emulator_2] represents an emulator configuration. The text docs you mentioned are the substitutions for these sections. You normally just replace the entire section (between [Emulator_1] and [Emulator_2] for instance) with the text file. Once you've made the wholesale change, you can use the GameEx config app to change individual elements to suit your configuration without further manual editting of the ini file. You'll still need to install the various emulators and get them working of course... If you're new to this type of thing, BACKUP your GameEx.ini FIRST!... Shaun *** Hey Tom, This guy is the 1000th Forum member! Does he get a prize or something!!!??? ***
-
Just to clarify, if you use the GamexConfig app and go to Display Settings and select let's say Arial from the dropdown list for both main font and title font and run GameEx, you get "Arial does not exist"?? What happens if you reinstall Trebuchet MS. Shaun
-
No sorry, haven't looked at Dreamcast. I did a search on this forum, found this: http://www.gameex.info/forums/index.php?showtopic=752 and this: http://www.gameex.info/forums/index.php?showtopic=3 Any use? Shaun
-
No worries, It can get to us all! I tried the sbaby config above and it works OK for me... Try copying that config directly into the CONFIG\gameex.ini file under an emulator number (changing paths where appropriate of course) Shouldn't need an external wrapper, the command line does work. If that doesn't work, what is happening? Details? Shaun
-
Just checking, did you do a a cut-and-paste on the command line above? The final directory entry is mis-spelled! Shaun
-
As Atari says, the information is in the Future Pinabll's help file! "future pinball.exe" /open "[rompath]\[romfile]" /play /exit Maybe I should have said that when I mentioned FP originally as an option... Sometimes it can take a few days for people to respond to help requests. This forum has a pretty good bunch of people who share their knowledge readily, but even here sometimes things take a while. Don't give up, do some more research and re-ask the question if you can't get anywhere. That's what I do! Shaun
-
If you've got a very fast PC and use a hi-res monitor have a look at Future Pinball. Fanastic graphics and different playing angles. But I've got a 2.4GHz P4-HT, 256Mb GeForce and 1Gb RAM and it's still choppy except in smaller resolutions/low detail settings... Otherwise it's VPinball/PinMAME, but bear in mind if you're building a cab that you can't do a 'seamless' integration with an FE. Some windows GUI elements can't be avoided, I believe. Don't know / can't find Hurdy Gurdy, but if it a 'classic', i.e. pre-ROM days (pre-1980s), you won't need PinMAME to play it. If you've got access to the graphics, you could built it yourself, using either FP or VP! Shaun
-
Hmm, still strange behaviour...it should 'just work'. Just out of interest, have you remapped any Stella control keys? You could try this work-around: Launch Stella GUI from XP, start any game and press TAB. Select the Input Settings button. What is 'Quit' set to? Default is Ctrl Q. Try mapping Quit to the Escape key. If I do this, I can set Map Keys to NO in GameEx and quit the 2600 game that way. It returns back to GameEx no problem... (See Index.html in stella\docs for the help file, section 9 for more info) Maybe that's an alternative that might work in your case? Shaun
-
That should do it!! Strange... Included my config (just verified working OK): Gameex section and stella.ini [Emulator_5] Enabled=True StartPageName=Atari 2600 Games TitleText=2600 StartPageLogo=2600 RomFilter=*.a26 RomsInFolders=False ROMPath=D:\Program Files\Emulators\Stella\roms SnapPath=D:\Program Files\Emulators\Stella\snap WorkingPath=D:\Program Files\Emulators\Stella MapKeys=True WaitBeforeKeys= SendKeys= ReplaceDash=True ReplaceUnder=True Capitals=True RemoveBrackets=True AlsoLaunch= ShowDesktop=False Debug=False MapFile= OLDatZip= Command=stella.exe "[ROMPath]\[RomFile]" TitlePath=D:\Program Files\Emulators\Stella\title BoxPath=D:\Program Files\Emulators\Stella\boxart LaunchBefore= LaunchAfter= CartPath=D:\Program Files\Emulators\Stella\cartridgeart configFile= DumbyValue= ExcludedFiles= CustomBackground= PlayMusic= PCGame= DATABASE= GamesIn7Zips= ; Stella configuration file ; ; Lines starting with ';' are comments and are ignored. ; Spaces and tabs are ignored. ; ; Format MUST be as follows: ; command = value ; ; Commmands are the same as those specified on the commandline, ; without the '-' character. ; ; Values are the same as those allowed on the commandline. ; Boolean values are specified as 1 (or true) and 0 (or false) ; video = gl dirtyrects = 0 ppblend = 77 gl_filter = linear gl_aspect = 1.7 gl_fsmax = 1 gl_lib = opengl32.dll zoom = 2 fullscreen = 1 center = true grabmouse = false palette = standard debugheight = 27 sound = true fragsize = 2048 freq = 31400 tiafreq = 31400 volume = 100 clipvol = true keymap = 90:0:0:0:0:0:0:0:0:87:83:0:0:0:0:0:0:0:0:0:81:0:0:0:0:0:0:0:86:0:0:0:0:15:0:0:0: :0:0:0:0:0:0:0:66:0:67:68:59:45:46:47:21:22:23:24:57:58:0:65:0:0:0:0:0:0:0:0:0:0 0:0:0:0:0:0:0:0:0:0:0:0:0:0:0:0:0:0:0:0:0:0:84:0:0:0:85:51:0:56:53:50:20:18:17:6 :19:63:64:0:0:61:62:48:0:52:0:0:0:49:55:16:54:0:0:0:0:74:0:0:0:0:0:0:0:0:0:0:0:0 0:0:0:0:0:0:0:0:0:0:0:0:0:0:0:0:0:0:0:0:0:0:0:0:0:0:0:0:0:0:0:0:0:0:0:0:0:0:0:0: :0:0:0:0:0:0:0:0:0:0:0:0:0:0:0:0:0:0:0:0:0:0:0:0:0:0:0:0:0:0:0:0:0:0:0:0:0:0:0:0 0:0:0:0:0:0:0:0:0:0:0:0:0:0:0:0:0:0:0:0:0:0:0:0:0:0:0:0:0:0:0:0:0:0:0:0:0:0:0:0: :0:0:0:0:0:0:0:0:0:0:0:11:12:14:13:70:72:76:69:73:9:10:3:4:5:6:7:8:79:77:78:80:0 0:0:0:0:0:0:0:0:0:0:0:15:0:0:0:0:0:0:0:0:0:0:0:0:0:0:0:0: joymap = 90:15:0:0:0:0:0:0:0:0:0:0:0:0:0:0:0:0:0:0:0:0:0:0:0:20:0:0:0:0:0:0:0:0:0:0:0:0:0 0:0:0:0:0:0:0:0:0:0:0:0:0:0:0:0:0:0:0:0:0:0:0:0:0:0:0:0:0:0:0:0:0:0:0:0:0:0:0:0: :0:0:0:0:0:0:0:0:0:0:0:0:0:0:0:0:0:0:0:0:0:0:0:0:0:0:0:0:0:0:0:0:0:0:0:0:0:0:0:0 0:0:0:0:0:0:0:0:0:0:0:0:0:0:0:0:0:0:0:0:0:0:0:0:0:0:0:0:0:0:0:0:0:0:0:0:0:0:0:0: :0:0:0:0:0:0:0:0:0:0:0:0:0:0:0:0:0:0:0:0:0:0:0:0:0:0:0:0:0:0:0:0: joyaxismap = 90:13:14:11:12:0:0:0:0:0:0:0:0:0:0:0:0:0:0:0:0:0:0:0:0:0:0:0:0:0:0:0:0:18:19:16: 7:0:0:0:0:0:0:0:0:0:0:0:0:0:0:0:0:0:0:0:0:0:0:0:0:0:0:0:0:0:0:0:0:0:0:0:0:0:0:0: :0:0:0:0:0:0:0:0:0:0:0:0:0:0:0:0:0:0:0:0:0:0:0:0:0:0:0:0:0:0:0:0:0:0:0:0:0:0:0:0 0:0:0:0:0:0:0:0:0:0:0:0:0:0:0:0:0:0:0:0:0:0:0:0:0:0:0:0:0:0:0:0:0:0:0:0:0:0:0:0: :0:0:0:0:0:0:0:0:0:0:0:0:0:0:0:0:0:0:0:0:0:0:0:0:0:0:0:0:0:0:0:0:0:0:0:0:0:0:0:0 0:0:0:0:0:0:0:0:0:0:0:0:0:0:0:0:0:0:0:0:0:0:0:0:0:0:0:0:0:0:0:0:0:0:0:0:0:0:0:0: :0:0:0:0:0:0:0:0:0:0:0:0:0:0:0:0:0:0: joyhatmap = 90:0:0:0:0:0:0:0:0:0:0:0:0:0:0:0:0:0:0:0:0:0:0:0:0:0:0:0:0:0:0:0:0:0:0:0:0:0:0:0 0:0:0:0:0:0:0:0:0:0:0:0:0:0:0:0:0:0:0:0:0:0:0:0:0:0:0:0:0:0:0:0:0:0:0:0:0:0:0:0: :0:0:0:0:0:0:0:0:0:0:0:0:0:0:0:0:0:0:0:0:0:0:0:0:0:0:0:0:0:0:0:0:0:0:0:0:0:0:0:0 0:0:0:0:0:0:0:0:0:0:0:0:0:0:0:0:0:0:0:0:0:0:0:0:0:0:0:0:0:0:0:0:0:0:0:0:0:0:0:0: :0:0:0:0:0:0:0:0:0:0:0:0:0:0:0:0:0:0:0:0:0:0:0:0:0:0:0:0:0:0:0:0:0:0:0:0:0:0:0:0 0:0:0:0:0:0:0:0:0:0:0:0:0:0:0:0:0:0:0:0:0:0:0:0:0:0:0:0:0:0:0:0:0:0:0:0:0:0:0:0: :0:0:0:0:0:0:0:0:0:0:0:0:0:0:0:0:0:0:0:0:0:0:0:0:0:0:0:0:0:0:0:0:0:0:0:0:0:0:0:0 0:0:0:0:0:0:0:0:0:0:0:0:0:0:0:0:0:0:0:0:0:0:0:0:0:0:0:0:0:0:0:0:0:0:0:0:0:0:0:0: :0:0:0:0:0:0:0:0:0:0:0:0:0:0:0:0:0:0:0:0:0:0:0:0:0:0:0:0:0:0:0:0:0:0:0:0:0:0:0:0 0:0:0:0:0:0:0:0:0:0:0:0:0:0:0:0:0:0:0:0:0:0:0:0:0:0:0:0:0:0:0:0:0:0:0:0:0:0:0:0: :0:0:0:0:0:0:0:0:0:0:0:0:0:0:0:0:0:0:0:0:0:0:0:0:0:0:0:0:0:0:0:0:0:0:0:0:0:0:0:0 0:0:0:0:0:0:0:0:0:0:0:0:0:0:0:0:0:0:0:0:0:0:0:0:0:0:0:0:0:0:0:0:0:0:0:0:0:0:0:0: :0:0:0:0:0:0:0:0:0:0:0:0:0:0:0:0:0:0:0:0:0:0:0:0:0:0:0: paddle = 0 sa1 = left sa2 = right joymouse = false p1speed = 50 p2speed = 50 p3speed = 50 p4speed = 50 pthresh = 600 showinfo = false ssdir = D:\Program Files\Emulators\Stella\snap\ ssname = romname sssingle = 0 romdir = D:\Program Files\Emulators\Stella\roms\ rombrowse = 0 lastrom = H.E.R.O. (1984) (Activision) [!] modtime = 297905301220743120 tiadefaults = 0
-
Thanks for the quick turnaround! 1,2 and 4 check off fine in 6.63. Re: 3 I've specified a separate MAP file in the emulator config section for my pinball setup. This is in addition to the defaulted one that seems to get set automatically (name emu_1.map) in DATA. I think the main list is using my specified map file, but the last played doesn't know about this and is only using the one in DATA. I reckon if I copy my MAP file over the top of the default one in DATA it would correct the problem, but just pointing it out... [EDIT] Tried that, but it didn't make a difference. It just appears the last played six at the top doesn't have any name mapping code...[EDIT] [EDIT]If I switch on Most played, the pin tables again are shown without any name mapping[EDIT] Cheers Shaun