|


gryhnd
-
Posts
136 -
Joined
-
Last visited
Content Type
Profiles
Forums
Events
Downloads
Store
Articles
Everything posted by gryhnd
-
I'm very, very sorry to hear this. Stay strong.
-
Thanks. The surface is offset with an extra 10" overhang extending over the doors of the cabinet (what I call the front). This is so there's enough room to "belly up" with bar stools, watch the games, eat, use as a desk of sorts when needed, hold food during parties, etc. This set up will be for vertical games, so each gamer will be sitting on the L/R of the cabinet where the control panels will be installed. Clear as mud? edit: controls not installed into the surface, they'll be traditional style coming out the sides.
-
The bolts glued up overnight, and I decided a few minutes ago it was time for the acid test. I bolted the monitor down: Prayed, and with the help of my 9 year old to shout directions to guide the monitor into the cutout, I flipped her over. At which point the shielding, which I couldn't budge when I wanted it to, began slipping right off the whole damn thing. Flipped it back over, two carefully applied screws, another prayer and.... Voila! Nothing other than the 4 corner tabs on the monitor are holding it in place. They are much stronger than I anticipated. Never having done this with a monitor before, are they designed to be able to hold the entire weight? Anyone? Bueller? And finally a shot of it from inside. I intend to leave it like this most likely for the next 24-48 hours and just see what happens to the butcher block top (warp?), the bolt-blocks, and the monitor tabs. PS - If my updates are too numerous, I'll cut back for a while.
-
Welcome, Telomere. Biotech?
-
I'm having second thoughts about gluing T3 strips to the B.B. top. I'm concerned that the strips will lock down the top from normal expansion and contraction due to humidity changes, causing more problems. Now I'm pondering the idea of just taming any potential cupping by building a supporting frame around the monitor which is screwed into the top, and then the cabinet surface underneath. That should keep any vertical movement to a minimum, and allow horizontal movement by slotting for the screws. Sorry...thinking out loud. So I've now attached the monitor mounts, and I'll let them glue up overnight at least before I get to anything else.
-
Picked away at a few things this morning before the family arose. Started with trimming off the excess table surface to make it rectangular, and used the trimmed portion as a template to round the corners: A test fit of the monitor showed I was a little tight on the tolerances for the recessed area, so I had to reroute it a bit bigger. Easier to take material off than have it be too big! And now she fits nicely: I did discover yesterday that the table top was starting to cup a little bit due to removing the material for the monitor. I'll be stabilizing that with some strips of T3 plywood which will also help with the weight the hanging monitor will add. Last thing I did for the morning was to rip 4 corner blocks for the monitor mounts, recess their bolt heads, and epoxy those bolts. Once they dry the block+bolt assemblies will be glued and screwed into position.
-
PDQ on the Q.T., K? OMG gtg ttyl, k? ;-) Sorry. Couldn't help myself. That sure was a ton of abbreviations in there and it made me LOL.
-
Thanks for the kudos guys. Last night I managed to cut out the display zone, and route out a recessed area for the non-display part of the monitor to nestle in to. This means these pics are of the underneath of the butcher block surface. Later I'll route out another smaller recess 1/4" deep on the top side for the glass to set flush in (I'm not covering the whole surface in glass). These are rough cuts...no sanding, filing or other work done yet.
-
Auto Hot Key. I see Tempest recommends Xpadder. I don't use it, so I didn't think of that one. Looks like a better match at first glance.
-
Not being AHK fluent...but would AHK be able to get him over the hump for now?
-
Next up will be cutting and routing the table top for the monitor. Hopefully sometime this week.
-
Step 5: cut the top of the original cabinet to allow the monitor electron gun to pass through. Eventually the monitor will be supported and height adjusted by either-or-both attaching to the butcher block, or building a support structure underneath. Template for the cutout: And the dry fit (doors on right-side up now!): Because the monitor protrudes into this easily accessible space, I opted to leave all the shielding on.
-
Step 4: strip the monitor of its cover and bezel. Was a bit more complicated that originally planned thanks to hidden screws that necessitated removing some of the shielding in order to locate. And a quick power-check to be sure I didn't mess anything up during disassembly:
-
Step 3 was to build a dolly and attach the island to it. We want the island to be mobile for various reasons. Two lockable swivel casters and two fixed casters. and now with the butcher block top sitting on top for a quick check. The top will be cut down soon to be rectangular.
-
Step 2 was to construct a door-like panel to fill in the space above the existing doors. The extra Z-cabinets were sacrificed. I ripped down their doors, resized and reassembled them: The doors on these z-cabinets to the right of the old store-bought arcade: were transformed into: The panel will be held on using super strong magnets so it can be removed completely for free access to the space where the monitor, CP wiring and encoder, etc will be. The two holes upper left are from the original door hardware. They'll be mostly hidden by the top overhang, and I'll fill them in at some point anyway.
-
Step 1 was to build up the carcass of the over-fridge cabinet vertically using the fridge side panels: (oops...doors on upside down here!)
-
Sorry, this thread isn't about pina coladas or daiquiris! I thought I'd throw out some of my progress on my Gameex cocktail cab build. It's not going to be in the traditional style. Recent parties in our new media room (80% complete) made us realize we needed more surfaces for placing drinks, snacks, etc. when we have a large crowd. We decided a small island would be the best option. *I* decided building in the cocktail arcade would be the b@lls, and that it would be set up for vertical games (already having two upright horizontals). Thank goodness I have an understanding wife. Since we wanted this to look as much like a proper kitchen island as possible, and not your classic vinyl-wood and be-stickered cocktail cab, I decided to use a few left overs from the cherry kitchen cabinets I installed in the media room earlier: an over-the-fridge cabinet, two tall fridge side panels, and an upper and lower Z-shaped cabinet. The side panels were cut down and used to build up the sides of the fridge cabinet. The upper z-cab sacrificed its door to to be redesigned into a flat panel. All the cabinetry came from a kitchen design showroom when they sold off a discontinued line's floor models for next to nothing. I found a butcher block style table top on Craigslist for the island surface. Arcade parts came far and wide: Craigslist for a beauty of a 22" CRT, Groovy Game Gear for buttons, encoder, joys and spinner, eBay for other goodies. Xgaming for the trackball. Build pics to follow...
-
Rubbish? Dude...one man's rubbish is another man's treasure. Looks great!
-
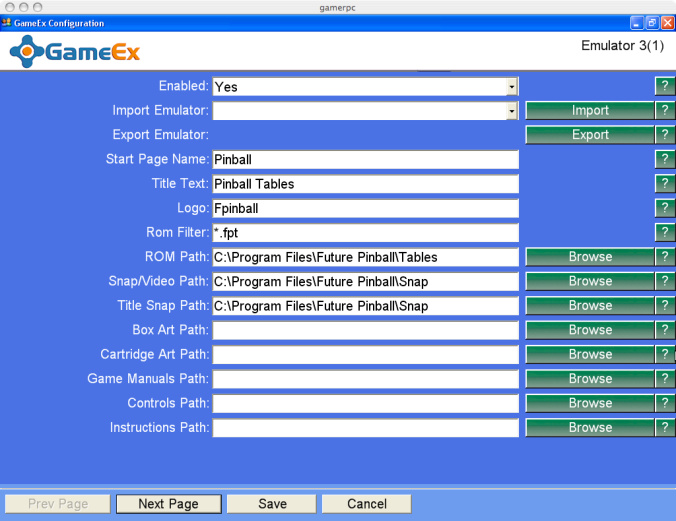
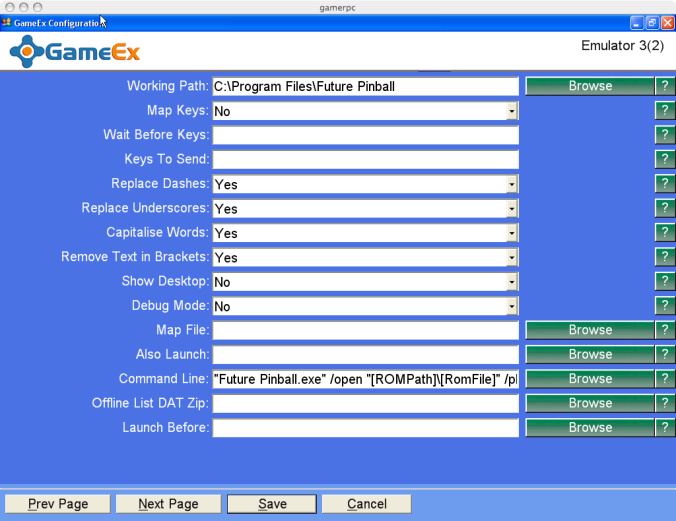
Well, I do not have mine zipped (didn't see the need), but FWIW here is my FP config if it is of any asistance. See attached.
-
Er...what's the problem? The USB isn't being recognized? (sorry...low blood sugar right now)
-
Cloning from a smaller drive to a larger drive usually isn't an issue. Otherwise, spend another $20 and just buy a PCI SATA card to expand your options :-)
-
there's probably an easier method that this, but if AHK allows you to call shortcuts, you can make a shortcut for TC and set its attributes so it runs full screen.
-
I'm 99 44/100% certain this is caused by the same root issue many people have with HTPC setups and HDMI, and it royally ticks them off. When the connection is severed to the video card, whether it is because you switched sources or left the PC on and turned the display off, the video card no can longer tell what it is connected to. One of three things happens: 1) nothing, the video card doesn't care 2) resolutions/color depth changes...often to a default level 3) black screen that won't recover until reboot.5 I personally get #3 on rare occasion with my nVidia card runniing DVI-to-HDMI, but most of the time I have no issues because I try and remember to turn off my PC first, then power everything else down. Then the reverse, with the PC being last. In your case the mid stream res change is probably causing Dx to barf. This is my semi-educated guess. Did you make sure all your drivers are up to date too for video. Are you behind on Dx patches, .Net update, etc? Anyway, there are gizmos out there that learn the resolution, etc of your display and then continue to fool the video card into thinking it is attached. I can't remember what it is called at the moment...DVI-something or other.
-
What about an app that delays loading of programs during startup? That way you can just have gameex load a little later in the queue. A quick google search turned up http://www.jockersoft.com/english/startupdelayer_index.php Never tried it, no connection.
-
Hail Mary: Maybe you have a bad video in the mix?