Jump to content

All my products and services are free. All my costs are met by donations I receive from my users. If you enjoy using any of my products, please donate to support me. My bare hosting costs are currently not met so please consider donating by either clicking this text or the Patreon link on the right.

Patreon

Search the Community

Showing results for tags 'guide'.

  • Search By Tags

    Type tags separated by commas.
  • Search By Author

Content Type


Forums

  • News
    • News
    • Convert-It News and Updates.
    • PinballX - News and Updates
    • Touch-Play - News and Updates.
  • Convert-It
    • Convert-It Support
    • Convert-It News and Updates
  • GameEx
    • FAQs, Guides, & Other Useful Information
    • General
    • User Projects
    • GameEx Media Projects
  • PinballX
    • FAQs, Guides, & Other Useful Information
    • General
    • User Projects
    • PinballX Media Projects
    • XDMD - DMD Display Library
    • News and Releases
  • Touch-Play
    • FAQs, Guides, & Other Useful Information
    • General
  • GameEx Evolution
    • FAQs, Guides, & Other Useful Information
    • General
    • Emulator Support
    • GameEx Evolution Media Projects
    • Plugins, Addons, Wrappers, etc.
  • VPDB
    • VPDB General Discussion
    • VPDB Feature Requests
  • Spesoft Free Products and Applications
    • SlingFront - SlingBox HTPC Front End
    • MAME Screensaver
    • MNGer - MNG Player
  • Hi-Score Competitions
    • GameEx Hi-Score Competition
    • The Arena
  • Gamer's Tavern
    • Social Club
    • Gamer Rigs
    • Buy - Sell - Trade
  • Spesoft Web Sites and Projects
    • Games Database
  • The UK Retro Gaming Club's Topics
  • USA CLUB's Post a pic of your arcade setup.
  • MacOSGaming's Topics

Calendars

  • Community Calendar
  • The UK Retro Gaming Club's UK Retro Gaming Events

Categories

  • Official Repository - GameEx
    • AddIns
    • Plugins
    • Themes
    • Emulators
    • Databases
    • Data Files
    • Utilities
    • Extensions
    • Themes (Evo)
  • GameEx Installs
  • PinballX
    • PinballX Install
    • Visual Pinball Tables
    • Visual Pinball Install
    • Documentation & Tutorials
    • UltraDMD Install
    • Wheel Images
    • Topper Videos
  • Images, Media and Sounds
    • Backgrounds
    • Bezels
    • Logos
    • System Images
    • Themes
    • Sounds
    • 3D Models
  • Apps, Configs, Map Files, Wrappers, and Plugins
    • Apps
    • Config
    • Plugins
    • Sounds
    • Backgrounds
    • Apps-Config-Map Files-Plugins
    • Databases & Management Tools
    • Other graphics and media
    • Map Files
    • Wrappers
  • Spesoft Applications
  • Database and Management Tools
    • Databases
    • DB Management Tools
  • Touch-Play

Product Groups

  • Packages
  • GameEx, PinballX and Spesoft Products. Make a donation.
  • Convert-It

Find results in...

Find results that contain...


Date Created

  • Start

    End


Last Updated

  • Start

    End


Filter by number of...

Joined

  • Start

    End


Group


Instagram


MSN


PSN


Twitch


Twitter


YouTube


Website URL


Xbox Live


Yahoo


Location


Interests

Found 6 results

  1. If PinballX crashes and you lose your mouse pointer, the best approach is to attempt relaunching PinballX and then close it properly. To accomplish this using only your keyboard, proceed with the following three steps. Step 1: Open search bar Press the Windows Key Step 2: Launch PinballX Type 'PinballX' (without the quotes) and press enter Step 3: Close PinballX Press ALT-F4 to close PinballX sucessfully If PinballX is still crashing, or your mouse pointer does not appear after PinballX has closed successfully, the next steps will guide you on how to restore your mouse pointer using only the keyboard. Step 1: Open Settings Press Windows Key + I to open the Settings menu. Step 2: Navigate to Devices Use the Tab key to move through the options until “Devices” is highlighted (bluetooth and devices in Windows 11). Press Enter to select it. Step 3: Go to Mouse Settings Use the Tab key again to navigate through the options on the left side until “Mouse” is highlighted. Press Enter to open the Mouse settings. Step 4: Change the Mouse Pointer Use the Tab key to navigate to “Additional mouse options” and press Enter. In the Mouse Properties window, use the Tab key to navigate to the “Pointers” tab. Press Enter to select it. Use the Tab key to navigate to the “Scheme” dropdown menu, and use the Arrow keys to select a different pointer scheme. Press Enter to apply the changes. Step 5: Apply and Save Use the Tab key to navigate to the “Apply” button and press Enter. Then, navigate to the “OK” button and press Enter to close the window.
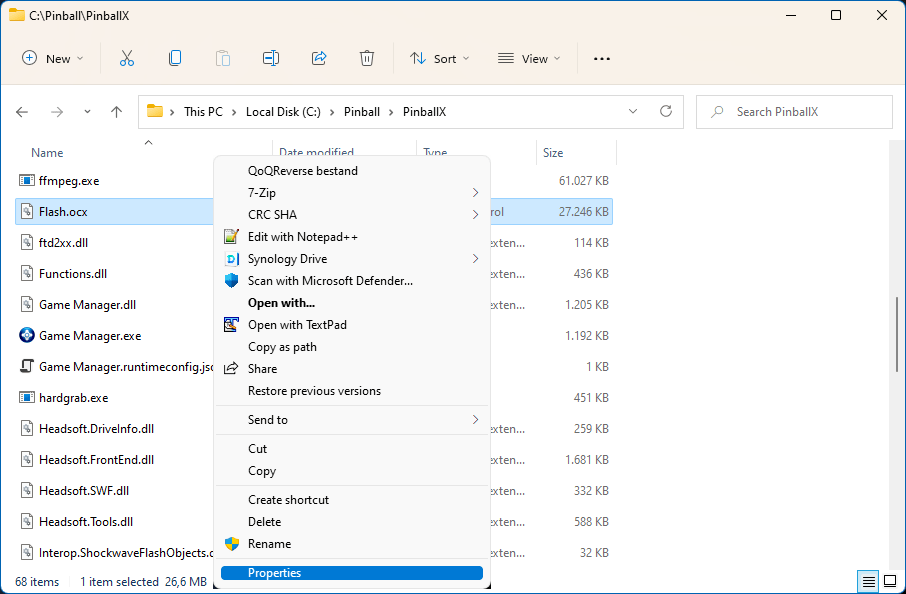
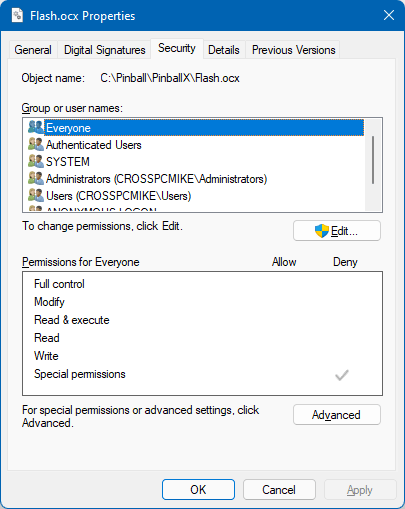
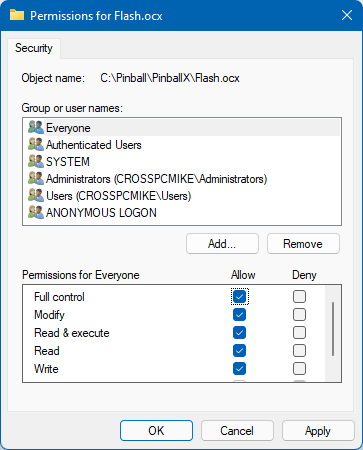
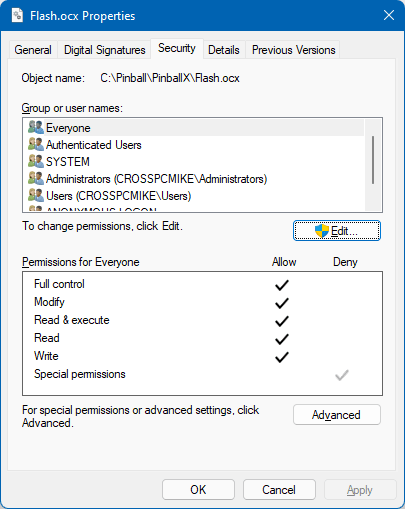
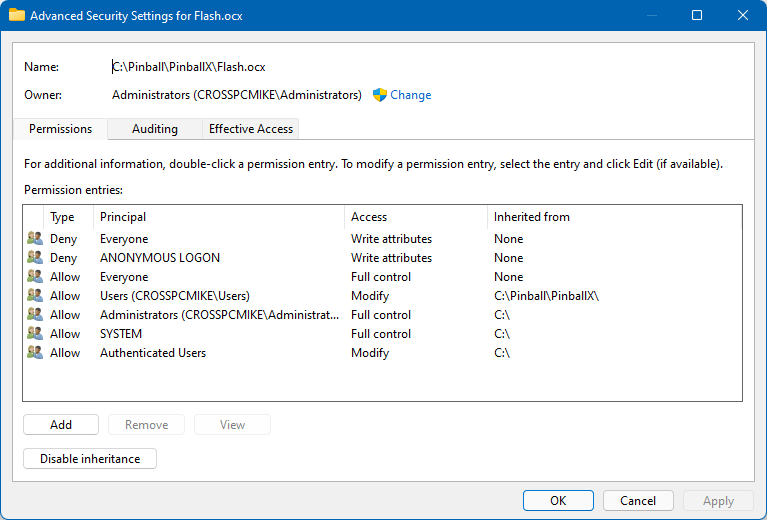
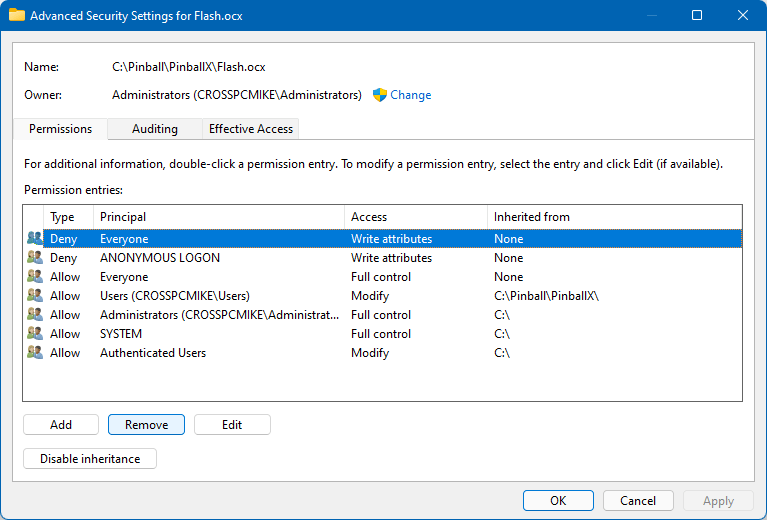
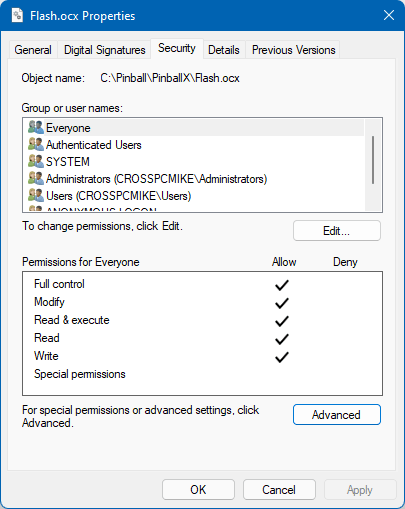
  2. When you need to remove the flash.ocx ,because your log file shows: 01:21:02.14 10/26/1985: Please try deleting flash.ocx in the installation folder and then reininstall PinballX. 01:21:02.14 10/26/1985: You may need to change security properties on the file. 01:21:02.14 10/26/1985: If PinballX does not initialize you should address this issue. It could be a difficult thing to remove the file. I hope this tutorial will make it easier. Navigate to your PinballX folder via the windows explorer (My example is in c:\pinball\PinballX, but could be installed in another drive/folder) and locate flash.ocx. Right click on it and select Properties Click on the security Tab and select Edit In the Permisissions for FlashOCX, make sure Everyone is selected And click on the Allow Full Control Click Apply and click OK after that Now click on Advanced There will be 2 entries for Everyone. Select the Deny Everyone and click remove Click again on Apply and click OK Click OK to close the window Now you are able to delete the Flash.ocx file
  3. One thing i've always loved about GameEx is all the little features you discover that may at first not seem obvious to you. MAME custom lists may well be one of those features! I've only recently discovered them myself and now can't live without them. So what are they? Well, you know all the various lists you can enable in the MAME section of GameEx, for example: Atari Games, Classics, Vertical Games etc etc? Well you can make your own! "Really?! Well stop babbling and show us how!" Sure thing For this guide i will be using our High Score Competition custom MAME list as an example. You can grab a live updated version anytime, here. As you can see it looks quite simple, and it really is! Let's break it down: [FOLDER_SETTINGS] | | This section must be included,RootFolderIcon = cust1.ico | but is not important. Leave as is.SubFolderIcon = cust2.ico |[High Score Games] | This is the Title of your list as it will appear in GE. It can be anything you like! <--It's important to leave this gap!1944 |anteater |arkanoid | Your game list! Just list the roms you would likebankp | included in your list, one on each new line. The onlyblazstar | thing to remember here is use the ROM name - GameExbloodbro | will take care of formating it for you into nice Titlesbombjack |You can create your lists with Windows Notepad (or any decent text based editor) using the above format, BUT make sure you save it with the .ini extension and NOT .txt (ie: myubermamelist.ini). The filename can be anything you like but obviously it's good practice to give it a name that makes sense to you.Great! Now what? Now you need to tell GameEx where your lists are! You should put all your lists into one folder. I have a folder in my MAME directory called "customlists", but they can be anywhere you like. Just make sure they are all together in that one folder. Next, load the GE Setup Wizard> Custom> MAME Settings. Find Custom Lists Path, and browse to the folder containing all your lists: Finally, boot GameEx. Go into the MAME section and hit Update List. Wait for it to do it's thing and then back out of the main game list (it will load the All MAME Games list automatically when it's finished updating) and BOOM! There is your snazzy custom list waiting to be browsed If i've not explained anything clearly just leave a reply and i'll do my best to assist you. Now get creating them awesome lists! For your pleasure, some lists that i have created: Dazzle's MAME Shmup Hitlist (WIP): thedazzlelist.ini The GC-Wolfman Shmup Comp 2014: wgcshmuptourney2014.ini The Internet Gaming Bash of the Year 2014: IGBOTY2014.ini Monster Mash 2014: monstermash2014.ini Internet Gaming Bash of the Year 2 - 2015: IGBOTY2-2015.ini - Courtesy of Buzzin69 Enjoy! TIP: To get the rom name of the games you want to add to your list, i find using Romcenter the easiest method. It will create a database from your own MAME.exe from which you can just search the title of the game you want and it will tell you the associated rom name. It sure beats sifting through 28,000 roms in Windows! halloweenbash2015.txt
  4. Just a short notice if you have a pinDMD3 and a Teensy 3.2 with an octo28 adaptor. When installing both in your cab, the pinDMD3 didn't show anything in PBX All tables worked fine, but not in PBX. Both are Teensy boards, but my DMD was on com5 and the Teensy 3.2 on com3 the pinDMD_log.txt in the pinballX fodlers shows : dll version: REV-pinDMD3-01006 locating device: PASS (COM3) creating connection: FAIL (COM3) pinDMD3 enabled: FALSE This should be com5. Solution : Create a pinDMD.ini in the pinballX folder with the following : [communication] debug=1 comport=COM5 [pinmame] log_frames=0 This will force PBX to use your pinDMD3 on COM5 Copy this file also to your Visualpinball\XDMD path to have ultraDMD working
  5. Custom Menus: The Basics In light of this thread i decided to make a simple tutorial on using the custom menus in gameex. Once you have a grasp on it you will soon realize just how versatile (and simple) custom menus are. And you will be able organize gameex menus anyway you see fit! Sound good? Then read on... PLEASE NOTE: You must have your emulators and apps setup in GameEx before you attempt configuring custom menus - the reason being if you did this before hand you wouldn't have anything to customize! There are two things you need to know the difference between: "Menus" and "Items". It may help to think of a "Menu" as a folder, and "Items" as files. So, you can put a Menu in a Menu (folder inside a folder) you can put an Item inside a Menu (file into folder) but you can't put a Menu inside an Item (folder into a file!). It may seem confusing at first but essentially all you are doing is arranging files (Items) into folders (Menus) An example would be helpful right now i reckon so here we go! I've decided, for the sake of this guide to arrange my main GameEx menu into 4 categories: Arcade, Console, PC and Handheld - with the relevant emulators in each category. Let's see how we achieve this: Open the Custom Menu app (Start>Programs>GameEx>Configuration>Custom Menus). Check the box "Enable Custom Menus": NOTE: For this guide i deleted all existing entries but you may, and probably will have entries already here when you first launch the app. You may use the "Delete Item/Menu" button to remove all entries if you wish - and don't worry about messing up, just uncheck "Enable Custom Menus" to revert GameEx back to default Menus On to creating our first Menu (which is basically a folder, right? ) First highlight "Start" in the lefthand tree-list, this is our top-level or "Main" menu. Then click the "New Menu" button: Now we have a new basic Menu or folder which needs some editing. The "Item/Menu Name" entry, which is how your menu will appear in the list and "Item/Menu Properties> Title" which is what will be displayed as the Title text, the big text at the top of most themes. So we change these: And repeat for the other 3 categories: So now we have 4 empty Menus to organize our emulators (Items) into. The obvious one to put under the "ARCADE" Menu would be MAME! So we highlight the "ARCADE" Menu in the lefthand tree-list and this time click on "New Item". MAME has it's own entry in the "Item Type" dropdown list so that's what we select, also editing the Name and Title as we did with the menus, only now you may want to choose a logo from the dropdown list, in this case "mame": Now, for the rest of the items we do the same but instead of "MAME" we choose "Emulator" in the "Item Type" dropdown and then the desired emu from the Properties section, in this case Neo-Geo: Rinse and repeat, editing Menu Name's and selecting logo's as you go: That is essentially it! Just create Menus (folders) and put Items into them. You really can organize GameEx in any way you want using custom menus and i'll bet you'll get great satisfaction in using them! I hope that was easy enough to understand and will help some of you on the road to "pimpin yo GameEx". Have fun and here's a vid of the example Custom Menu in action: http://youtu.be/zfgMgMj7u7s
  6. Welcome to the PinballX forums! If you were sent to this page, you are probably fairly new to PinballX, and have asked for help. Please do not be insulted that we referred you to this page, we are happy to help in any way that we can, but we need you to know a few things first, to help us serve you better. We cannot stress this enough, the more information you give us the faster we can pinpoint the issue you are having. Starting a thread that says PinballX doesnt start? HELP!!!! really doesnt give us a whole lot to go on. If you take the time to write a clear and concise post on the problem, more people will take the time to read it and help. Searching the forums and viewing the PinballX documentation will usually solve 90% of the problems people experience with a new setup. Documentation: http://www.gameex.info/forums/topic/13736-pinballx-documentation/ PinballX Forums: http://www.gameex.info/forums/forum/30-pinballx/ A few guidelines that will make our job easier: 1. If you have an issue following an update, please start a new thread and do not respond in the NEWS thread announcing the update. If the issue you are experiencing appears that it may be a result of a recent update, indicate the PinballX version in the Topic Title along with the issue encountered. 2. If your issue has been resolved (with assistance of a mod or admin or you just figured it out for yourself), you can edit the topic title if you are the creator and note [RESOLVED] at the beginning of the title. If you are uncertain how to do this, we can do it for you. Also, if you figured it out for yourself a brief summary of how you did so is also appreciated. By doing so, you may be helping the next person that comes behind you, or maybe even identify a bug if the solution is something that can be fixed with a future update. 3. If you have a Feature Request, please post it in the appropriate thread under the Pinned and Hot Topics forum! 4. If the issue or information you are sharing is not directly related to PinballX functionality, please utilize the Social Club forum. Help us help you: The first thing we will need to know, is do you have your emulator (Visual Pinball, Future Pinball, Pinball FX2, Pinball Arcade, etc) working outside of PinballX. By this I mean that you can open the emulator in Windows, and you can select/run a game. If not, we will still try to help, but please take a few minutes to look around on the emulators homepage to see if they have a FAQ (Frequently Asked Question) section, or other information to help you. If you have your emulator working outside of PinballX, but don't know how to set it up in PinballX, you may want to take a look at the PinballX Documentation at: http://www.gameex.info/forums/topic/13736-pinballx-documentation/ 5. Attach Your PinballX.ini If you are having a problem with starting a emulator, image issues or some other "built-in" feature of PinballX, we may want to take a look at your PinballX.ini, which can be found in this folder: X:\PinballX\Config\ 6. Attach your Log.txt If PinballX "crashes" or other errors occur, there is an error log that may help you find out why. To view it, Go to: X:\PinballX\Log\ 7. If having an issue with a specific emulator\simulator, please note the system and version and attach a copy of the system's .xml file (i.e. Pinball FX3.xml for Pinball FX3 launch or other issues). Updated PinballX v1.06 documentation also attached. PinballX_S2F_Documentation rev 1.06.docx.zip PinballX_S2F_Documentation rev 1.06.pdf
×
×
  • Create New...